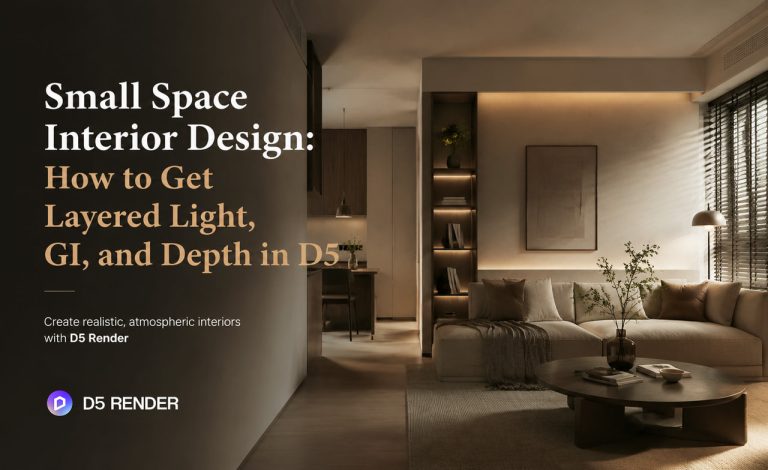
A small room demands careful lighting—every inch counts, and the way light bounces off walls, flows over furniture, and fills corners can turn a cramped space into something open and layered, making it feel bigger than it really is.
This open feeling, however, can disappear quickly. A small room might look great in early previews, then fall flat when the real lighting, fixtures, and materials settle in. With D5 workflow, you solve these issues live in the viewport. This guide covers seven tips for small space interiors—from early concept exploration and depth of field to a reusable workflow preset.
Key Takeaways on Small Space Interior Design
- Stay in the flow. D5’s seamless workflow takes you from sketch to final render without switching tools or waiting for exports.
- See adjustments live. Real-time viewport feedback and D5 GI show how each move affects the room as you work.
- Layer your lighting—don’t blast it. Balance ambient light and indirect bounce—one bright fixture flattens a small room quickly.
- Reuse a proven setup. Save your lighting and scene preset after completing your first interior project to avoid hours of repetitive configuration.

1. Start Before You Model—Test Ideas with D5 Lite
The tighter the room, the more each choice matters—color, material, fixture type. D5 Lite helps you generate a wide variety of interior concept images from a text prompt or a rough sketch, so you can see how different lighting moods and color palettes play out before you commit to anything.
- Text-to-image with presets—D5 Lite comes with built-in style presets for interiors—bedroom, dining room, bathroom, and more. Select a category, click “Generate”, and you’ll have a concept to work from.
- Image-to-image with a photo—upload a reference photo of a small room, then experiment with different materials and lighting looks.
- Custom prompts—describe the look you’re after, and D5 Lite generates images tailored to your specific needs.

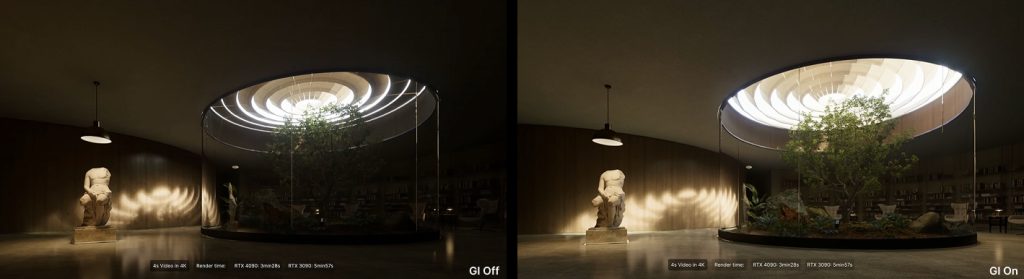
2. Why Small Interiors Feel Flat—and How Real‑Time D5 GI Helps
In a small space, shadows and uneven light make the room feel tighter. Dark corners in particular can visually shrink it even further. With an offline renderer, you might wait minutes or hours just to see how the indirect light bounces around. Real-time D5 GI, on the other hand, shows you the bounce live, which means you can:
- Spot unwanted shadows quickly. Move a bookshelf, adjust a curtain, or tilt a lamp, and watch how the indirect light bounces and shifts in real time.
- Balance direct and indirect light. In a small bathroom, check whether a recessed niche picks up enough bounce light from the ceiling without needing another fixture.
- Optimize furniture placement. Will a dark sofa against a bright wall absorb light or reflect it? D5 GI shows you the answer on the fly.
3. Materials in Small Spaces—AI Tools and Live Sliders
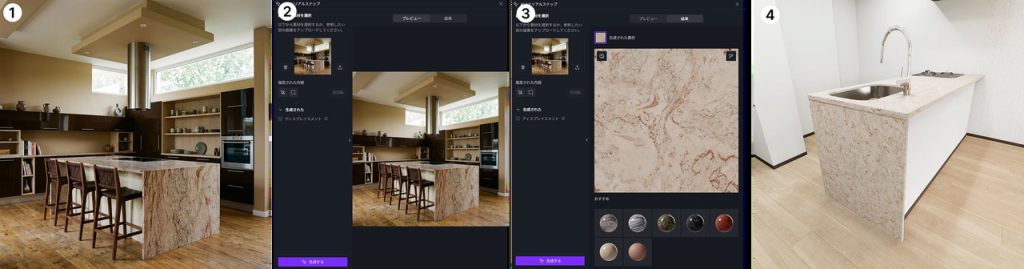
Surface textures have a stronger impact in tighter rooms—the way a wall reflects or absorbs light can change the whole feel. A matte plaster wall reflects light differently from glossy tile, and that contrast affects the perceived size of the room. With D5 Render’s AI material tools, you can refine those surfaces in real time without getting into complex node setups.
- AI PBR Material Snap—upload a reference image, select a specific region or use the entire image, and D5 generates a full set of material maps—color, normal, roughness, AO—on the fly.
- Texture cleanup—use the built-in Make Seamless and Ultra HD Texture tools to clean up base color maps and remove visible tiling before you start fine-tuning.
- Live sliders—adjust roughness, specular, and base color while watching the scene update in real time. In a narrow hallway, lowering floor roughness slightly changes how wall sconces are reflected in the floor—and you see the effect as you adjust.
Pro Tip: Roughness directly affects bounce light. A slightly rough plaster wall softens and diffuses the light, while a glossy surface throws sharp reflections. Always tune roughness and light together—they work as a pair.
Take Fuuko, a Japanese design expert, for example. She used to spend 30–60 minutes manually tweaking PBR materials every time a client wanted a specific marble counter look. With D5 AI Material Snap, one photo instantly generated accurate materials—cutting that down to seconds and freeing her up for actual design work.
4. Furnish Without Breaking Scale—Using D5’s Library and AI‑Generated Models
Putting the right furniture in a small interior makes a huge difference, while incorrect proportions or an empty layout can undermine the entire space.
D5 Render’s built-in library includes sofas, tables, chairs, bathroom fixtures, and more. D5 Works also offers curated scene kits with ready‑made furniture vignettes—you can drag them straight into the scene and reposition or resize them.
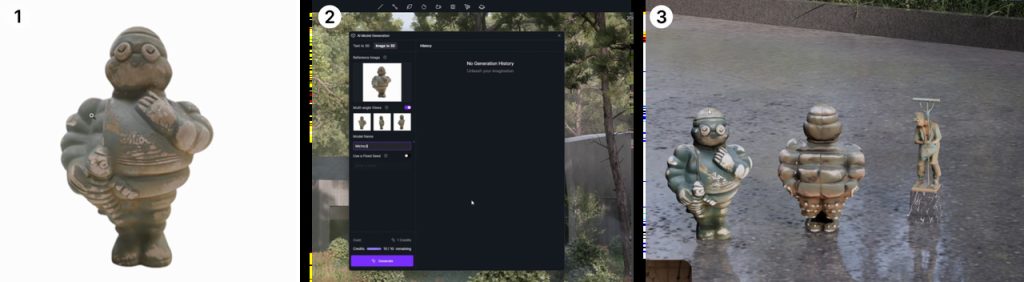
Beyond the built-in library, you can use Text to 3D or Image to 3D—upload a reference photo or describe what you want, and D5 Render generates a model you can place right away. For small spaces, that gives you the freedom to test custom pieces on the fly, instead of forcing generic models into a tight layout.
Digital artist and educator Gediminas Kirdeikis uses this approach. He takes a client’s reference photo of a sculpture, uses Image to 3D in D5 Render, scales it to the right dimensions, and places it directly into the scene—no manual modeling. The same approach works for a narrow side table or accent piece during layout exploration.
5. Environment Presets and HDRI Skies—Simulating Real Window Light
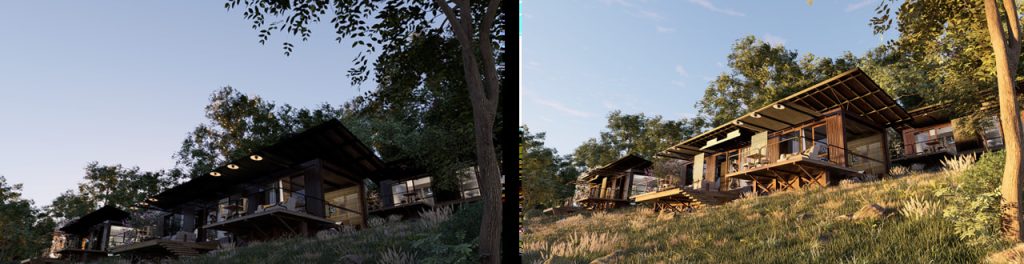
Natural light is the biggest source in any small space. A real window’s contribution, however, depends on time of day, weather, and sky conditions. With D5’s environment presets and HDRI support, you can simulate all of that quickly.
- Rotate the HDRI sky—line up the sun with your window. For a south-facing apartment, set the sun high for midday or low for late afternoon, and see how shadows from the window frame fall across the floor.
- Overcast vs. clear sky—switch HDRI presets or use Geo Sky with a softer atmospheric setting, so light wraps around corners—a soft look that works well for small interiors.
- Custom HDRIs from real sites—photograph the actual view outside your project’s window, generate an HDRI (requires external tools), and apply it to the scene. The lighting ends up much closer to the real thing.
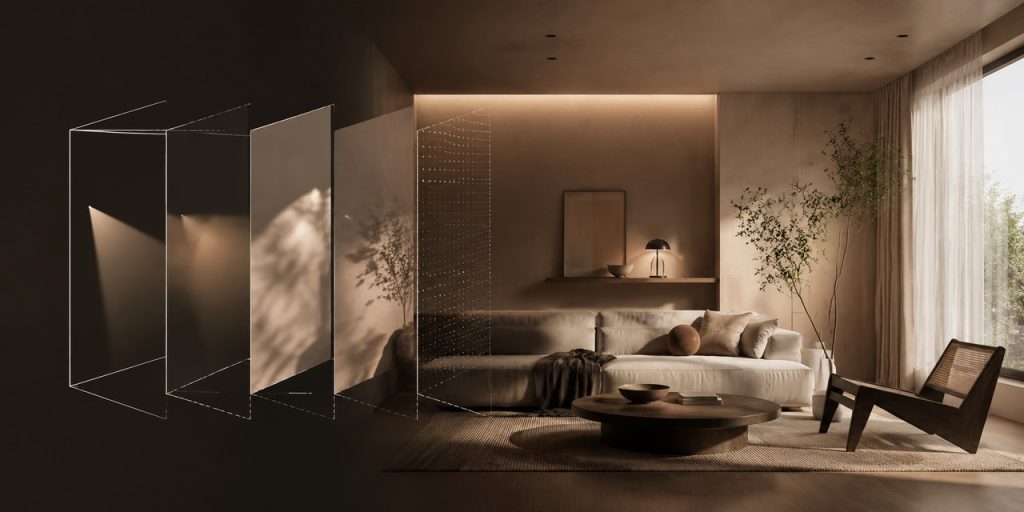
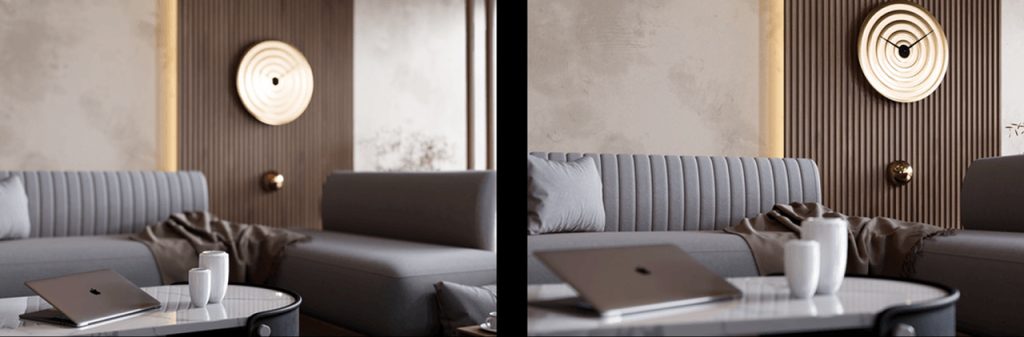
6. Layered Lighting in Small Spaces—D5’s Five Built‑In Light Types
Once the window light is set, the next step is to fill the room with artificial layers. One common mistake in small interiors: cranking up a single bright light. It flattens the room instead of adding depth. Layer a general wash, task lighting, and accents that draw the eye—then let indirect light unify the bounce layers.
D5 Render has five built-in light types in one menu, and IES profiles are applied to Spotlight, Point Light, Rect Light, and Disc Light when you want a realistic fixture beam—so recessed cans and pendants look like the real fixtures.
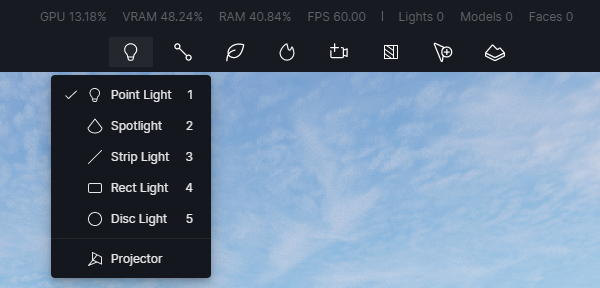
Before layering fixtures, consider the role each light type plays:
- Rect Light—Good for window spill, soft panels, or virtual daylight. Place it outside the glazing or behind the camera for base fill.
- Disc Light—Even, soft circular wash. Works well for low ceiling zones, round fixtures, or gentle light pools without hard edges.
- Strip Light—Linear accent for coves, under-cabinet lighting, mirror backlight, or perimeter accent lighting that draws the eye upward and lifts perceived ceiling height.
- Spotlight—Directional accent with realistic beam falloff. Use for cans, pendants, bedside lamps, or art. Swap IES profiles to compare beam widths.
- Point Light—Small local source for table lamps or localized accent glow. Pair with IES if you want to mimic a specific real-world fixture.
In practice, small interiors work best with one soft base (usually a Rect or Disc Light), one or two accents, and indirect bounce. You don’t need all five at once. Here are five common lighting combinations for small spaces:
| Space | Lighting Goal | Practical Lighting Setup in D5 Render | Tuning Guide |
|---|---|---|---|
| Studio/One-Room Apartment | Daylight + cozy zones | Rect Light at window (low) + Strip Light in cove + Spotlight on the dining table or desk | Use a Strip Light with a color temperature around 3000K–3500K |
| Small bedroom | Soft base + readable bedside lighting | Disc Light or Rect Light fill + Spotlight on nightstand + optional Strip Light in cove | Adjust the Light Source Radius of the Spotlight for soft wall gradients |
| Compact bathroom | Mirror lighting + even ceiling illumination | Strip Light behind mirror + Disc Light or Rect Light + small Point Light in niche if needed | Keep accent radii tight so tiles don’t blow out |
| Narrow hallway | Emphasize length and ceiling height | Strip Light along ceiling line + Point Light or Disc Light at far end | Avoid one overhead blast; use multiple low-intensity lights |
| Windowless room | Simulated daylight + depth | Large Rect Light behind camera (~5500K–6500K) + glow from a Strip Light on shelving + Spotlight task lights | Balance exposure before adding more Rect Lights |
Pro Tip: Start by configuring one fixture—set its IES, color temperature, Light Source Radius, and Attenuation Radius, then duplicate and adjust it. Consistency across fixtures gives a more natural, cohesive look.
7. Real‑Time Depth of Field—Set the Focus on the Fly
Depth is where many small room renders fall short. Everything in focus results in a flat image. In D5 Render, turn on Depth of Field in the camera panel, click Set Focus on your main subject—say a chair arm, a vase, or a faucet—then adjust Blur from 0 to 10 until the background softens. It works like adjusting lens blur on a real camera, but with a slider.
Enable Follow Focus to keep that object sharp while you orbit. Turn it off and set Focal Distance manually for consistent framing. In a small living room, a higher Blur value separates the sofa from the window, giving the room a real sense of depth. The viewport updates in real time, so you can orbit, adjust Blur, and find the framing that best reveals the room’s depth—no extra work in Photoshop afterward.
A Practical Workflow for Small-Space Interiors in D5
Here’s a four-step workflow for small spaces that keeps you from jumping between tools. Save it as a preset and reuse it on your next small-space project.
- Step 1: Concept—rough out your space with D5 Lite. Generate early inspiration with AI, then use live previews to fine-tune the layout before you start lighting.
- Step 2: Sync and set materials—sync your model, apply AI PBR Material Snap to key surfaces, then furnish the room using items from the built-in library, D5 Works, or custom AI-generated models.
- Step 3: Light and refine—set your HDRI or Geo Sky first, then layer Spotlights, Strip Lights, and Point Lights—add IES profiles where you need realistic beams. Use live indirect lighting to read the bounce in tight corners as you edit.
- Step 4: Output and save—dial in Depth of Field and exposure, render, and save your environment and lighting preset for the next small-space project.
Conclusion on Small Space Interior Design
What makes small spaces work isn’t more light—it’s smarter light. Real-time D5 GI, layered fixtures, and depth of field let you dial in that balance while you edit, not after a full render pass. Download D5 Render and try one of these combinations on your next small interior project—see how layered light and GI unify the composition.
Continue reading about interior design techniques:
Essential SketchUp Interior Rendering Tips You Need!
User Showcase: Archicad Interior Visualization with D5
Out-of-the-box Interior Parallax Assets Available in D5 Library, Saving You Time
How To Make an Interior Phasing Animation
Best practices of interior lighting for SketchUp
D5 Render Interior Design: Accelerate Workflow Efficiency
FAQ on Small Space Interior Design
Small rooms quickly reveal flat lighting and harsh shadows. A single bright source washes out the walls, and dark corners become visually dominant, making the room feel even more cramped. You need layered light—ambient, accent, task lighting—and accurate indirect bounce so surfaces appear visually cohesive. With D5 Render’s real-time GI, you can read that bounce while you edit instead of waiting for previews.
Use linear lights or cove lighting along the top edges of the walls. Combine with a soft Rect Light near the ceiling. Set the HDRI sky to slightly overcast, which diffuses light downward. In D5 Render, you can set this up quickly: place a Strip Light in the cove, adjust its intensity and color temperature, and see the ceiling glow as indirect light bounces down the walls.
Layer a combination: a Rect Light behind the camera to act as a virtual window, a Spotlight with an IES profile for task zones, and a Strip Light behind furniture to add glow. Adjust color temperature to match daylight—around 5500K–6500K—for a natural feel. D5 Render has all five light types with real-time preview and full control. Tweak the balance until the room feels open.
Yes. D5 Render’s denoising keeps the viewport readable while you move a lamp or swap a sofa. Turn on Accumulate briefly when you need a clearer preview of how light bounces, then turn it off to navigate smoothly again.
Start with a soft Rect Light near the window for base daylight. Add Strip Lights for coves and counters. Use Spotlights or Point Lights with IES for cans, pendants, and table lamps. The table in Section 6 has setups for studio, bedroom, bathroom, hallway, and windowless rooms. Layer warm accents around 3000K–3500K over neutral ambient light at 4000K or higher. This adds depth without making the room feel smaller.
AI tools in D5 speed up your work at every stage. In the concept phase, D5 Lite generates images from text or sketches, so you can test lighting and color before modeling. When it’s time for materials, the AI PBR Material Snap creates full maps from a single photo. And for furniture, Text to 3D and Image to 3D let you generate custom pieces on the spot instead of hunting for the right model. For small spaces, that means less time searching and more time designing.
Not exactly. You’ll need a DXR-capable discrete GPU. A GTX 1060 with 6GB VRAM is the minimum spec, but an RTX 2060 or higher is better. Most small to medium-sized interiors run fine on a mid-range RTX card like an RTX 3060, even with indirect light and depth of field on. D5 Render’s denoising keeps the viewport readable while you work.