Key Takeaways:
- AI-assisted workflow: Cinematic lighting isn’t about perfect settings—it’s about strategic AI delegation
- Efficiency multiplier: Treat AI as your starting point, not your finish line
- Quality control: Clean renders come from nailing the small checks most people skip

Step 1: Lock the Lens and Ground the Materials
Before the AI can do its job, your scene needs a solid base. Start with the basics. Lock in your composition first. Drop in your camera, turn on that Rule of Thirds grid, and frame your shot. AI is smart, but it needs a clear focal point to read your geometry correctly.
Then, make your materials readable. Don’t chase perfection here—just aim for “recognizable.”
- Glass: Ensure it has reflection and refraction set.
- Concrete & wood: Assign basic roughness values.
- Emissive materials: Set a reasonable intensity.
Why it matters: D5 Render‘s built-in AI tools can analyze your materials to modulate light behavior. If your materials are flat—no roughness, no reflection—the AI has nothing to bounce light off.
Pro tip: Dial your exposure to a neutral 0.0–0.3 before proceeding. This prevents the AI from overcompensating and washing out your highlights.
Step 2: Let AI Handle the Heavy Work in D5 Render
This is where D5 Render‘s AI pipeline stands out. You have two distinct tools for two distinct situations. The choice depends entirely on what you have in your hands.
Path A: “I have a reference image.”
You have a specific visual target—a golden hour photo, a moody film still, a foggy morning landscape. Use AI Atmosphere Match.
- How it works: Upload your reference. D5’s AI analyzes light position, shadow softness, color temperature, and volumetric density. It then maps those parameters directly onto your scene.
- Best for: Photorealistic consistency. When you need your render to visually match a real-world reference or film frame, this tool handles the heavy lifting of light direction and tonality in seconds.
For example, a user on the YouTube channel “Surviving Architecture“ was working on a desert architectural scene. She had spent hours manually adjusting the lighting—trying different skies, tweaking shadow softness, even swapping HDRI after HDRI. But the result always fell short: flat sand, harsh or washed-out shadows, an atmosphere that didn’t read as desert. So she turned to D5’s AI Atmosphere Match.
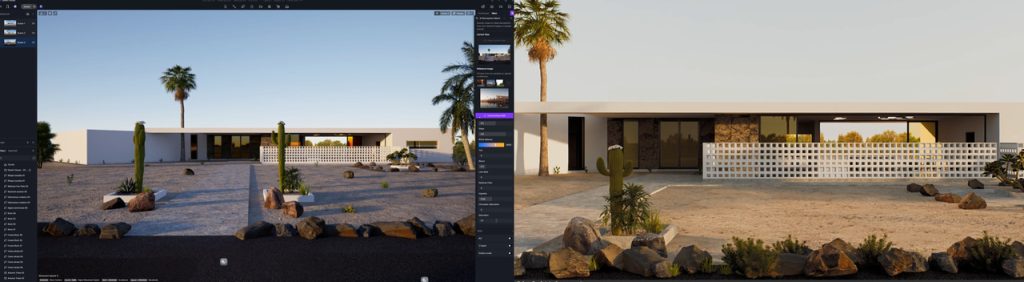
She uploaded a real desert golden-hour photo—within seconds, D5’s AI nailed it: warm directional light, soft shadows, that dry hazy horizon. “Now it feels like a desert!” A few tweaks to intensity and shadow depth, and the scene looked shot on location in minutes.
Path B: “I only have the concept.”
There are times when you don’t have a reference image. Maybe you only have the concept— “I want this interior to feel cold, alienating, with sharp blue shadows.”
D5 Render’s AI Scene Match is designed for this exact scenario. You can describe your vision. The AI takes your current scene and camera parameters, then generates a reference image that matches both your description and your existing geometry. That generated image is then used to configure the scene’s lighting and atmosphere—ensuring the result is grounded in your actual scene. It can also recommend matching materials from the library, speeding up scene building.
Best for:Ideation and exploration. If you’re stuck in the “gray box” phase and want to test a dramatic mood shift, Scene Match is ideal for quickly prototyping different moods.
On Japanese social media, architect Fuko (ふーこ) shared her design experience: she used to spend over 30 minutes iterating on lighting, but with D5 Render’s AI Scene Match, she can now describe her vision in a meeting and get a matched atmosphere in seconds. As she put it, “I tried using AI Scene Match in a meeting”—and it resolved her workflow bottleneck. Now, she can quickly explore different moods and find the perfect look for her projects.
The key distinction: Need a specific look—use Atmosphere Match. Need to find a look—use Scene Match.
Step 3: Applying the Free LUT in D5 Render
Once the AI establishes your light and atmosphere, it’s time for color grading. This is where the LUT (Look-Up Table) comes in.
D5 Render supports custom LUTs natively. Here’s how to apply them for a cinematic tonal curve without clashing with your AI lighting:
- Start neutral. Apply a neutral LUT like “Desert3” first to create a “color-safe” base for your lighting.
- Then add a LUT like Vibrance C (also included in free D5 LUT packs). This LUT compresses highlights and lifts shadows—the classic S-curve response you see in cinema.
Why apply a LUT after AI lighting? AI tools like Atmosphere Match handle the physical behavior of light. LUTs manage color perception. If you apply a heavy teal/orange LUT before finalizing your AI lighting, the light intensity might clash with the color tint.
How to Apply a Free LUT in D5 Render
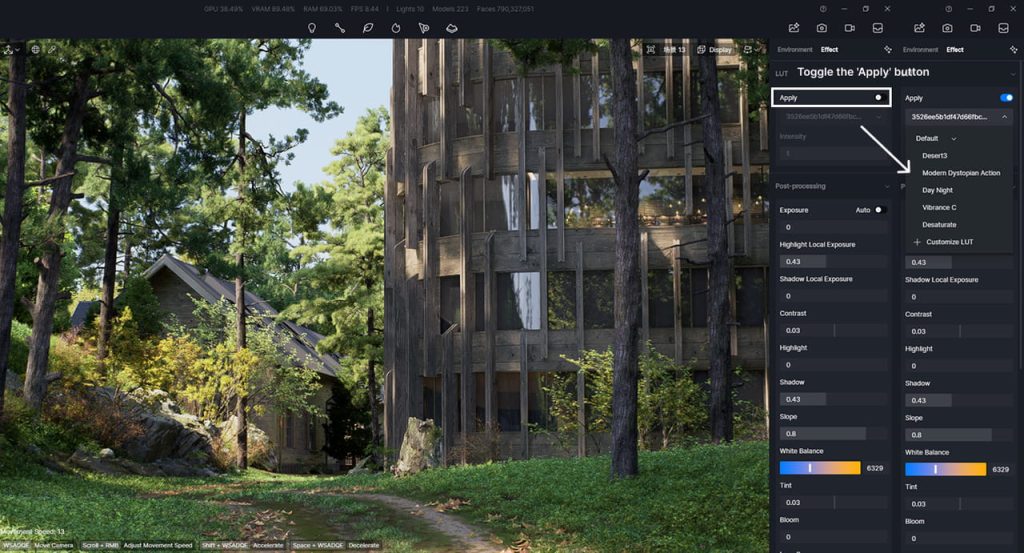
- Enable the LUT switch. It’s off by default—turn it on to activate the feature and access the LUT options.
- Pick your LUT in the drop-down menu. Switch between the five default ones for different color looks.
- Import a custom LUT if needed. Click “+Custom LUT” and select a .cube file.
- Adjust intensity. Pull the control left to reduce the effect (default 1 = strongest; 0 shows the original).
- Switch categories in the menu if you want Default vs Custom.
Continue Reading: Add Your Artistic Taste to Rendering with LUT >>
Step 4: Final Polish – Output Adjustments & Quality Check
AI handles the heavy math. The LUT sets the mood. Now you just need to perform a final check and fine-tune.
Before you hit render, do a quick three-point check:
- Shadow detail: Are your shadows completely crushed (pure black)? If so, slightly raise the Shadow slider in post-processing.
- Bloom control: AI lighting often adds strong specular highlights. Dial Bloom down if windows look unnaturally glowing.
- Noise & Sampling: For a clean cinematic render, make sure your Realtime Quality is set to Precise (not Smooth) in the top menu before rendering. Then, inside the Display > Precise Realtime Quality panel, open Custom Settings and adjust Noise Reduction. Increase Samples Per Pixel (SPP) until the noise clears up.
Now Go Create: You’ve Mastered AI Lighting
You’ve seen how AI can handle the heavy lifting while you focus on the creative decisions that actually matter. The best part? You can test this entire workflow—AI Lighting, LUTs, and all—inside D5 Render right now, completely free. No trial limits. No credit card required. Just download and start creating.
Continue Reading: More AI Features in D5 Render
How to Use AI within 3D Rendering Software
How AI Inpainting Supercharges 3D Visualization Workflows
AI Rendering Revolution: D5 2.11’s Smart Tools for Designers
What Is an AI Agent? How D5 Render Automates Landscape Design
D5 Render’s AI Texture Generator: Speed + Realism Boost
AI Image to Image: D5 Render’s AI Transforms Design Workflow
FAQ About AI Lighting in Architectural Visualization
It basically acts as your personal lighting and atmosphere assistant. You upload a reference photo (like a moody overcast day), and the AI analyzes the light, shadows, and sky, then applies that exact vibe to your scene in seconds. It saves you hours of manual slider-tweaking.
When you only have a concept, D5’s AI Scene Match is the ideal tool. Just type your mood—like “cold, alienating interior with sharp blue shadows”—and the AI generates a lighting reference, then applies it to your scene. This is ideal for early ideation stages in architectural design, letting you quickly explore dramatic changes without waiting for full renders.
Use AI Atmosphere Match when you have a real reference photo (golden hour, film still, etc.)—it maps light direction and tonality directly. Choose AI Scene Match when you only have a text description or sketch; it creates the reference image from your words first. Architects decide based on the situation: reference for accuracy, prompt for exploration. Both tools are part of the same D5 AI lighting collection and work seamlessly with your materials.
Yes, the D5 Render Community Edition includes AI Atmosphere Match, so you don’t need to upgrade just to try it. The process is simple: load your scene, open the AI tool, upload your reference image, and generate. Many users on Reddit report that it instantly improves exteriors and interiors alike. It’s especially helpful when you’re chasing that realistic architectural visualization look without constant trial and error.
AI Atmosphere Match focuses on replicating the lighting, sky, and environmental mood from a photo, while D5 Render’s AI Scene Match goes further by generating a reference image based on your current scene and camera, then applying the matched atmosphere and enabling one-click matching of similar materials from the library—making it ideal for quickly iterating on mood while keeping your composition intact.
For many, yes—especially under tight deadlines. D5 Render‘s AI Atmosphere Match can analyze your entire scene and recreate a client’s reference image in one click, giving consistent, story-driven lighting. Manual methods take longer but offer more control. In practice, many architects use AI Atmosphere Match as the foundation and tweak manually only where needed, saving massive time while still delivering client-ready cinematic results.
D5’s built-in LUTs like “Modern Dystopian Action” or “Vibrance C” pair perfectly with AI-generated atmospheres. They add that filmic color pop and depth without extra software. Import custom free LUT packs from communities if you want something specific. The beauty is you can test multiple combinations in minutes inside D5—no need to hunt for paid tools.