Tired of complicated workflows for adding real-world locations to your 3D projects? The latest D5 Render for Teams introduces seamless Cesium integration. revolutionizing how teams work with 3D mapping data.
Explore D5 Render 2.11 Teams: What's New
5 Must-Know GIS Tools for 3D Designers
This game-changing update lets you:
- Enable Cesium with just a few clicks.
- Access accurate global 3D terrain and 3D mapping data instantly.
- Collaborate on geospatial projects in real-time.
In this guide, we'll walk you through the simple 3-step process to:
- Prepare your team workspace
- Configure Cesium access
- Start using live 3D mapping data in D5 Render
Whether you're working on architectural visualization, urban planning, or any project requiring real-world context, D5 Render 2.11 for Team's Cesium integration eliminates tedious data preparation while ensuring team-wide consistency.
Stay tuned—Cesium integration will soon be available for Pro users too! Get familiar with the feature now to hit the ground running.

1. Step 1: Check Prerequisites Before Using Cesium in D5 Teams
Before diving into geospatial design with Cesium integration in D5 Render for Teams, let's nail down the essentials. First things first – grab the latestD5 Render 2.11update via D5 Launcher.
Next step, A Cesium ion account (sign up here)—your gateway to stunning 3D terrain data! Cesium’s free tier offers powerful tools to explore and visualize global landscapes. And if you later scale up to commercial use, their pro plans provide even more flexibility and support.
One quick tip: Since Cesium streams high-detail 3D maps in real time, a stable internet connection ensures smooth loading. If your Wi-Fi is spotty, you can still prep datasets ahead of time for uninterrupted creativity.
2. Step 2: Configure Cesium Token in D5 Teams Admin Panel
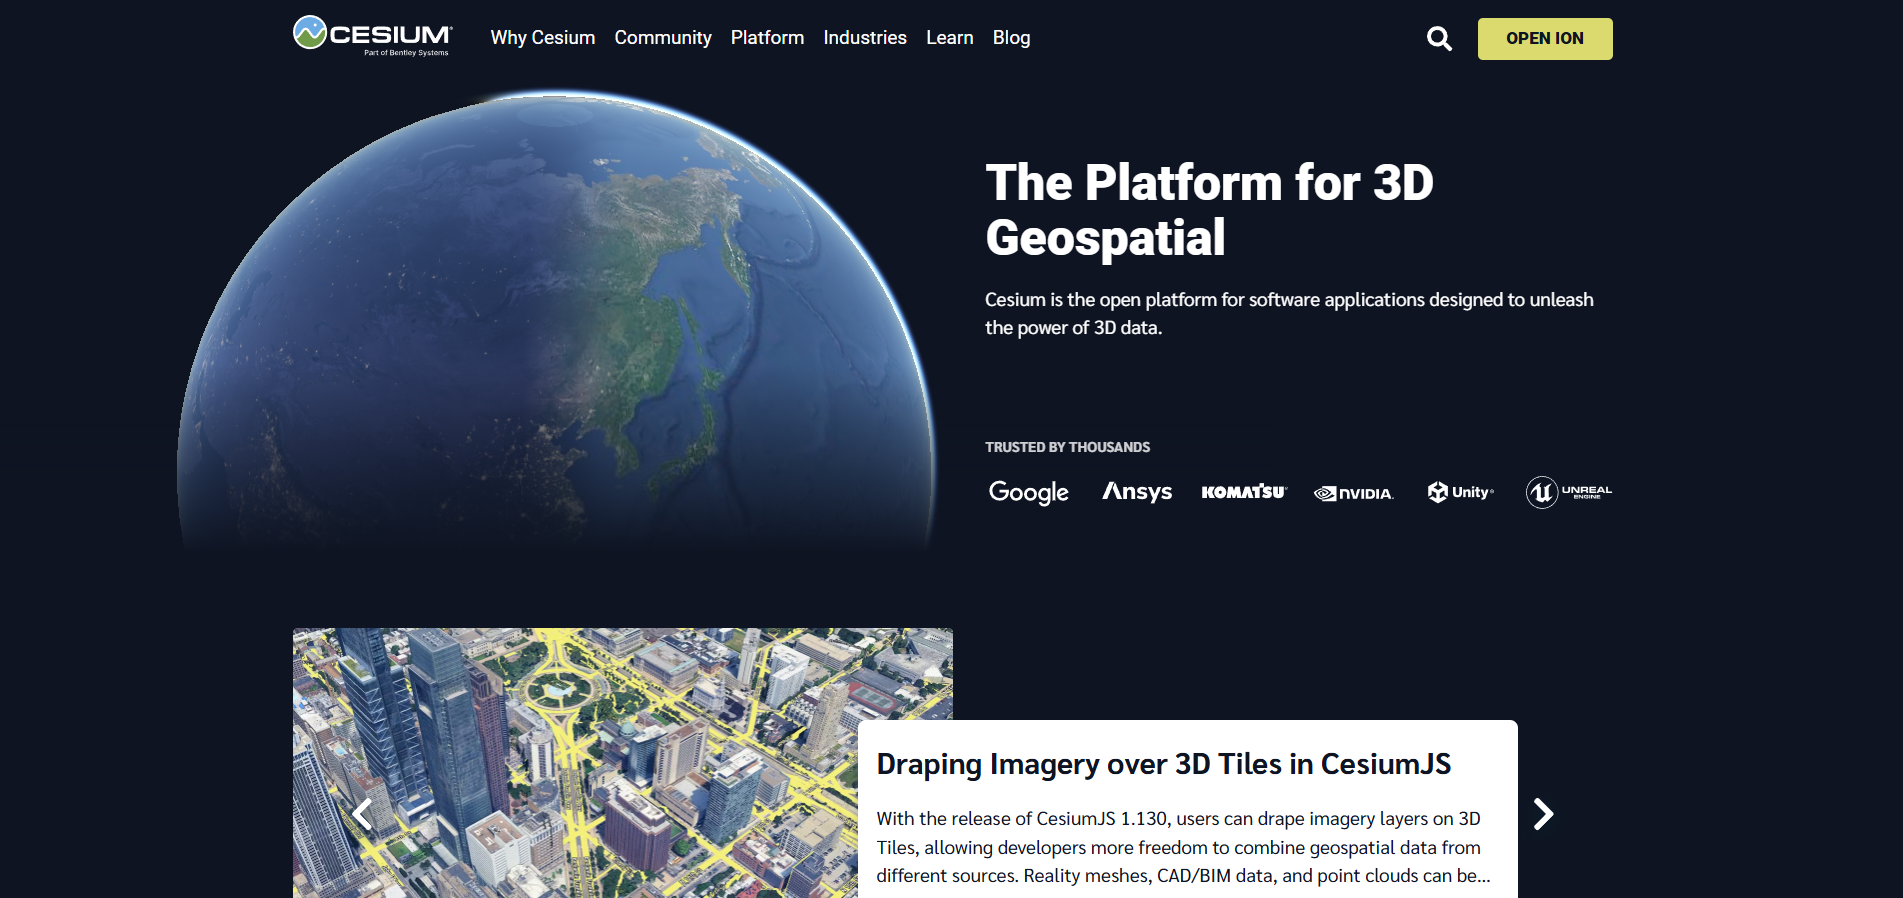
1️⃣ After logging in to Cesium, go to "My Assets" in the dashboard (as shown in the image below)—where you'll see all available [GIS data sources]. Along with default datasets, you can also upload custom models or survey data. A flexible platform for all your 3D mapping needs!
![available [GIS data sources] on Cesium](https://usa-official.d5cdn.com/wp-content/usa-website-assets/daaf2eafbbb0ef5794354b09/68820b5c1e9f9522467fe593_5eecdaf48460cde58d0f774c4af2644ce8364132d83edf5f75b8339e1c4c2483f728f271dbcdaa6639e8703ac5556d0ddf368fbc39e9272c1578d4fa6401777084c51bf7ff9bff5f47977ced22d09e700b76fcbfdb08014c0d2cb84bbf51847a.png)
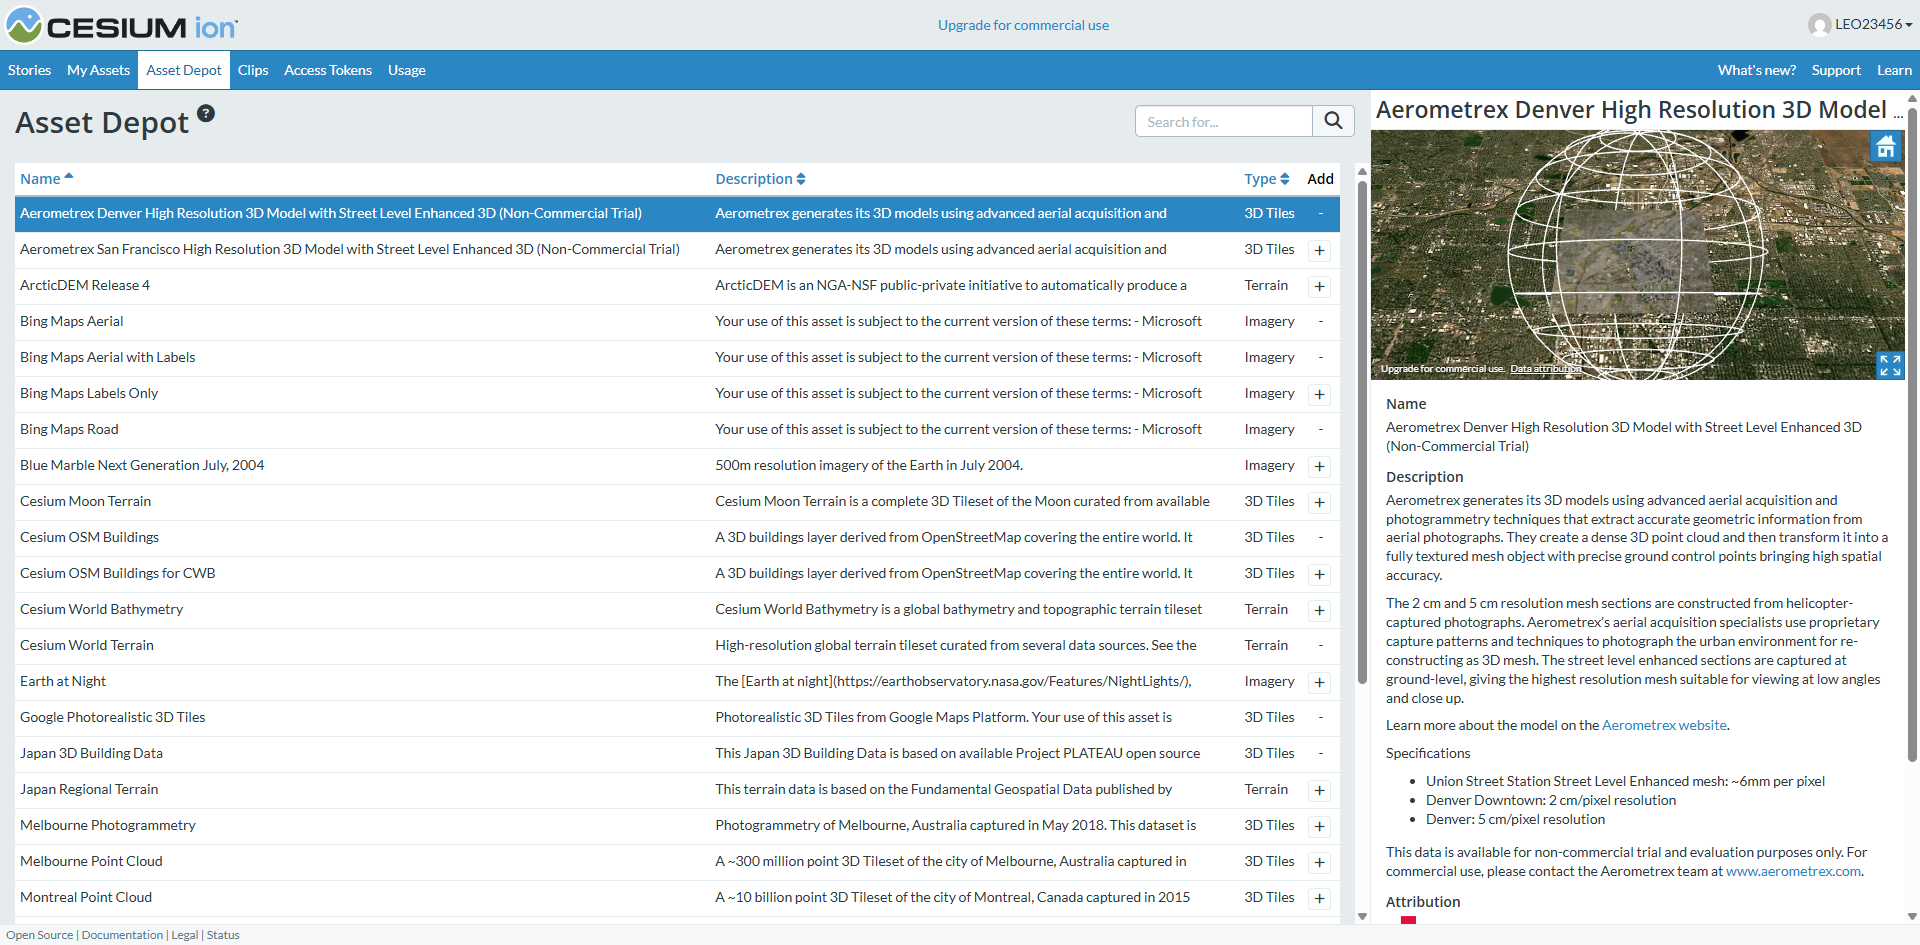
Want more data? Check out the Asset Depot to access additional official GIS resources (as shown in the image below), including 3D Tiles, terrain, imagery, and more—all ready to use in your Cesium 3D projects! Build richer maps with just a few clicks.
Important reminder: Commercial use of Cesium 3D mapping requires a paid subscription.
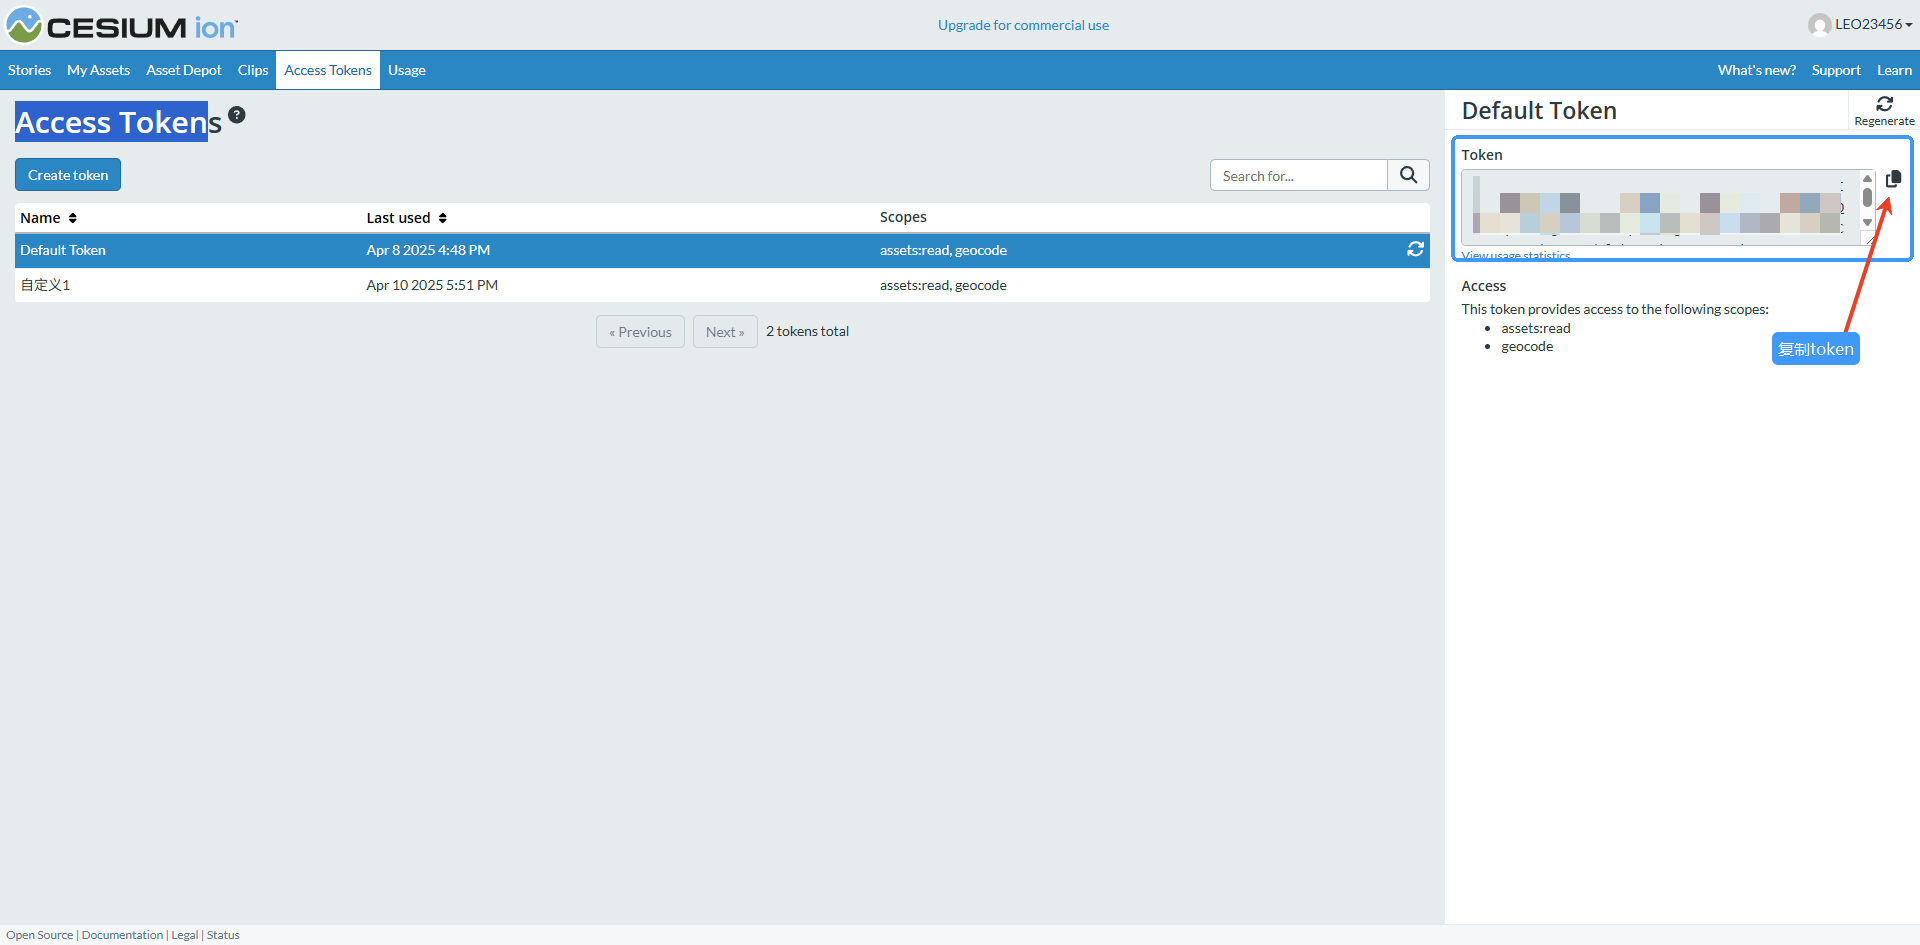
2️⃣ Then navigate to Access Tokens in your backend to create your API key. Note:
- Default Token: Automatically generated with full access to all your account data.
- Custom Tokens: Create restricted tokens that only access specific datasets - perfect for team members who don't need complete Cesium 3D access.
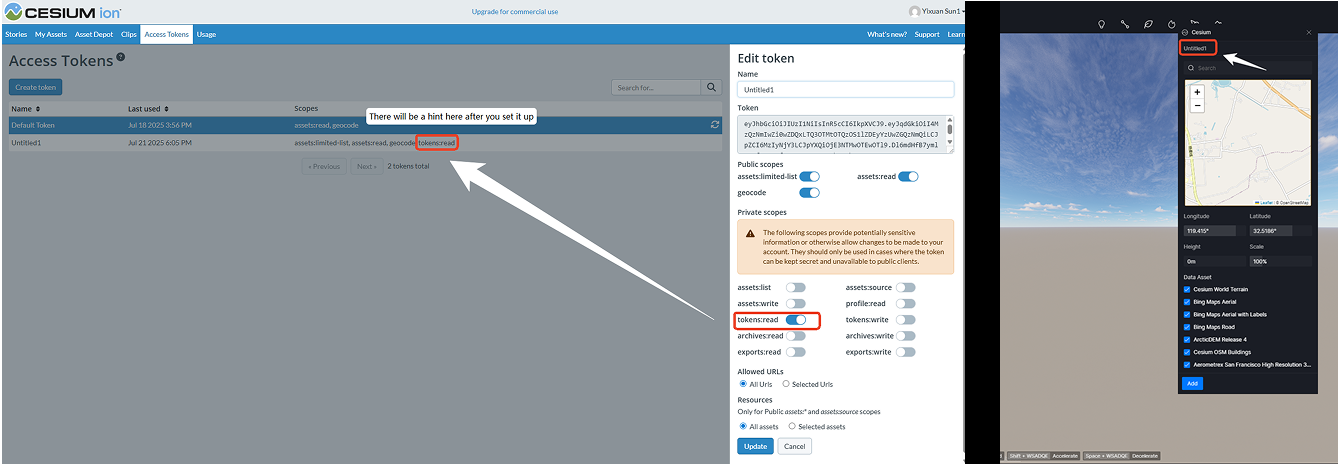
Cesium Token Setup Tip: When configuring tokens in Cesium as an admin, don't forget to enable the "tokens: read" permission (shown in the left panel below). This crucial step grants your team members' clients proper access rights. Otherwise, you'll find the token name field appearing blank in the Cesium interface (like in the right panel example)
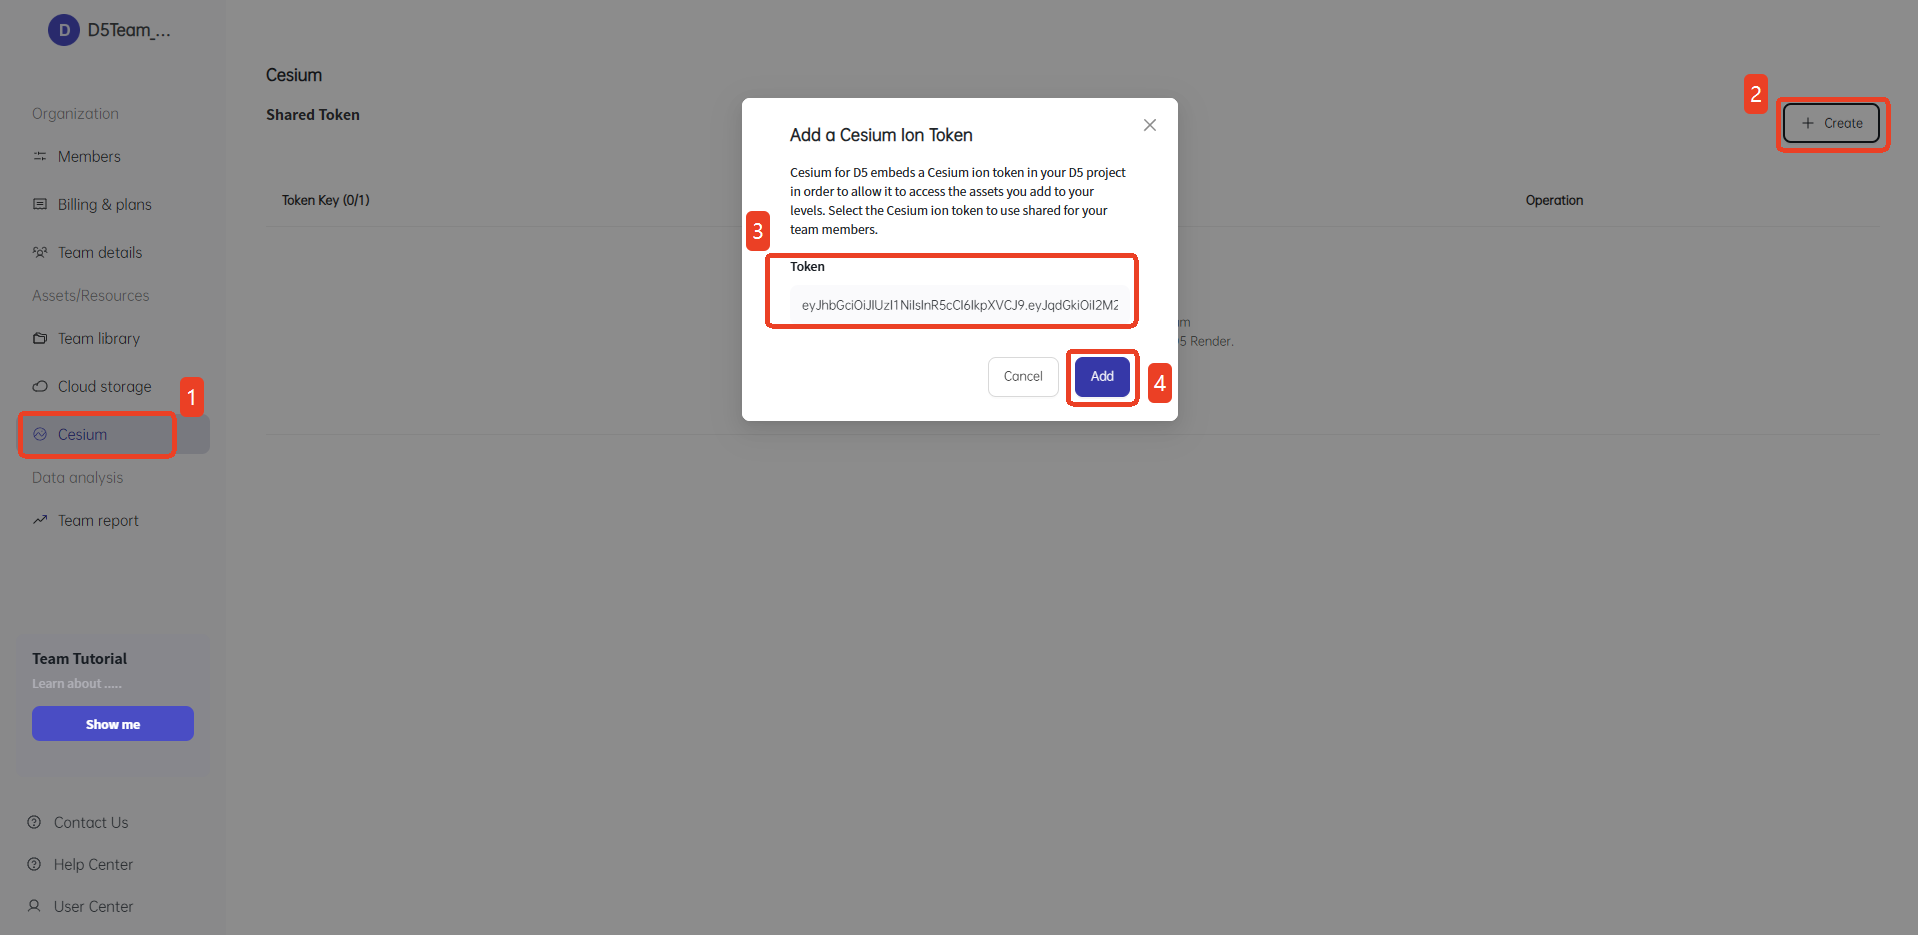
3️⃣ To share a Cesium Access Token, log into the D5 Team Admin Panel and navigate to Assets/Resources → Cesium. Copy an existing Cesium token, then go to the top-right corner of the D5 Render Team Management panel and click 'Create' to paste it (as shown in the image below).
Once created, any team member can use this token in their local D5 project via the Cesium plugin to access authorized 3D mapping data sources. Streamlined collaboration made easy!
Security Tip: D5 doesn't store Cesium 3D data locally—it's only temporarily referenced. Even client users can only view and render the data, never extract raw files. True peace of mind for sensitive projects.
Key Highlights of D5: Secure, Local, and Efficient
What sets D5 apart? Its local-first workflow revolutionizes how designers integrate 3D mapping data. Unlike traditional pipelines—where you export models to Cesium (exposing proprietary files and requiring re-uploads when edits are needed)—D5 keeps your data private.
We simply leverage Cesium's real-world terrain and imagery as dynamic references—while letting you freely layer, tweak, and perfect your models directly in D5 Render's workspace. No cloud dependence. No repetitive upload cycles. Just seamless creativity with complete control over your data.
Explore our detailed feature comparison in the table below to see the key differences:
| Feature | Traditional Workflow (3ds Max, etc.) | D5 Render Workflow |
|---|---|---|
| Data Flow | Local → Cesium Cloud | Cesium Cloud → Local |
| File Storage Location | Exposed on 3rd-party platforms | Stored securely on your PC |
| Best For | Public showcase projects | Confidential projects (commercial/government) |
| Edit Flexibility | Requires re-uploading | Real-time adjustments in D5 Render |
3. Step 3: Load Cesium Scenes in D5 Render
1️⃣ Once your team admin sets up the shared Cesium plugin, members can access it instantly in D5 Render - just click the Cesium option in the top menu. No extra logins or setups needed, letting your team focus on creating, not configuring.
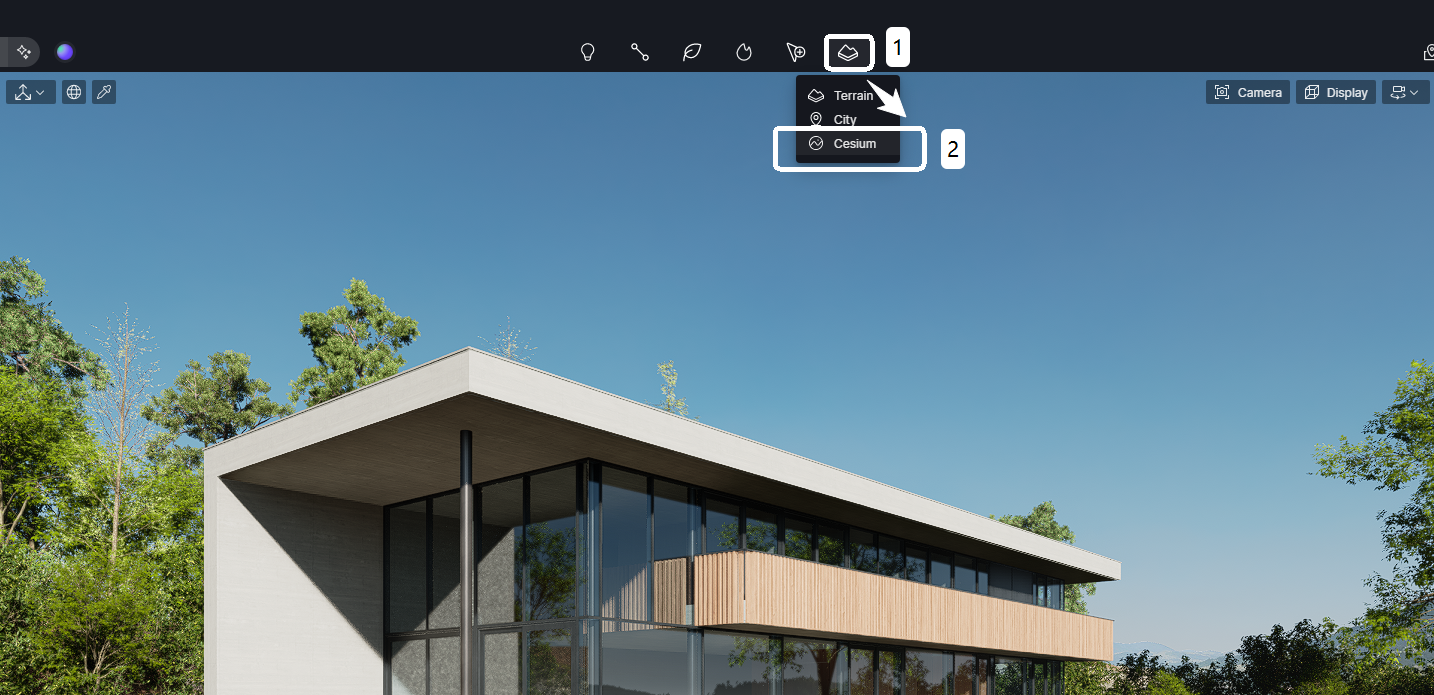
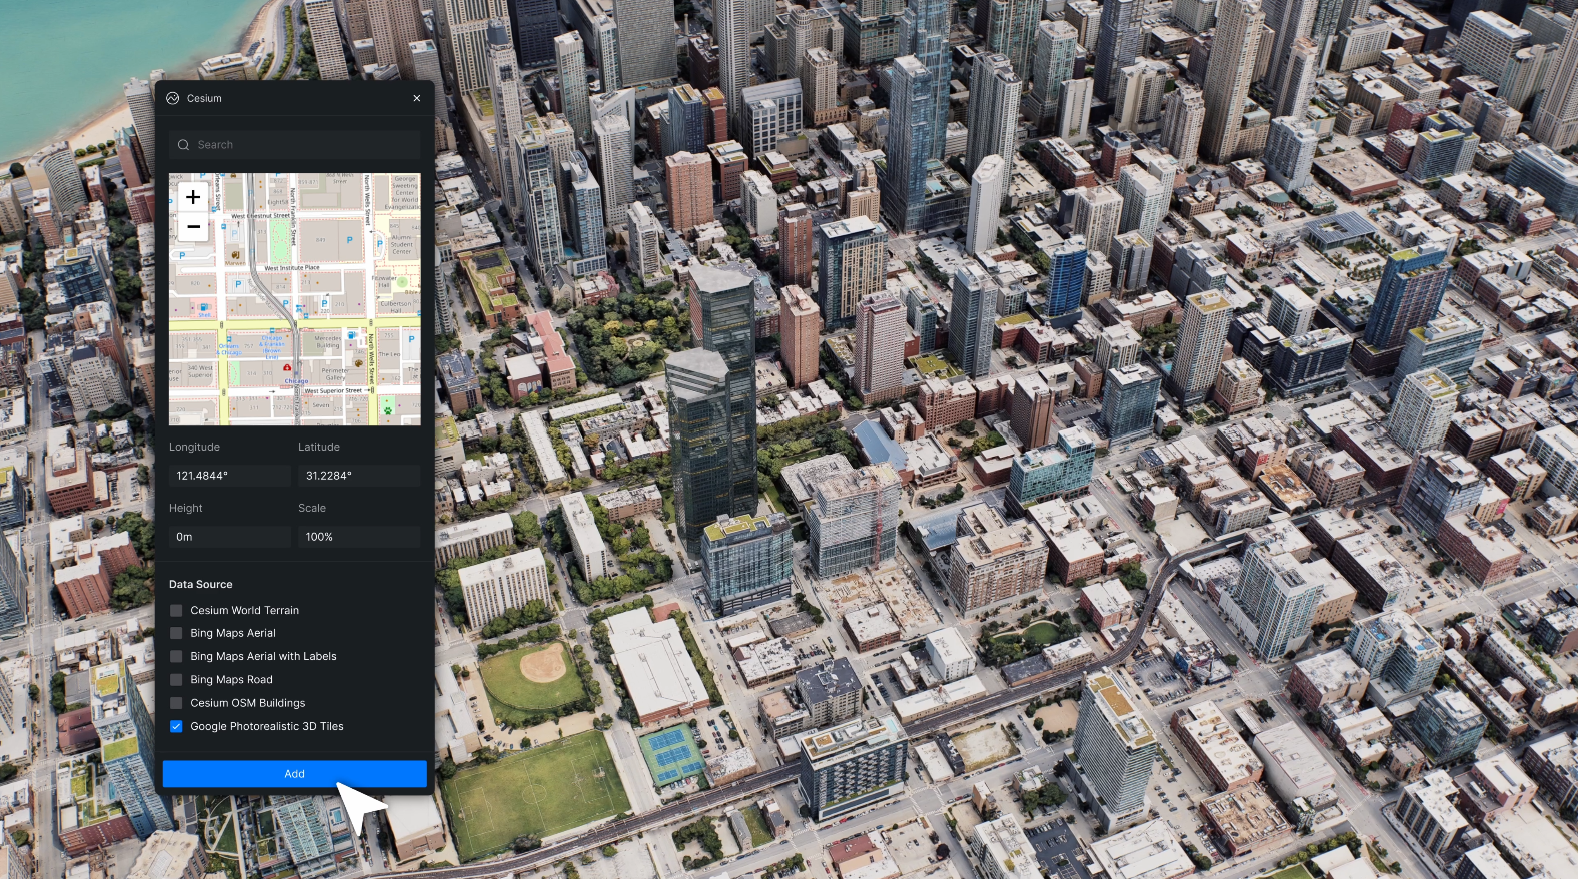
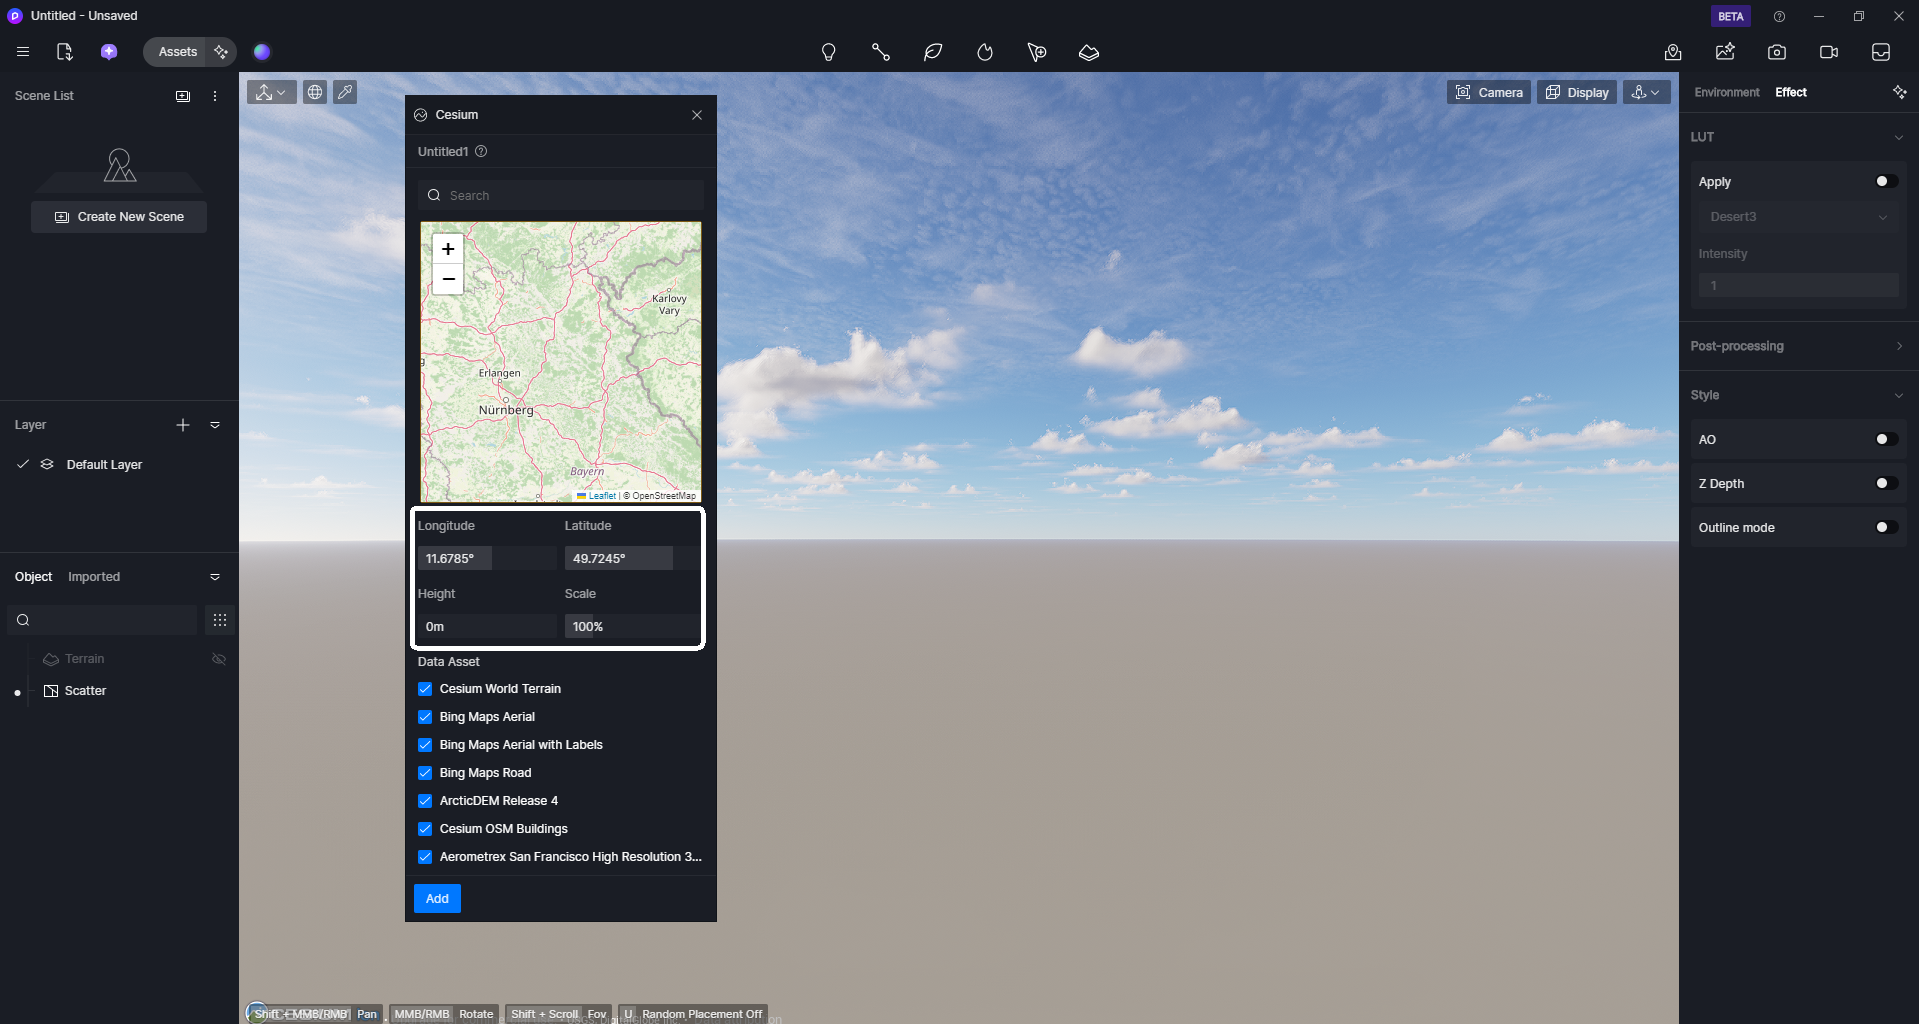
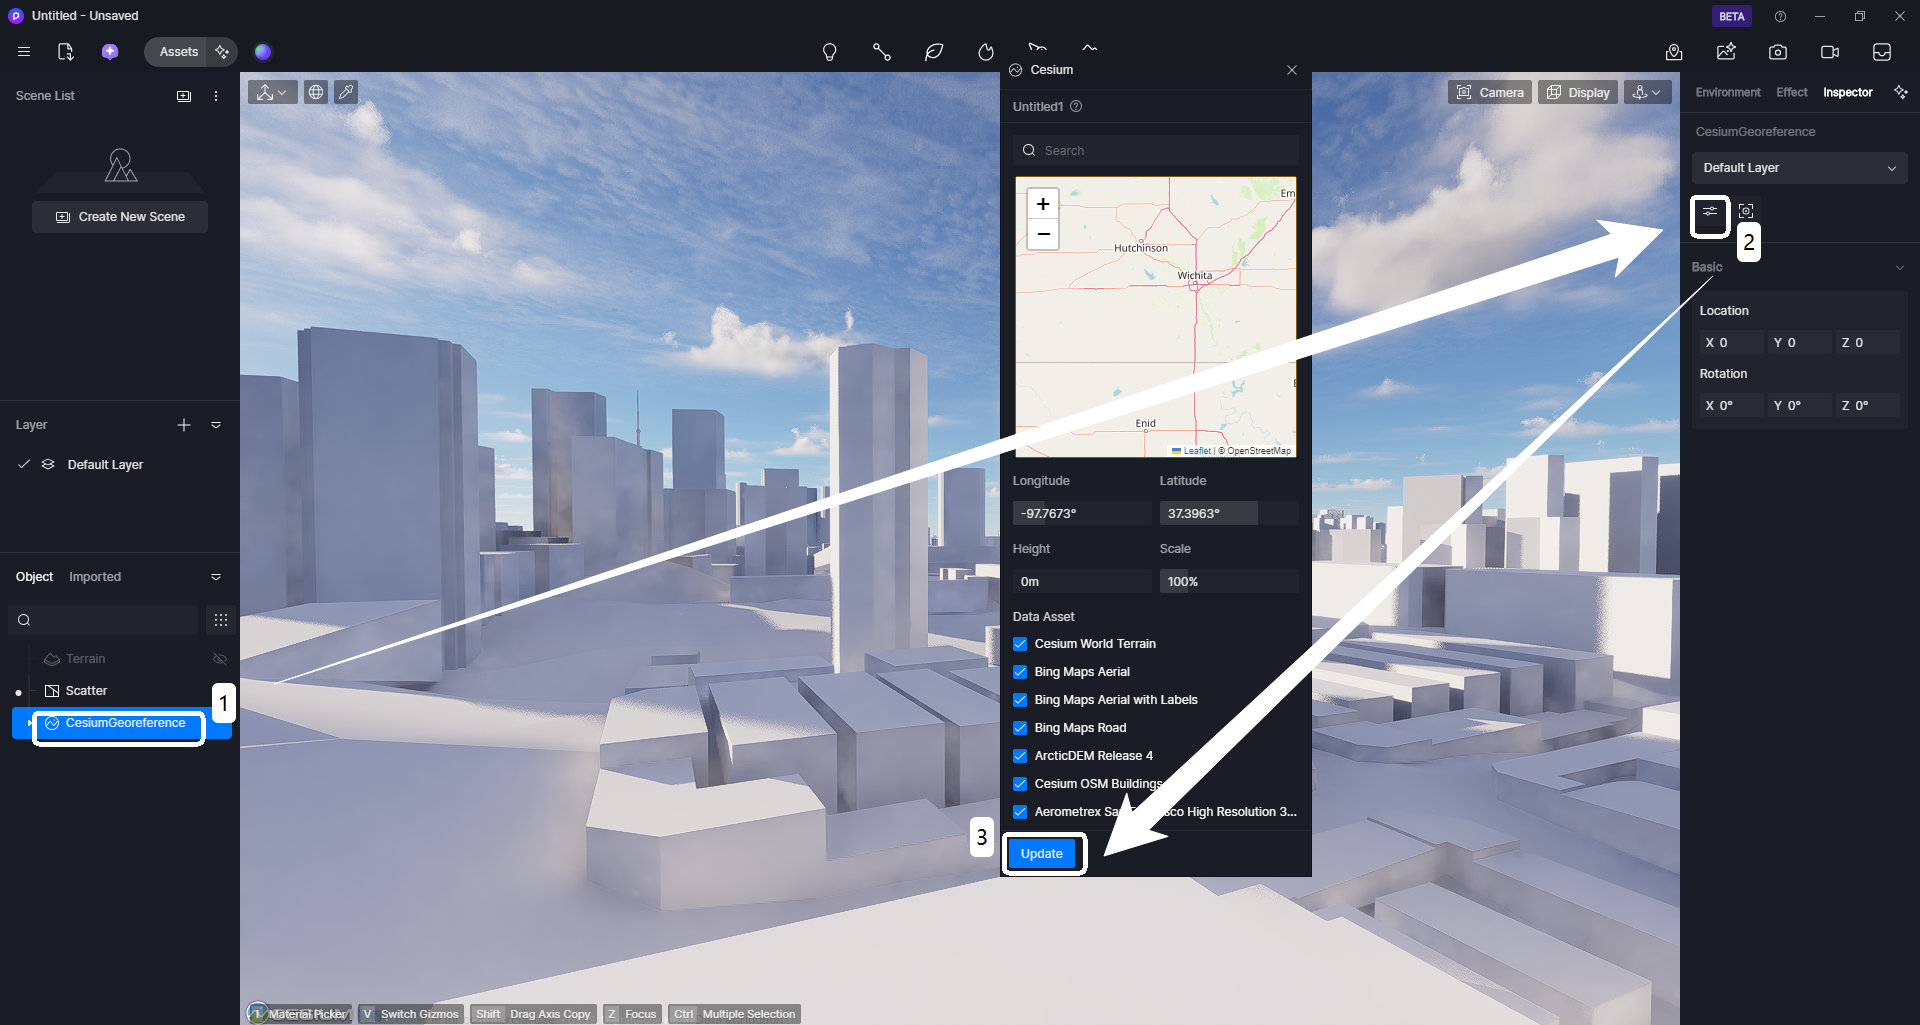
2️⃣ Getting started is easy: Enable Cesium, then either use the map widget or manually enter your project's latitude/longitude (as shown in the image below). The plugin will automatically create a geo-anchor at these coordinates (available data sources depend on what your admin enabled in Cesium's backend).
Now simply check which data layers you want to load - 3D terrain, satellite imagery, or 3D tiles - and they'll appear perfectly aligned in your D5 scene.
Quick Tip: Think of a Geo-Anchor as your project's GPS pin—it locks a specific latitude/longitude as the center point, with surroundings rendered only within a set radius. Once the 3D terrain, roads, or context loads correctly around your building, you're all set to focus on design!
3️⃣ Click "Add"—a tree-structured geo-anchor will instantly appear in your scene's resource list (visual example below)
Pro Tip: Since 3D mapping resources load progressively from the network, we recommend first hiding or removing D5's default terrain, then temporarily raising the camera height while the data streams in for a smoother workflow.
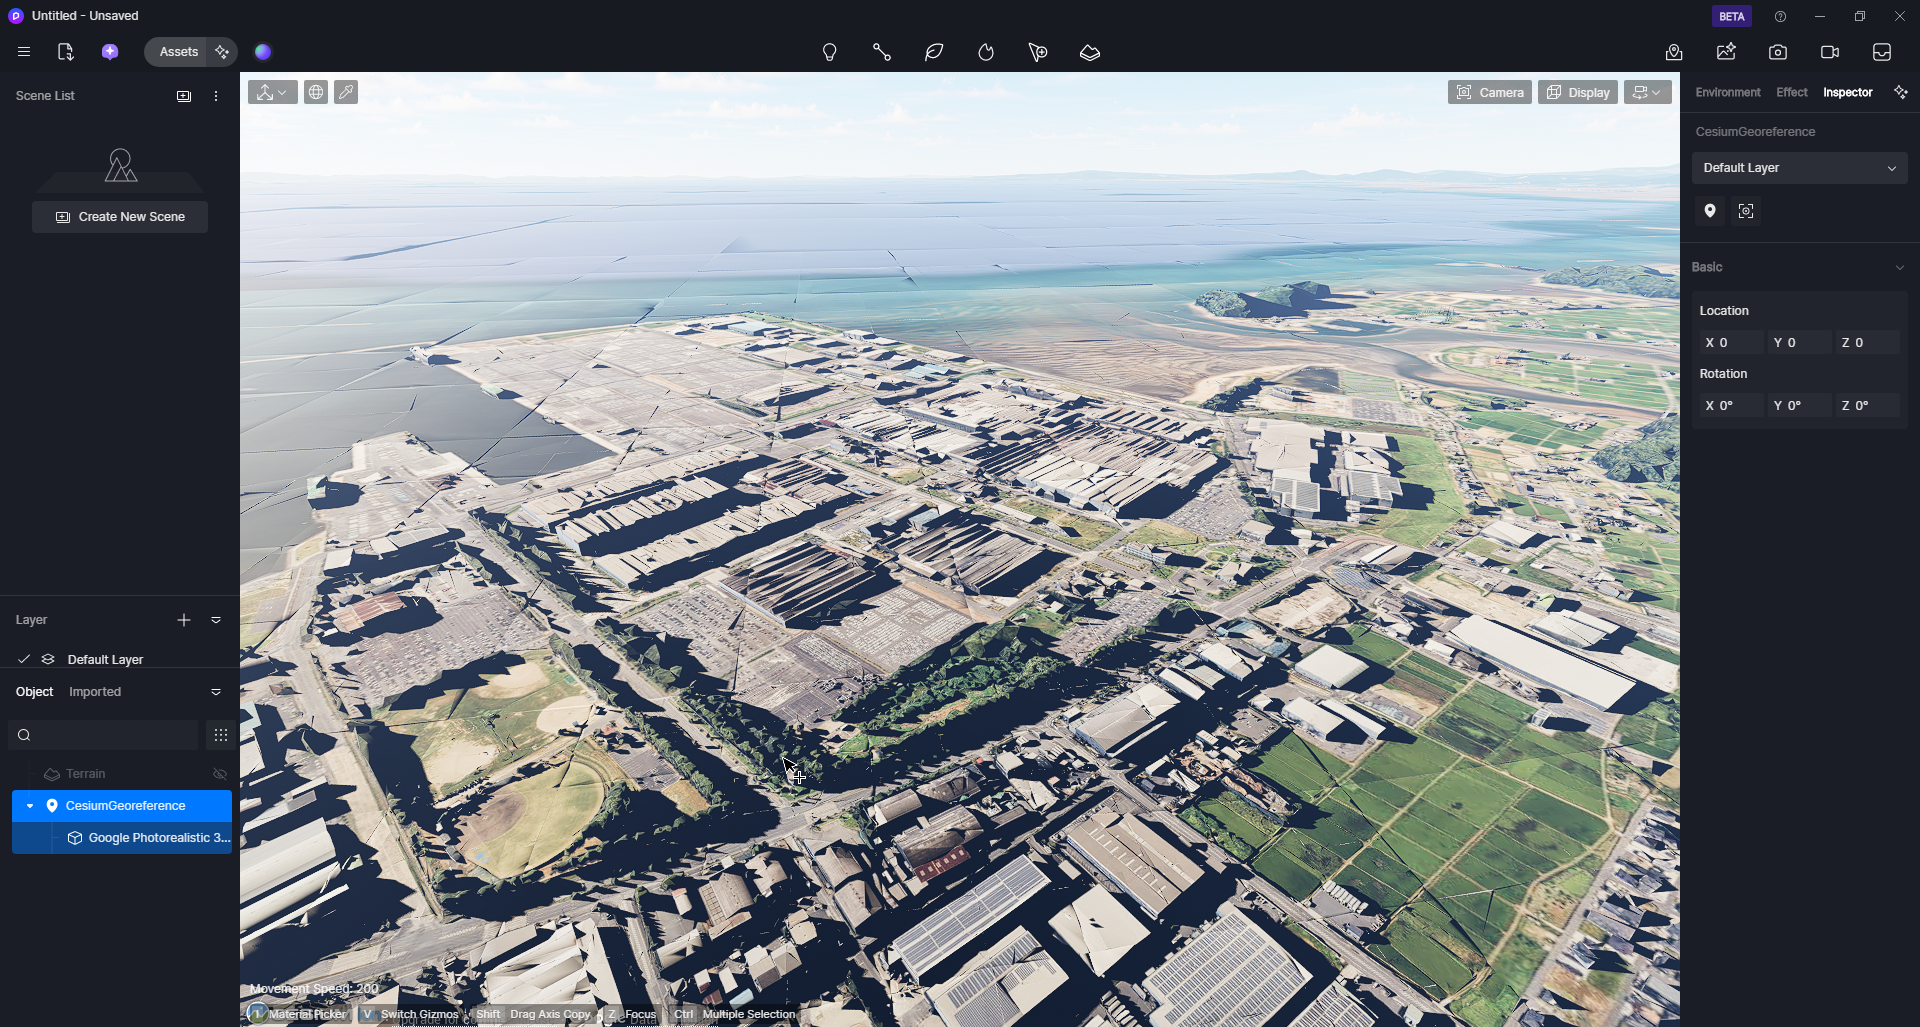
4️⃣ Now, overlay your design data on top of Cesium's real-world 3D terrain—import models, adjust their position and materials, and watch as your proposal blends naturally into the geographic environment. Once everything looks perfect, move on to rendering professional-quality images and videos that showcase your vision in its actual context.
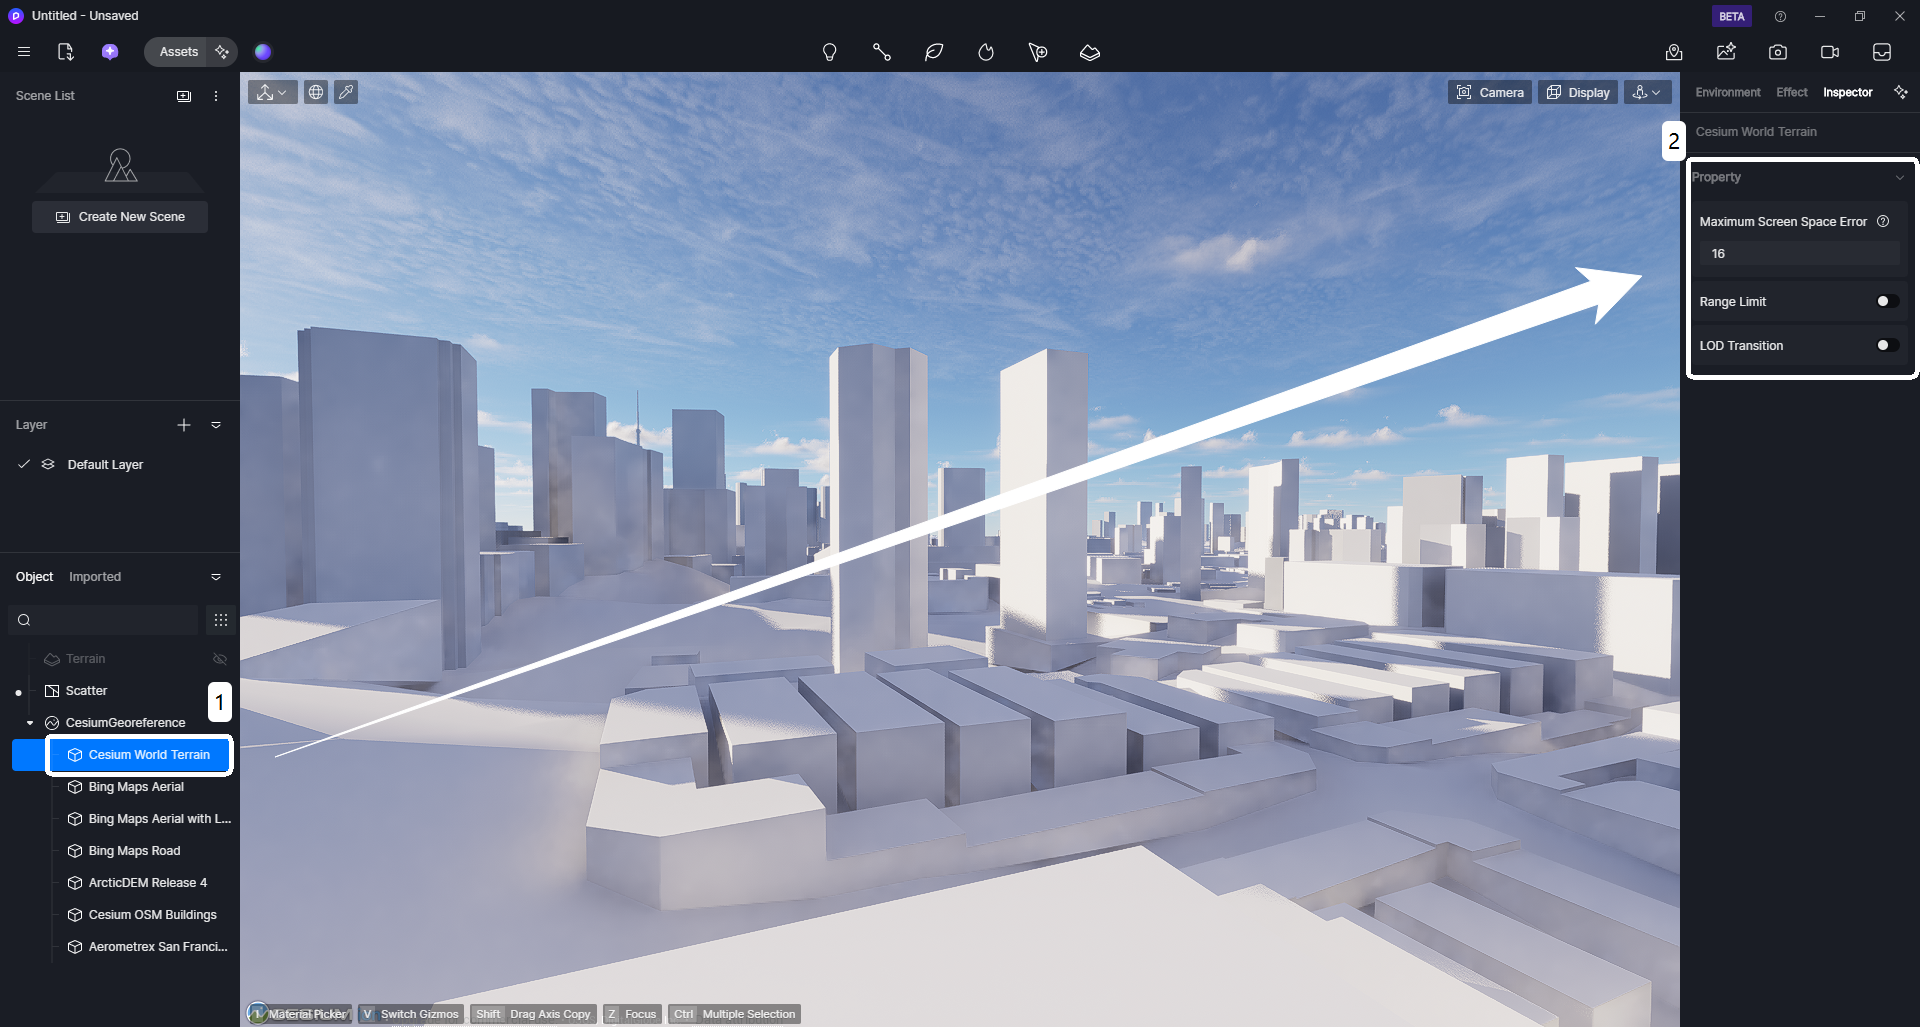
5️⃣ Adjusting Data Source Parameters. Simply click any data source in the tree structure, then fine-tune settings in the right-hand panel:
① Maximum Screen Space Error (0–100)
- 0= Highest precision (may impact performance)
- Higher values = Optimized rendering
② Range Limit (Toggle On/Off): Define a rectangular area with custom width/height.
③ LOD Transition: Smoothens level-of-detail changes for cleaner visual.
6️⃣ Need to modify the position of your Cesium anchor? It's easy! Simply:
- Click the top-level node in the left panel's Cesium Geospatial Anchor tree (visual example below).
- In the right-side parameter panel, locate and click the [Reselect] icon. This lets you change the 3D mapping data source loaded for the current anchor or adjust the center point coordinates
- Confirm your changes, and voilà—the scene will automatically refresh to reflect your updates!
Pro Tip: Always double-check coordinates after adjustments to ensure 3D terrain precision.
4. Advanced: Combine Cesium with Other Teams Features in D5 Render
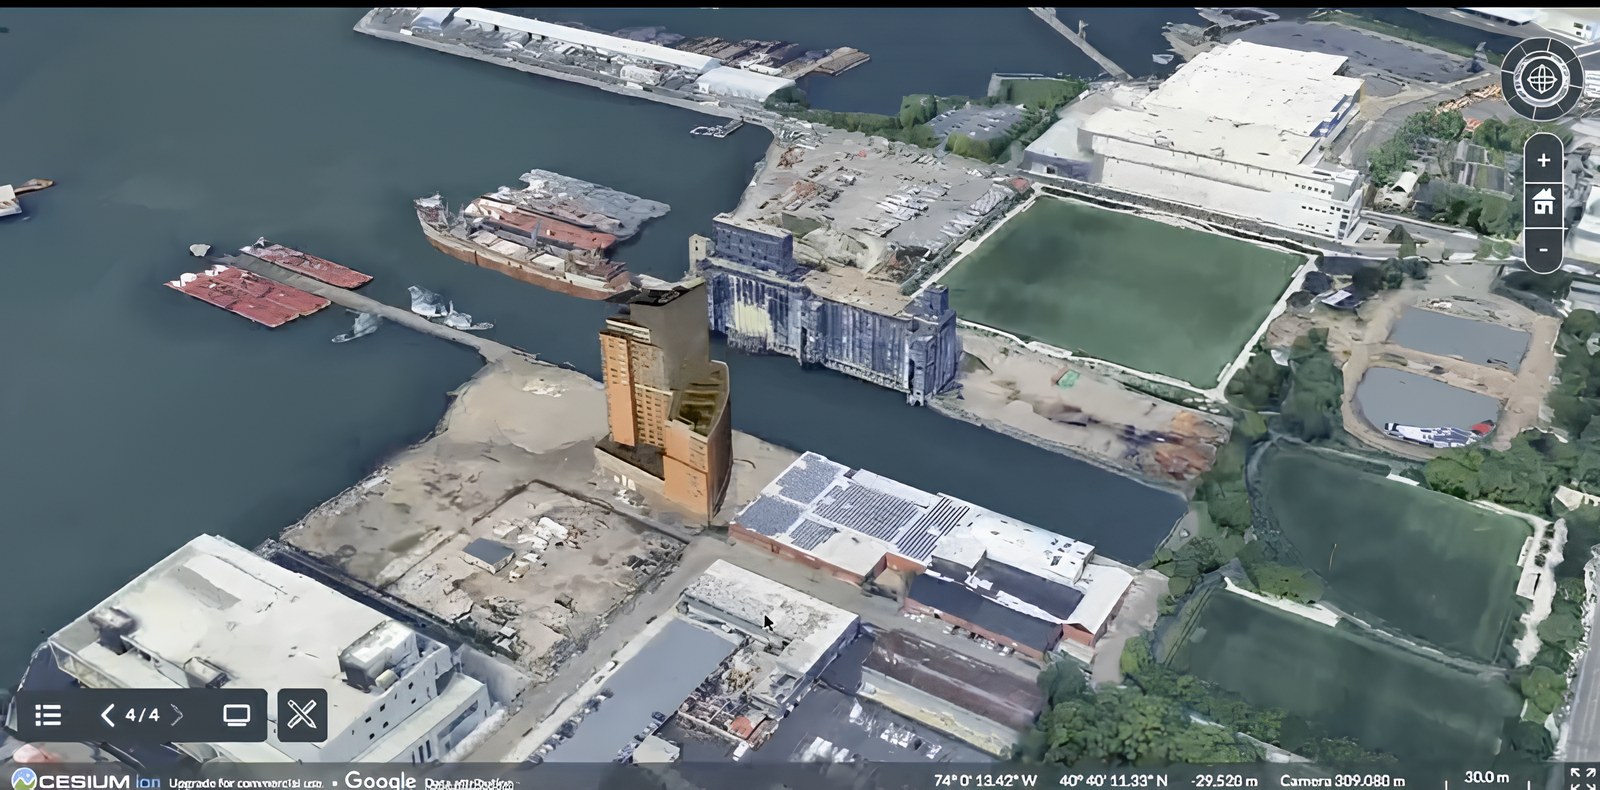
Want to take your 3D designs beyond static renders? D5 Render's PLY export (coming this update!) lets you upload models directly to Cesium, transforming them into stunning, interactive 3D presentations. Imagine showcasing your project in a cinematic "Google Earth-meets-arch-viz" experience—complete with:
- Dynamic sun studies (real-time shadow analysis)
- Bird's-eye flythroughs (pan, zoom, and rotate freely)
- Contextual storytelling (embed labels, routes, or data overlays)
More powerful features await your exploration…
Check out our demo below—this isn't just a slideshow, but a professional geospatial presentation toolkit powered by Cesium's global 3D engine.
Why Designers Love This Combo:
① For XR Collaboration: Using D5 for Teams' XR feature mode, instantly enter your Cesium-geolocated scene to enable immersive design reviews where teams can:
- Switch between macro (Cesium 3D map) and micro (XR walkthrough) perspectives
- Annotate site-specific issues in VR/AR while referencing real terrain 3D terrain
② For Competition Entries: Drop your concept into the site's actual terrain, proving how it harmonizes with the environment.
③ For Client Pitches: Share a single link (hosted on Cesium) that lets clients explore the design from any angle, even on mobile.
Pro Tip: Export your D5 model to Cesium via PLY, then use D5 Teams' XR tools to convert Cesium's 3D base map into a navigable VR space - creating seamless transitions from city-scale planning to human-scale experience.
Experience a Photorealistic XR Tour in D5 Render >
5. Conclusion on Using Cesium in D5 Render 2.11 for 3D Mapping
Cesium inD5 Render 2.11 for Teams makes 3D mapping effortless—no more tedious data prep or workflow hassles. In just three steps (setup, token config, and data loading), your team can integrate real-world terrain, collaborate in real-time, and create stunning geospatial visuals. Whether for architecture, urban planning, or immersive XR presentations, this powerful combo puts precision and efficiency at your fingertips. Ready to elevate your 3D projects? Start exploring with Cesium today!
Continue Reading More About D5 Render for Teams
How to Create an Immersive Virtual Tour with D5 Render?
How D5 Showreel's Panorama Comment Boost 3D Design Collaboration?
How to Use Gaussian Splatting to Convert MP4 Videos to 3D Models
D5 Widgets | Merge Rendering Projects for Better, Easier Arch Studio Teamwork
How Settanta7 Future-Proofed Their Workflow with Real-Time Rendering
Archicad-D5 Workflow Smooths Large-scale Architecture Design
FAQs on Using Cesium in D5 Render 2.11 for 3D Mapping
1.Why is Cesium integration showing a blank scene after import?
Step 1: Check Your Internet Connection
Cesium relies on real-time data streaming—slow or unstable internet can cause delays or missing content.
Step 2: Hide Default Terrain & Adjust Camera
If the scene remains blank:
Hide/Remove D5's default terrain to avoid conflicts.
Temporarily raise the camera height—this gives Cesium space to load data smoothly.
Pro Tip: Since Cesium loads content progressively, an initially blank scene is normal. Wait a few seconds for assets to fully stream in!
2.Can non-team members access and use Cesium terrain when opening a project that contains it?
No. When a non-team member opens a project containing Cesium, the Cesium content will fail to load (displaying a red error indicator). If clicked, the 'Update' button in the 'Parameters' panel on the right side will be disabled (grayed out).
3.Why does the Cesium layer show errors (red highlight) and fail to load data for team members?
If your team admin has deleted the Cesium token, members will encounter errors when trying to use Cesium resources. First, check with your team administrator to resolve the issue. If the problem persists, please contact our support team at [email protected] for further assistance.