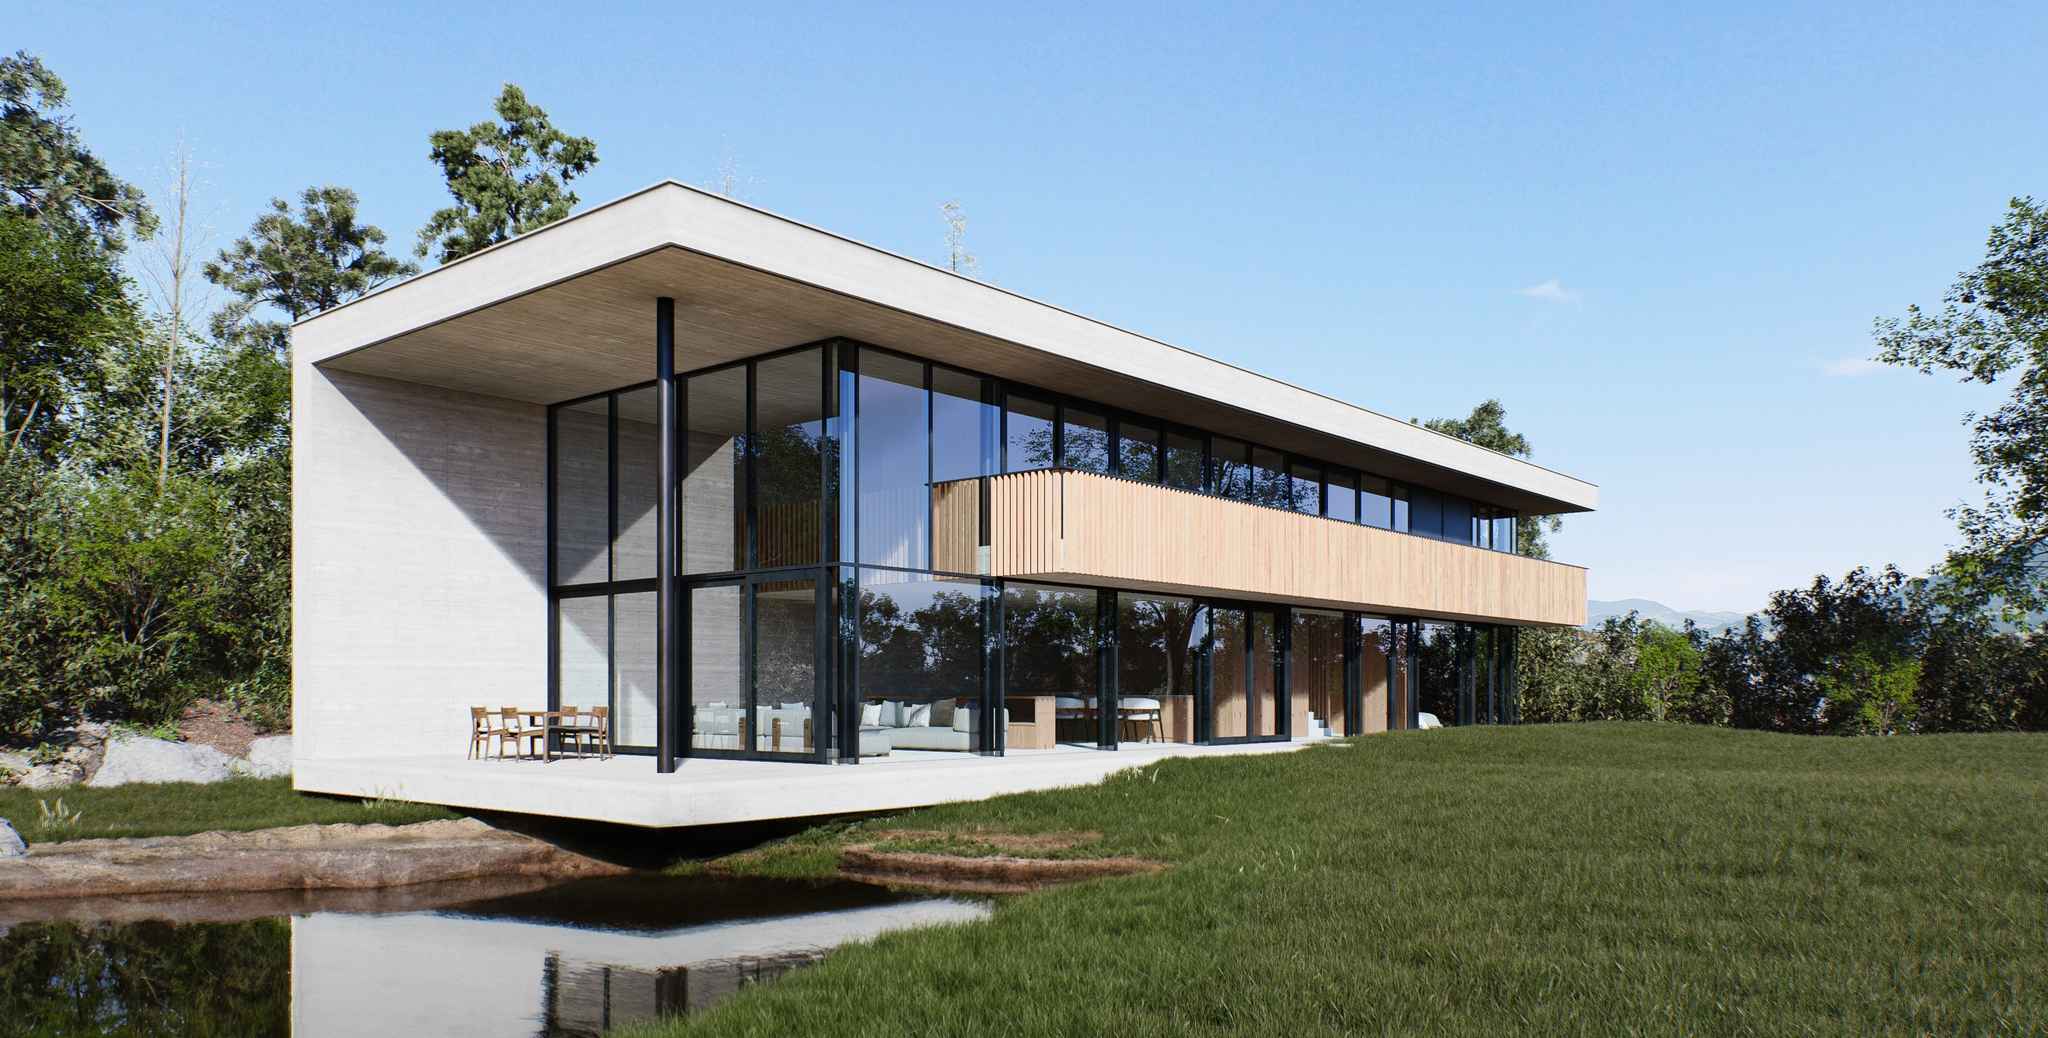
Two-point perspective remains the gold standard in architectural visualization for its ability to merge structural accuracy with immersive realism. Yet achieving this balance traditionally demands meticulous camera calibration – until now. D5 Render redefines the workflow with intelligent automation, transforming technical precision into creative empowerment.
By integrating dedicated Two-Point Perspective Mode with real-time correction algorithms, D5 eliminates manual axis adjustments while preserving vertical integrity across all navigation modes. Architects freely explore designs through Walk, Orbit, and Fly controls without perspective drift, while Advanced Camera Tools offer surgical control over vanishing points and depth effects. This synergy of automation and precision liberates professionals from technical constraints, letting them focus on crafting narratives rather than fixing distortions.
Key Takeaways on Two Point Perspective in D5 Render
- D5 Render’s Two-Point Perspective Mode automates vertical correction, letting you explore angles freely while walls stay perfectly aligned — no manual adjustments needed.
- Fine-tune compositions with D5’s precision tools — adjust FOV, clip distractions, and layer DOF depth without breaking two-point perspective rules.
- Walk, Orbit, or Fly seamlessly in D5 Render— switch modes while verticals stay locked, ensuring client-ready renders from every viewpoint.
1. Why Two Point Perspective Dominates Architectural Visualization
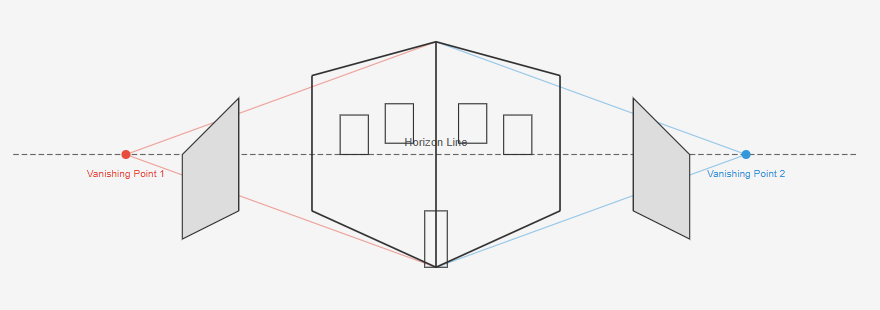
Two-point perspective, defined by two vanishing points on a horizon line with verticals remaining parallel, mimics how humans perceive built environments. This technique is foundational in architectural visualization because it balances realism and structure — converging lines create depth while stable verticals preserve scale.
In 3D rendering, accurate two-point perspective prevents unnatural distortions (like leaning walls) and ensures spaces feel grounded and proportional. For exterior shots of skyscrapers or interior corner views, it transforms flat models into immersive scenes.
In D5 Render, achieving textbook-perfect two-point perspective isn’t a technical hurdle – it’s your creative starting point. The software’s Auto-Correction locks verticals automatically, freeing you from manual axis adjustments. This lets architects focus on crafting compelling compositions using Advanced Camera Tools to fine-tune vanishing points or Walk Mode to explore perspectives in real time. Here, precision becomes a catalyst for artistry.
2. Two-Point Perspective: The Manual Control Trap
Perfect two-point perspective seems simple in theory, but traditional 3D software turns it into a frustrating puzzle. But here’s the problem: architects shouldn’t need engineering degrees just to keep walls vertical.
In most tools, you’ll waste hours manually dragging vanishing points and tweaking camera tilts. Rotate your view even slightly, and vertical lines mysteriously warp – turning sleek columns into leaning towers. Want to explore your design in walkthrough mode? Unexpected “3-point perspective creep” twists your carefully framed shots, making buildings look like funhouse mirrors.
The D5 Difference:
With D5 Render’s Two-Point Perspective Mode, these headaches vanish. Vertical lines stay locked to perfection while you:
- Freely rotate horizontally to find ideal angles (no tilt distortions!)
- Adjust FOV in real-time using the Advanced Camera Tool’s precision sliders
- Verify proportions instantly by toggling Orthographic View
🔔 Camera setting tips must known for archviz >

3. Mastering Two Point Perspective with D5 Render
D5 Render’s Two-Point Perspective Mode (activated via Keyboard Shortcut: P) is the ultimate safeguard against distorted architectural renders. Without this feature, tilting the camera even slightly introduces unwanted three-point perspective – a critical flaw in professional visualization where vertical lines (walls, columns, beams) converge unnaturally upward or downward, violating real-world physics and undermining design integrity.
Why Two-Point Perspective Matters
- Three-Point Pitfalls: In uncalibrated workflows, a 5° unintentional camera tilt can cause walls to appear 12-15% slanted , forcing time-consuming post-production fixes. (Please refer to the comparative results in the image below.)
- D5’s Solution: Enabling Two-Point Perspective Mode (P) automatically zeroes camera tilt angles and recalculates the projection matrix (OpenGL gluPerspective derivatives), locking vertical geometry to true orthogonality.
- D5 Render's Technical Superiority:D5 Render enforces two-point perspective by adjusting the projection matrix during the geometry processing stage (OpenGL-based calculation), rather than applying post-render image warping. This ensures ray-traced shadows and volumetric lighting calculations are based on corrected 3D geometry, avoiding artifacts caused by mismatched geometry and lighting data.
4. Two-Point Perspective: Advanced Camera Toolbox
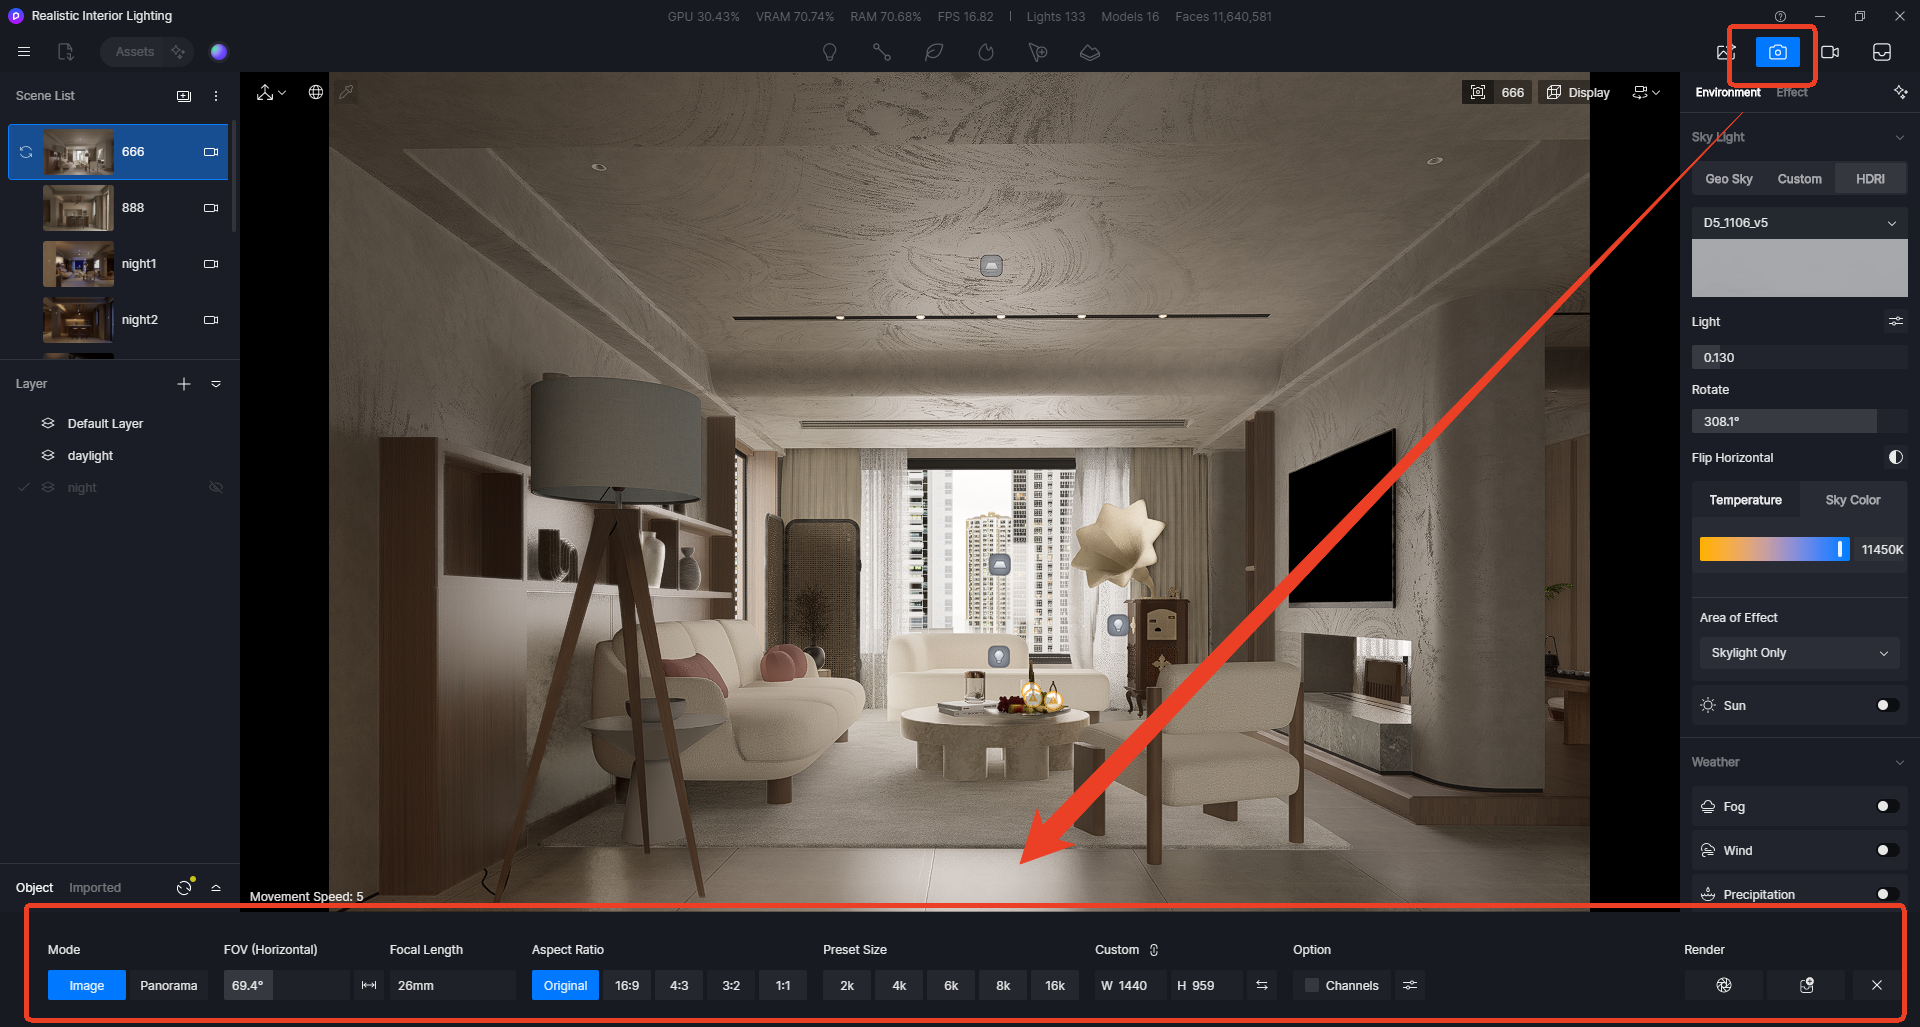
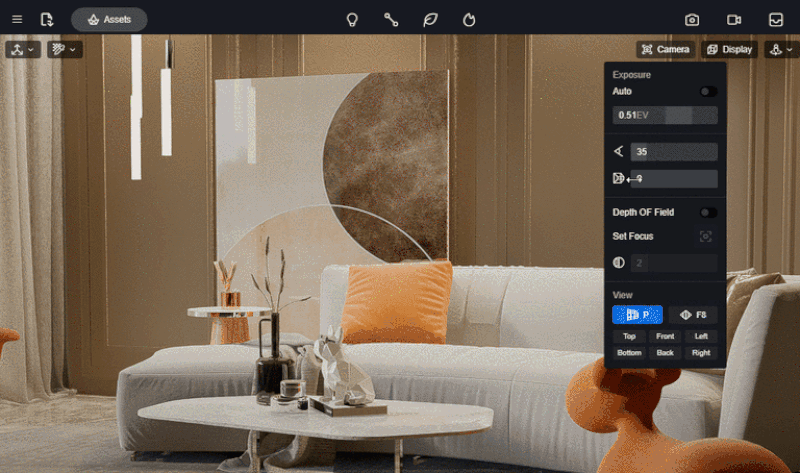
D5 Render’s Advanced Camera Tool (Camera Properties Panel > Advanced Settings) delivers cinematic control over perspective geometry and depth effects:
4.1 Field of View (FOV) & Focal Length Synergy
In D5 Render’s Advanced Camera Tool, FOV acts as your visual "zoom lever." A wider FOV (e.g., 120°) captures expansive scenes – ideal for tight interiors or sweeping cityscapes where maximizing visible space is critical. Conversely, a narrower FOV (e.g., 15°) mimics telephoto lenses, narrowing your focus to highlight architectural details like façade textures or decorative columns.
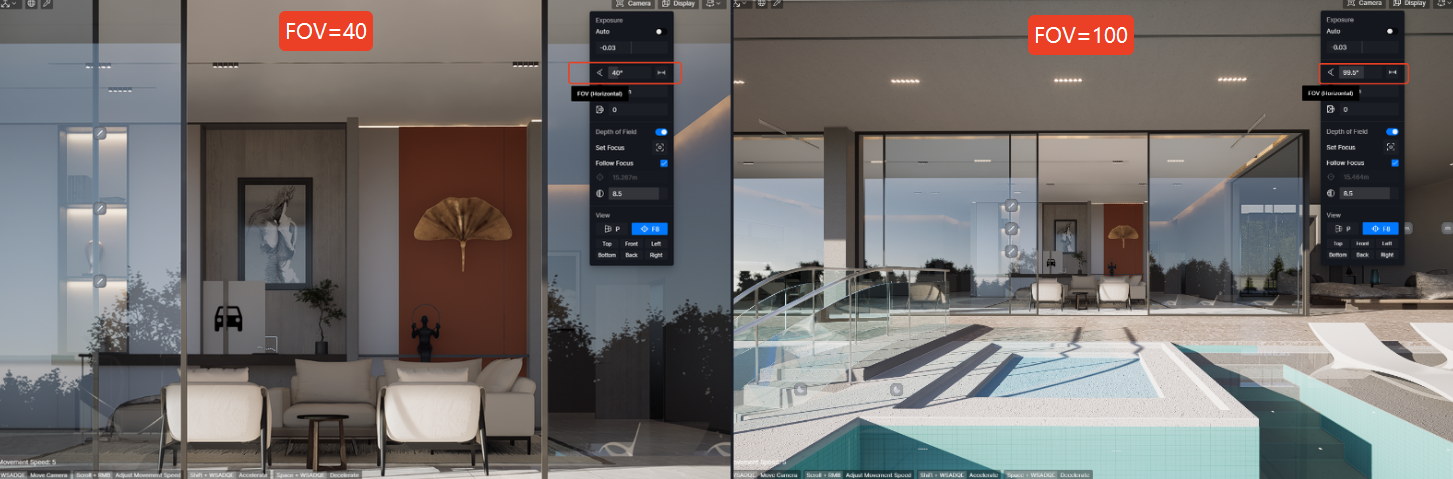
The tool automatically converts FOV values to real-world focal length equivalents (24mm to 200mm full-frame). For example:
- 24mm (≈84° FOV): Classic wide-angle for capturing entire building elevations.
- 50mm (≈46° FOV): Natural perspective for human-scale interior views.
- 200mm (≈12° FOV): Flattens depth to emphasize geometric patterns in structures.
Technical Validation: At 35mm FOV (≈63° horizontal), D5 Render's perspective geometry aligns with optical characteristics of professional architectural photography lenses.
4.2 Camera Clipping Plane: Scene Optimization Without Model Edits
D5’s Camera Clipping Plane (Camera Properties > Clipping Range) dynamically hides geometry beyond user-defined near/far thresholds (0.1m to 10km). This enables:
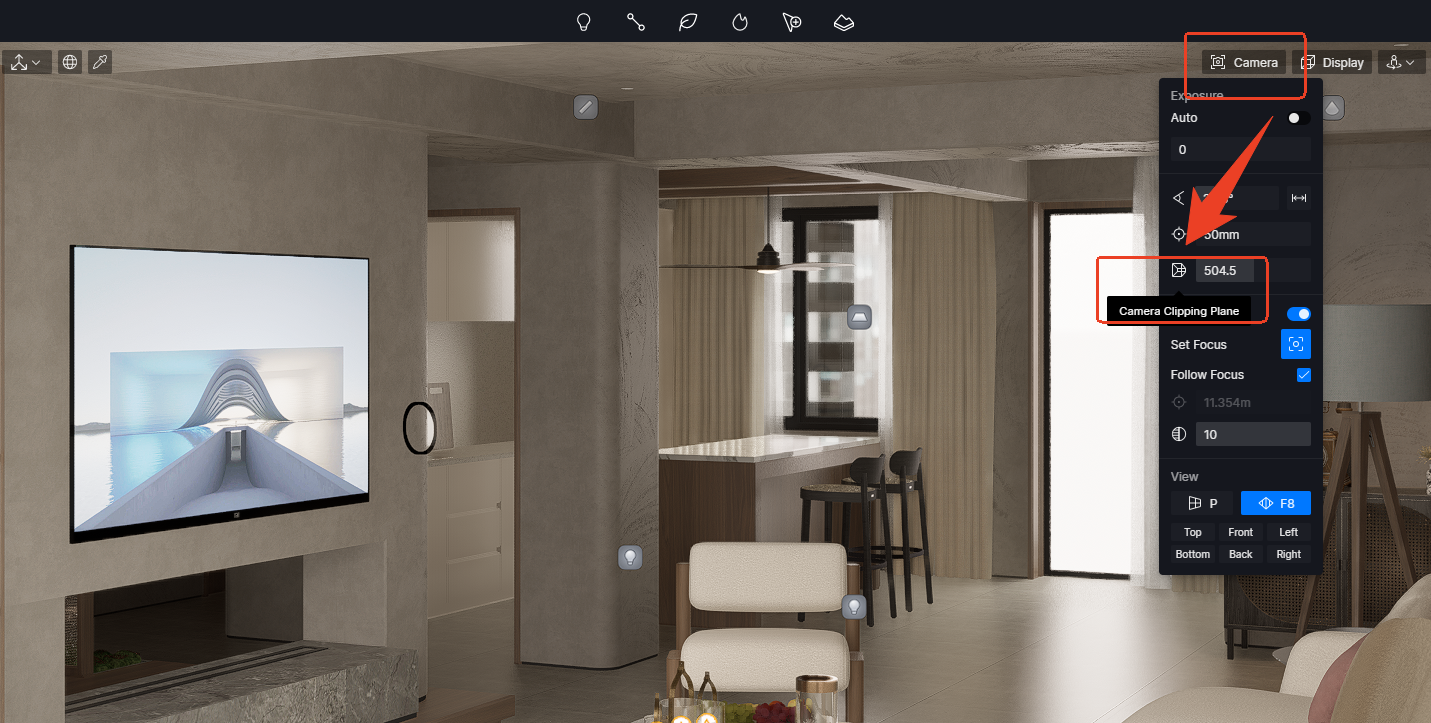
- Selective Scene Focus: Remove obstructing foreground objects or distant terrain without modifying original models.
- Perspective Simplification: When combined with 24-35mm FOV (Two-Point Mode enabled), clipping isolates key architectural elements along vanishing lines.
- Workflow Efficiency: Clipping updates render previews instantly, unlike manual model visibility toggling.
This non-destructive approach maintains model integrity while accelerating iterative composition – critical for client-driven design revisions.
🔔 Download D5 Render Free Now!
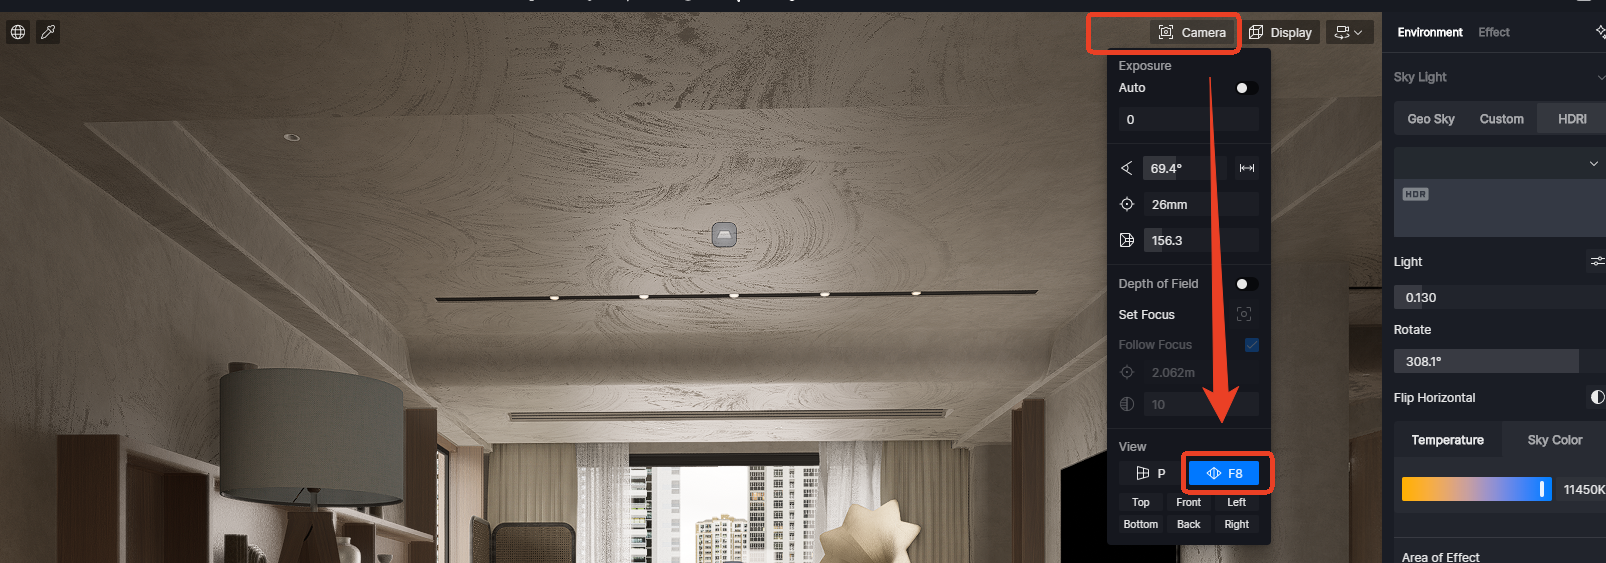
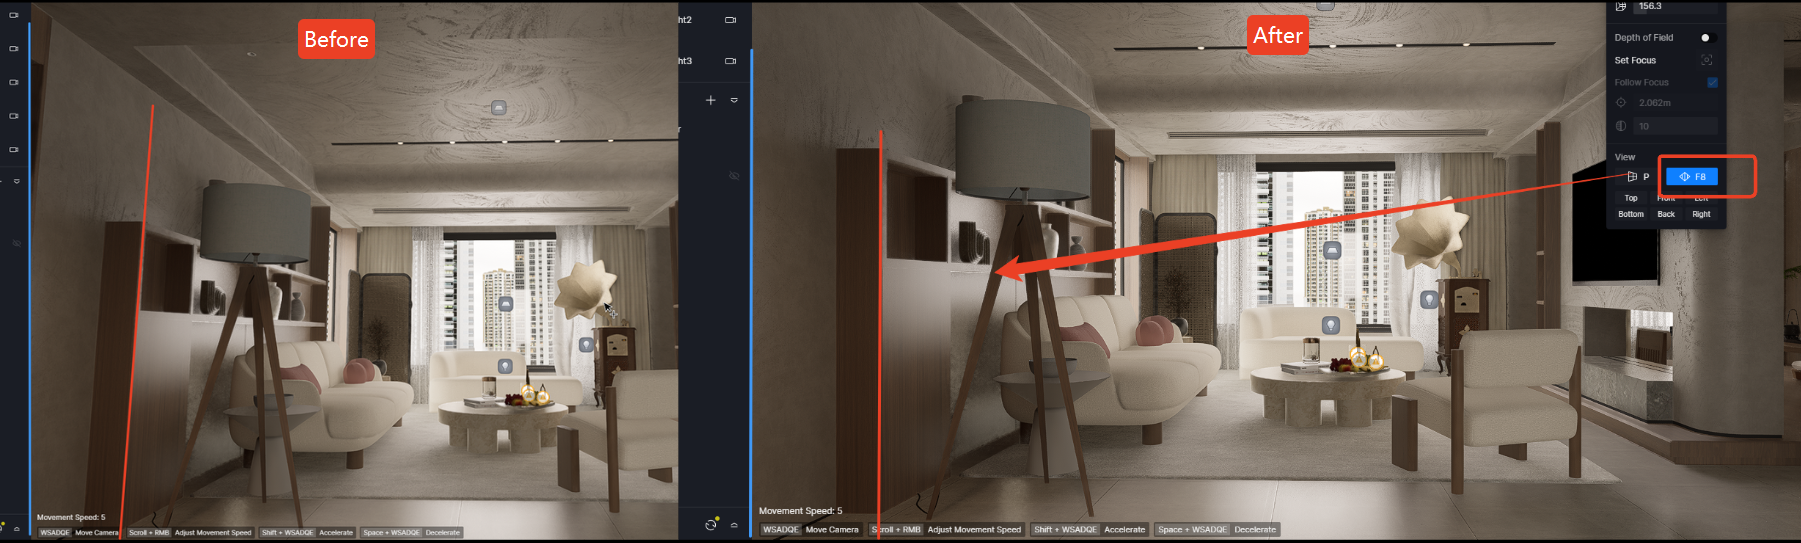
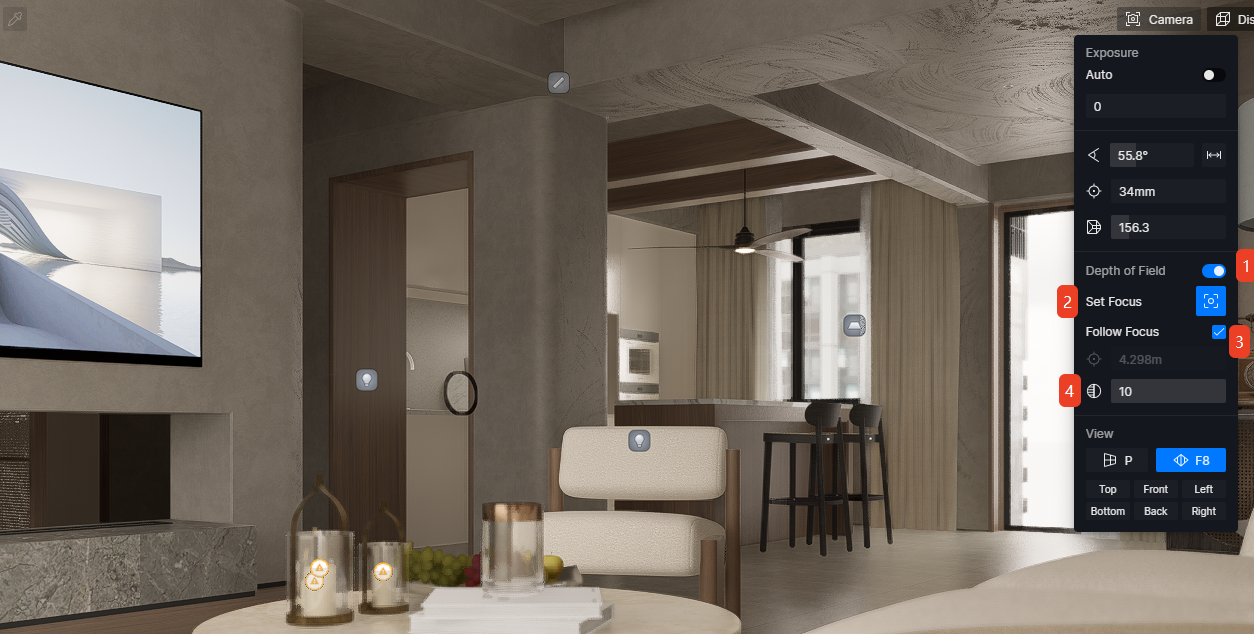
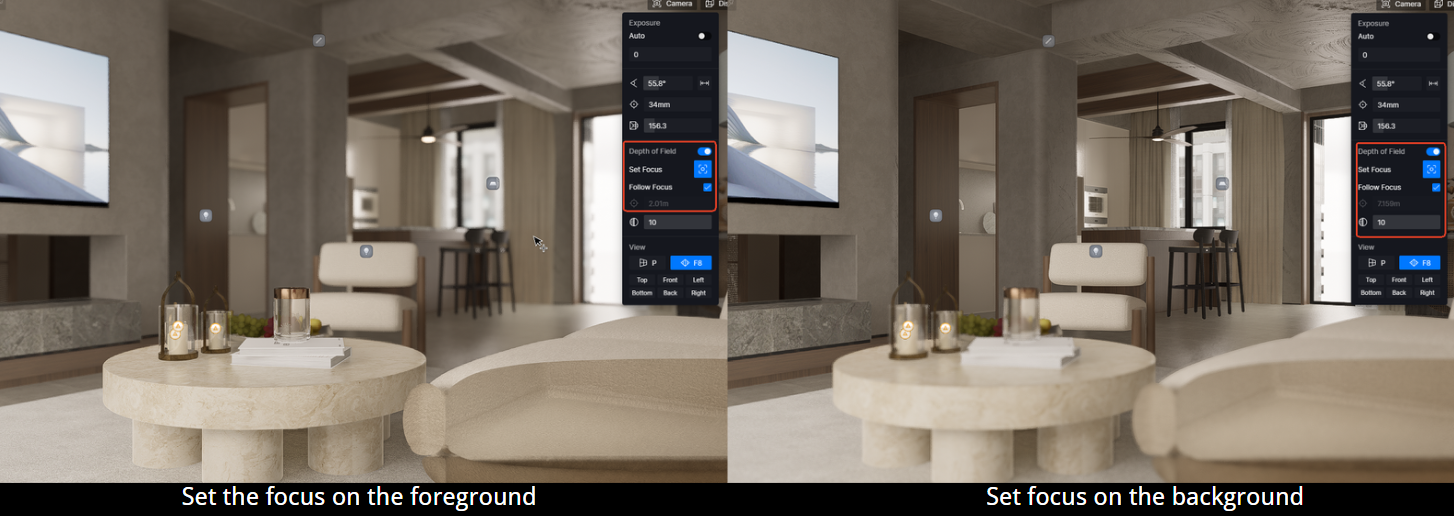
4.3 Depth of Field (DoF): Cinematic Focus Made Simple
D5 Render’s Depth of Field feature mimics how cameras focus on specific areas, blurring foreground/background elements to guide the viewer’s eye and enhance depth.
Simple Setup:
- When you turn on the depth of field and select the focus point in the camera, the effect of auto follow focus will be enabled by default.
- Open the depth of field option, click on "Set Focus", and click on the object you want to focus on in the scene to determine the focus position. Meanwhile, it supports one-click auto focus feature.
- After cancelling the "Follow Focus" option, you can fill in the value to set the distance to the focus plane manually.
- Adjust the "Blur" parameter to change the strength of the depth of field effect.
This effect can also be achieved in combination with Effect - Style - Z Depth.
Why Choose D5:
- Real-Time Preview: See focus effects instantly as you adjust, avoiding guesswork.
- Physical Accuracy: Blur intensity scales naturally with distance, matching real lens behavior.
- Creative Control: Soften distracting elements while keeping architectural lines crisp, complementing the Two-Point Perspective auto-correction.
🔔Download D5 Render Free Now!
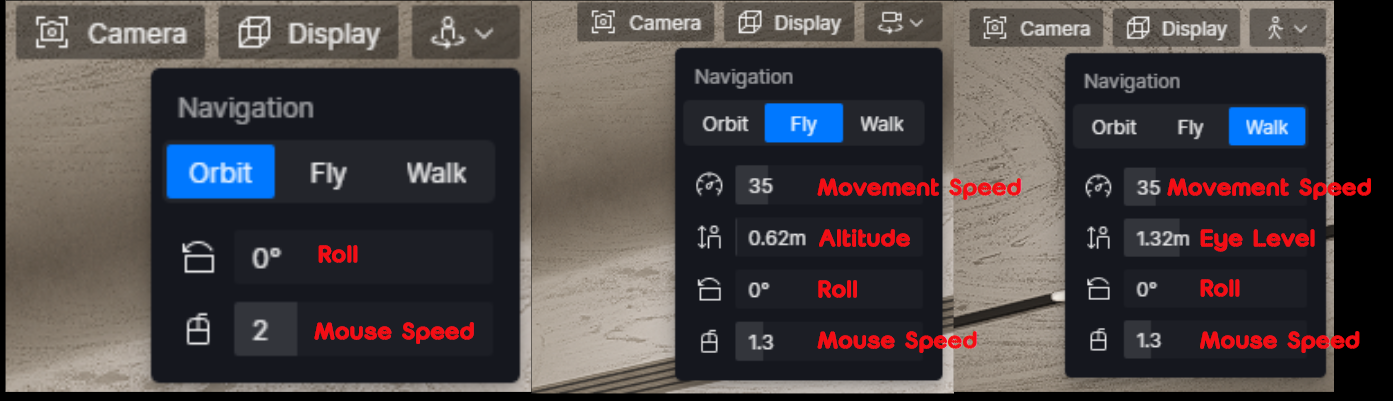
5. Dynamic Walk: Perspective-Aware Navigation
D5 Render’s navigation system lets artists fluidly switch between Walk, Orbit and Fly (press Alt+V/W to cycle) while automatically preserving two-point perspective rules. This eliminates perspective distortion during exploratory movement.
1. Orbit Mode:
- Move through the mouse wheel, right-click and Shift key combination
- Rotates around a fixed pivot point while locking verticals.
- Auto-pivot selection based on hovered geometry.
- Best for: Exterior building inspections, object-centric views.
2. Fly Mode:
- Right-click with WASDQE on the keyboard
- Gravity-free 3D movement with altitude control (Q/E keys).
- Vertical correction persists during ascent/descent.
- Best for: Aerial overviews, rapid scene exploration.
3. Walk Mode:
- Right-click with WASDQE on the keyboard
- Maintains vertical correction even on slopes/staircases.
- Best for: Interior walkthroughs, human-scale framing.
D5's perspective-aware navigation modes eliminate context-switching by maintaining two-point correction rules in real-time across Walk, Orbit, and Fly modes, enabling designers to seamlessly switch between human-scale validation, aerial reviews, and detail inspections without manual perspective resets – accelerating decision cycles while preserving design integrity.
🔔Click Here to Master Freely Navigating Viewpoints in D5 >
6. Conclusion on Two-Point Perspective in D5 Render:
Two-point perspective remains the gold standard for architectural realism, and D5 Render redefines its execution. By automating vertical correction, delivering precision tools like FOV sliders and clipping planes, and enabling real-time perspective-locked navigation, D5 transforms meticulous technical work into intuitive creative flow. Architects now wield perfect perspective not as a constraint, but as a catalyst – download D5 Render and build your vision on mathematically solid ground.
Continue Reading to Explore More D5 Render Features
What's Global Illumination and Why We Need It
What is Real-Time Path Tracing in D5 Render 2.10 and Why Does It Matter?
D5 Render 2.10 Beta Integrates NVIDIA DLSS 4: AI Revolution in Real-Time Rendering
The Easiest Way to Create Stunning Phasing Animations
Mastering Architectural Landscaping with D5 Render Terrain Tool
Mastering AI-Powered Lighting in D5 Render for Realistic ArchiCAD Visualization
FAQs on D5 Render‘s Camera’s Setting like Two-Point Perspective
1.Does Camera Clipping Plane modify my original model?
No. Clipping Plane (Camera Properties > Clipping Range) only hides geometry visually. Your model remains intact for future edits.
2.Why do vertical lines blur with Depth of Field enabled?
DoF blurs out-of-focus areas optically but doesn’t distort geometry. Reduce "Blur" strength (DoF settings) if lines appear overly soft.
3.Can I adjust FOV without breaking two-point perspective?
Yes. Use the Advanced Camera Tool’s FOV slider (15°-120°). D5 maintains vertical correction automatically.
4.How to batch render multiple two-point perspective views efficiently?
Save camera positions (Camera Panel > Save View) with Two-Point Mode enabled. Use Render Queue to process them sequentially. Each saved view retains its FOV, clipping settings, and perspective mode.
5.How do I maintain two-point perspective when rendering ultra-tall buildings?
D5's Two-Point Perspective Mode automatically handles vertical correction regardless of camera height. For skyscrapers, combine with Camera Clipping Plane (0.1m-10km range) to isolate sections while maintaining true verticals. If shooting extreme low angles, temporarily disable the mode via Camera Panel > Perspective Settings for intentional 3-point dramatic effects.