Preface
What are Caustics?
Have you ever heard of ‘caustic’?
The word may sound a bit alien to you, but I’m sure you’ve bumped into it in daily life.
Check out these two images below – they give you a glimpse of what caustics usually look like.

Alright, let’s break it down. By definition, caustics refer to light’s journey from the light source, bouncing off or bending at the specular surface (be it once or multiple times), then hitting a diffuse surface, and finally contributing to what a camera or your eyes capture.
If we were to sketch this out on an optical path analysis diagram, it would look something like this:
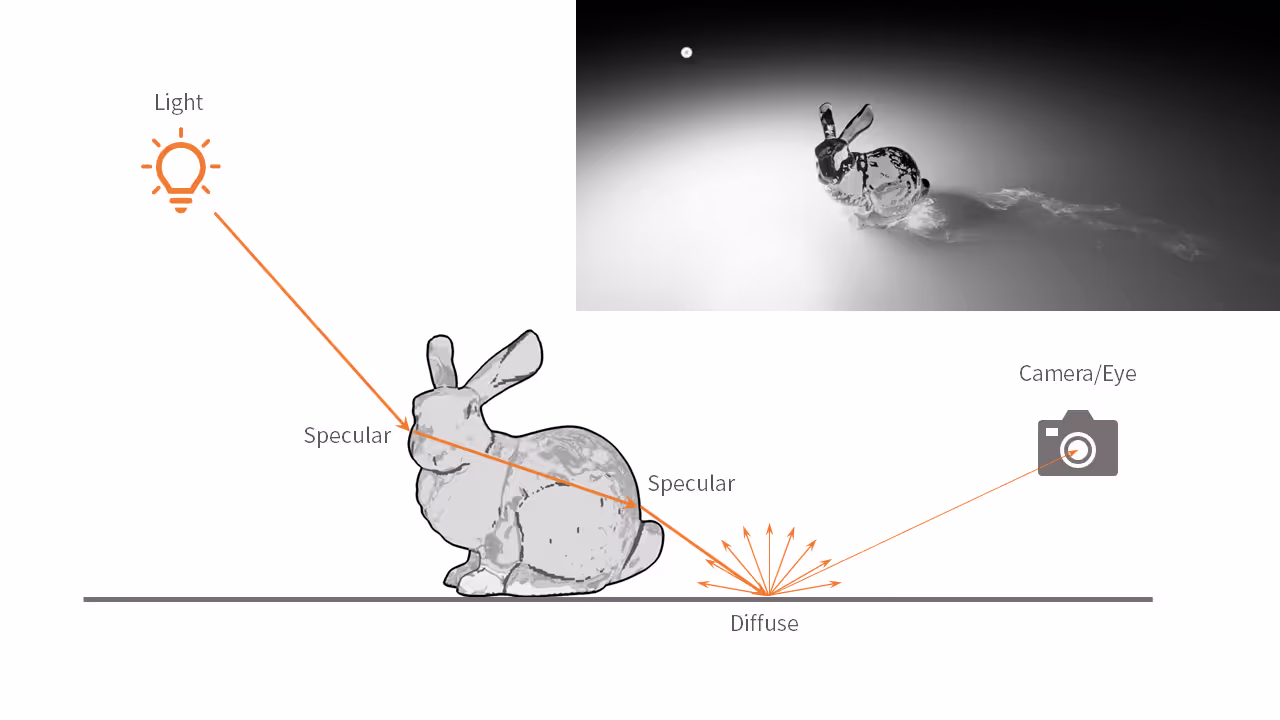
The light ray hits the glass bunny twice, refracts, then strikes the diffuse tabletop before finally making its way into the camera.
When will Caustics Appear?
Based on the definition of caustics, we can boil it down to three key ingredients that give rise to this phenomenon:
- A light source that emits the light rays (to be exact, caustic photons);
- A specular surface that reflects or refracts light (like glass, metal, and so on);
- A diffuse surface that presents the caustics.
Here’s a fun fact: in real life, any light can cause caustics. But in rendering engines, caustics are simulated by having the light source emit what we call ‘caustic photons’.
Some “Stereotypes” about Caustics
For a long time, the vast majority of rendering software users have had two big stereotypes about caustics rendering:
- The principles of caustics are abstract and require learning how to set a series of parameters.
- Caustics are an “advanced” effect, thus requiring a long time to render it.
These two issues do exist. Caustics are all about how light sources and materials work together. To get caustics right, you have to fine-tune the light parameters, figure out the translucency of the material, and get the sampling parameters spot on. If anything goes wrong here, caustics won’t look good. Moreover, it does take some time for caustics to settle into a noise-free result, and all rendering software are working hard to speed things up.
D5 Real-time Caustics Solution
Highlights
D5 Render introduces the caustics rendering feature in version 2.5. For the headaches with caustics, D5 comes up with the following two highlight solutions:
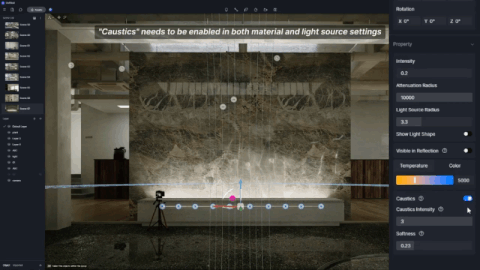
- Simplified Settings
D5 has turned those complicated caustics parameters into easy switches in the light and material panels. So, with just two clicks, you can get a nice caustics effect . No more fiddling with parameters – it’s all preset and ready to go.
In D5, four basic light sources (point light, spotlight, strip light and rect light) and Sunlight (Geo Sky, HDRI-Sun) can all emit caustics. The “custom” material can present reflective caustics, while “water” and “transparent” materials can handle both reflective and refractive caustics.
- Real-Time Rendering
D5 Render’s caustics feature is now real-time. That means the feedback between light and material is super clear and fast. No more waiting around – you see the changes as they happen.
>Note:
In real-time rendering, we dial down the accuracy of caustics a bit to boost performance.
But when it comes to producing images or videos, the accuracy will be further improved, requiring more memory.
Behind the Stage
To put it simply, D5 generates real-time caustics like this:
First, it sends out photons from a light source and lets them bounce around, reflecting and refracting. It then records their position and color in space.
Next, using the position and color info of these photons, it performs scattering calculations to figure out the caustics effect in screen space.
Then, it reduces the temporal and spatial noise in the caustics effect, before finally layering it onto the image.
How to Create Caustics in D5
Take this scene as an example:
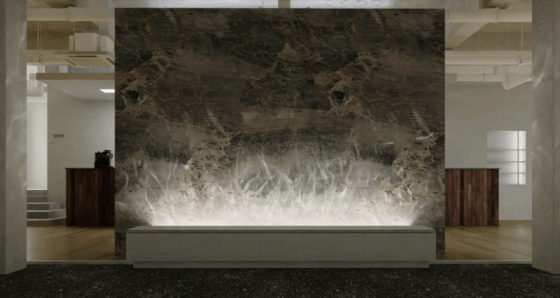
The BE WATER Lamp is made of a glass tube model with a uneven surface.
(Note: You can also create a uneven look with a normal map which affects caustics as well. )
To rotate the glass tube, you can set a keyframe animation for it in D5’s video mode, or create one in DCC software and import it into D5 as an .abc file.
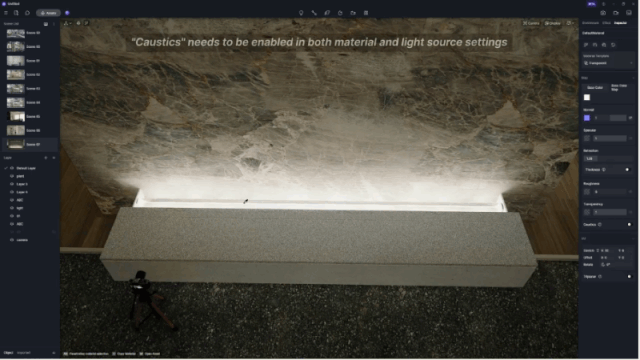
Then, place some light sources under the rotating glass tube and turn on their Caustics switch. After selecting the material of the glass tube, change its material template to ‘Transparent’ and switch on ‘Caustics’.
The caustics effect will immediately appear, making the BE WATER lamp life-like.
You can adjust the Caustics Intensity and Softness parameters of the light to get the desired effect: