The Best AI Tool for Architects and Designers with Real-Time Rendering Integration

Architects are known for their innovative ideas when designing buildings and spaces. However, the process of turning concepts into visuals can be time-consuming and mentally exhausting, and it's common for designers to experience creative blocks or even lose their initial ideas during the process.

That's why D5 Hi, an AI conceptual design tool, was born: to help architects capture their concepts in a quick yet creative way, making design easier than starting from scratch yourself.

Despite being the most popular AI image tools currently available, stable diffusion and mid journey have steep learning curves when it comes to practical application in architecture. D5 Hi, however, is specifically designed and trained for spatial design, and is also integrated with real-time rendering software D5 Render, ensuring that architects can quickly and easily bring AI-generated spatial concepts to life.

Try D5 Hi

How D5 Hi is integrated into the design workflow

Imagine having D5 Hi that seamlessly integrates into your architecture design workflow, allowing you to simply input basic sketches or even describe your ideas with words, and watch as D5 Hi generates 2D visuals with accuracy and impressive creativity.

Designers can convert these visualizations into stunning 3D walkthroughs/animations using D5 Render, significantly boosting work efficiency.

Put simply, the AI-powered architecture design workflow is:

D5 Hi for Rendering Refinements

"I uploaded a render I did on D5 (the left image) and then just prompted 'house, twilight' in D5 Hi with the Accurate mode (the right image). I find it VERY useful to check how the lighting should look and the overall ambiance of the scene. Then I can adjust my render for something similar(the third image)," said Xavier Alonso Mayorgarodz.

Image Credit: Xavier Alonso Mayorgarodz

D5 Hi for Rendering Atmosphere Previews

Jamstech Studios uploaded their own SketchUp model onto D5 Hi and generated stunning conceptual images, providing clear direction for the atmosphere.

These conceptual images also provide clients with a quick preview, allowing them to choose their preferred atmosphere, thus avoiding the need for repetitive modifications during the later stages of the visualization process.

The Original Model
D5 Hi Visuals

Image Credit: Jamstech Studios

Quoc Phan, a professional interior designer, also tested the AI-powered concept-rendering workflow. He can "rely on the D5 Hi generated images as the basis of my complete project using D5 Render."

The Original Model
D5 Hi Visuals
A Basic Render in D5

Image Credit: Quoc Phan

D5 Render Free Download

How to Use D5 Hi

  1. After entering the D5 Hi page, please apply to join the waitlist and you will receive a confirmation email with details.
  2. Once your application is approved, you will receive an email notification, and then you can start experiencing D5 Hi.

*It is recommended to use an existing D5 email account to apply for membership.  


Detailed Guide:

Say goodbye to Stable Diffusion and hello to a new era of intuitive design workflow integrated with D5 Hi & D5 Render!


Try D5 Hi

D5 Render v.s Lumion: which is better for architectural design & rendering

In the traditional architecture industry, design and visualization were two separate processes. Visualization was often outsourced to specialized companies.

However, with the advancement of technology, real-time rendering has become more accessible and user-friendly, providing architects with greater convenience. They can now see their designs come to life instantly and make adjustments on the fly. Design and rendering have become complementary partners.

So, which real-time renderer is the best design and visualization tool for architects? This article will walk you through two leading engines in the industry: D5 Render and Lumion.


Real-Time Raytracing Rendering

D5 and Lumion both offer real-time rendering capabilities. Although Lumion 2023 has promoted raytracing as its major upgrade, D5 Render was already equipped with real-time raytracing when it was launched in 2020.

So, how does the real-time raytracing performance of Lumion and D5 compare?

Real-time Viewport

Lumion:

Architects using Lumion may experience a significant discrepancy between the viewport and the final rendering results. They need to refresh the preview frequently and wait for some time to determine the rendering outcome.

D5 Render:

On the other hand, D5's viewport provides genuine real-time rendering, ensuring architects can see what they will get and saving them a considerable amount of time. Besides, the viewport is a huge plus when a client needs a real-time 3D walkthrough.

D5 Render
Lumion

Light and Shadow

Light and shadow are critical to realistic rendering because they convey mood and emotion, and depict the illusion of objects in a scene. The accuracy of light and shadow depends on the algorithm used by the rendering engine.


It can be observed that D5 displays more accurate lighting transitions, as evidenced by the shadows cast by the buildings onto the floor, while Lumion appears to have lost this detail.

Reflection

Glass reflection is an area where D5's real-time rendering outperforms Lumion's.

In D5 Render, nearby objects are accurately reflected in the glass, while Lumion fails to achieve this level of realism.

Even with raytracing on, Lumion's rendering of curved glass lacks the necessary reflections to create a convincing image.

Glass Reflections

Animation

Animation means a lot to architecture design. By creating animated walkthroughs and flyovers of a building or space, architects can provide clients with a more immersive and engaging experience.

Rendering time

As you can see, D5 only took one-tenth of the time Lumion took to render this 6-second animation, and that was with Lumion using only 2-star quality.

Animated models/particles

D5 Render has 1,037 animated models and particles including nature, vehicle, animal, character, and ornament. All of them can be precisely presented by raytracing.

Lumion doesn't state how many animated models there are in its content library. Yet it should be noted that animated models are not converted to raytracing engine in Lumion.


For reference, while Lumion 2023 comes with 227 new models, D5 has released over 450 new models since its latest update D5 2.4, including 220+ animated trees and flowers for architecture and landscape design.

Check the new animated plants in D5 Asset Library

D5 Render currently has 9,384 models, 2,036 materials and 76 particles.

Lumion 2023 has 7,130 models (and other contents) and 1,452 materials.

Quality

As previously mentioned, D5's viewport is highly accurate, allowing architects to see the final output result while designing the animation.

Lumion, according to its release note, does not currently support raytracing for animated objects. And "there can be noise/glimmering in movies with RT, depending on the lighting of the scene and camera movements. Low light conditions and fast camera movements are known to cause this."

Conclusion

Overall, D5 Render is superior to Lumion in many ways. Whether you are an architectural designer or an architectural visualizer, D5's real-time raytracing solution undoubtedly improves your efficiency.

D5 enables you to accurately see the final rendering before output, presenting realistic light and shadow and reflections. With the abundant and high-quality D5 Asset Library, you can take the animation rendering up a notch.

Free Download D5 Render

D5 Render & NVIDIA DLSS 3.0: Introducing Smoother, Real-Time Interactive 3D Rendering

What is D5 Render

D5 Render is a real-time ray tracing renderer for architects, landscape, interior designers, engineers and other 3D professionals. It is fully compatible with SketchUp, 3ds Max, Revit, Archicad, Rhino, C4D and Blender with live-sync support.

The proprietary Global Illumination technology, D5 GI, sets D5 Render apart by delivering the highest quality lighting and shading effects without sacrificing workflow efficiency. As an industry-leading real-time rendering solution, D5 allows you to see every modification to your scene in real time with trustworthy preview and higher FPS. It renders images, videos and panoramas fast enough to leave time for fine-tuning or further edits. 

D5 Render 2.4.5 Free Download

D5 and DLSS 3

D5 Render now fully supports NVIDIA DLSS 3, bringing a new real-time experience to architects, designers and 3D artists, improving the efficiency and overall experience of the creative process. 

Prior to this integration, D5 had already integrated DLSS 2, which leverages Super Resolution Sampling to enhance real-time image clarity and rendering speed. DLSS 3 is a significant upgrade to DLSS 2, with improvements in real-time smoothness. This process greatly improves the real-time performance of D5, allowing designers to work with larger scenes, higher-quality models and textures without sacrificing speed or interactivity. By combining DLSS FG and RS technologies, D5 is set to deliver an unprecedented creative experience for architects, designers, and 3D artists.

Let's take a look at the data comparison.

*At 3840 x 2160 resolution on GeForce RTX 4090

Scene

Frame rate

*DLSS3 OFF: Around 31-38 fps

*DLSS3 ON: Around 59-61 fps

Frame rate during operation

Switch Scenes

*DLSS3 OFF: Around 36-38fps

*DLSS3 ON: Around 59-67fps

Video Preview

*DLSS3 OFF: Around 31-36fps

*DLSS3 ON: Around 68-70fps

We can see that the smoothness of operation is exponentially increased.

The integration of DLSS 3 with D5 marks a milestone in the real-time rendering industry. With advanced rendering capabilities and real-time performance, D5 is poised to revolutionize the way architects, designers and 3D artists work, opening up new possibilities for creativity and innovation.

*DLSS Frame Generation requires GeForce RTX 40 series graphics card, and when you open D5, it will be turned on by default. You can turn it off manually if you need to. Also, you need to enable “Hardware Accelerated GPU Scheduling".

About the hardware requirement and Hardware Accelerated GPU Scheduling, please check: https://forum.d5render.com/t/how-to-enable-hardware-accelerated-gpu-scheduling/16633

How To Make an Interior Phasing Animation

Phasing animation is a technique used in interior showcases to visually demonstrate the various stages of a design project. It involves creating animated transitions that show how space transforms from one state to another, helping designers effectively communicate their design concepts and highlight specific design elements.

With offline rendering tools, it might be a hard nut to crack because designers can only imagine how a phasing animation will look before outputting one. Yet with D5 Render, a real-time rendering engine, you can preview the animation and make adjustments anytime.

Image credit: Nuno Silva


Free Download D5 Render

Table of Content:

- Utilize Keyframe for phasing animation

- Tips & Tricks for phasing animation

- More amazing uses of keyframe animation

Utilize Keyframe for phasing animation

A keyframe is a specific point in time used in animation and video production to mark the start or end of an animated movement or change, allowing animators to create smooth and complex animations.

Take this carpet as an example.

End keyframe: If we want the carpet to drop down from the ceiling, first add a keyframe when it's still on the ground. This refers to its end position.

Start keyframe: Then, move it up by changing the z coordinate. Add another keyframe before the end one on the timeline, representing the start position of the carpet.  

Here's the preview:

More Tips & Tricks for phasing animation

  • How to make an object "growing" in size:

After adding the end keyframe, set the size of the target to 1,1,0 and add the start keyframe.

Here's the preview:

  • How to create an object rotating to make a presence:

You only need to rotate the book a bit at the start keyframe.

Here's the preview:


Image credit: Nuno Silva

More amazing uses of keyframe animation

Keyframes can be used for more than just creating phasing animations. There are many other uses, such as creating a rotating Ferris wheel.

To learn more, please read this blog: How to use keyframes to create animations in D5 Render


The D5 Render animation tool allows designers to add animated effects such as lighting changes, material transitions, and camera movements, creating an immersive and engaging experience for viewers. With its user-friendly interface and intuitive controls, D5 Render can help designers efficiently create phasing animations that effectively communicate their design concepts, making it an essential tool for interior design visualization.

D5 Render Animation Showcase

Free Download D5 Render

220+ new animated plant models in D5 Asset Library

The 220+ new animated vegetation models in the D5 Asset Library are designed to meet the needs of different landscape projects, ranging from small-scale residential gardens to large public spaces and urban developments.

When paired with animation, these animated plant models will take your projects up a notch.

You can find all of them by searching “new spring plants” in the library.

Download D5 Asset Library

01 | Flowers

140+ new flowers at Nature > Flowering Shrub/Flowering Hurb

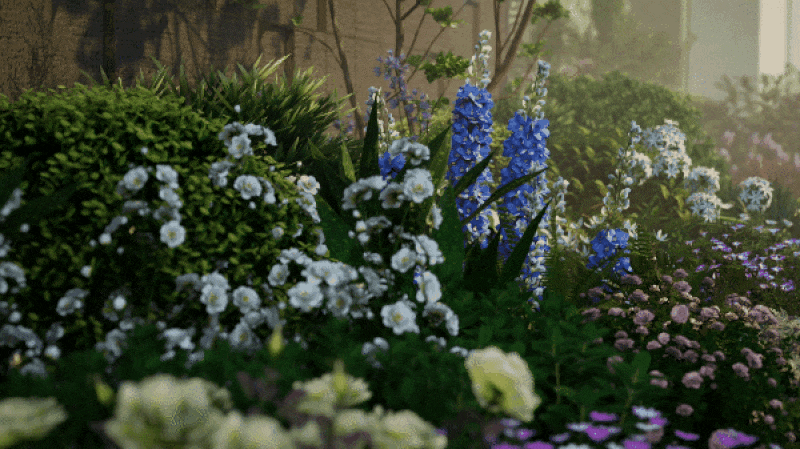
For this residential garden, we used new flower models such as the Mexican petunia, the African lily, and  the big leaf hydrangea.

02 | Flower bed combos

You can customize each plant in the combo, such as their size, or group your own combos and save to local. This way, you can easily reuse them for your next project, saving you time and effort.

Check how to add group assets to local

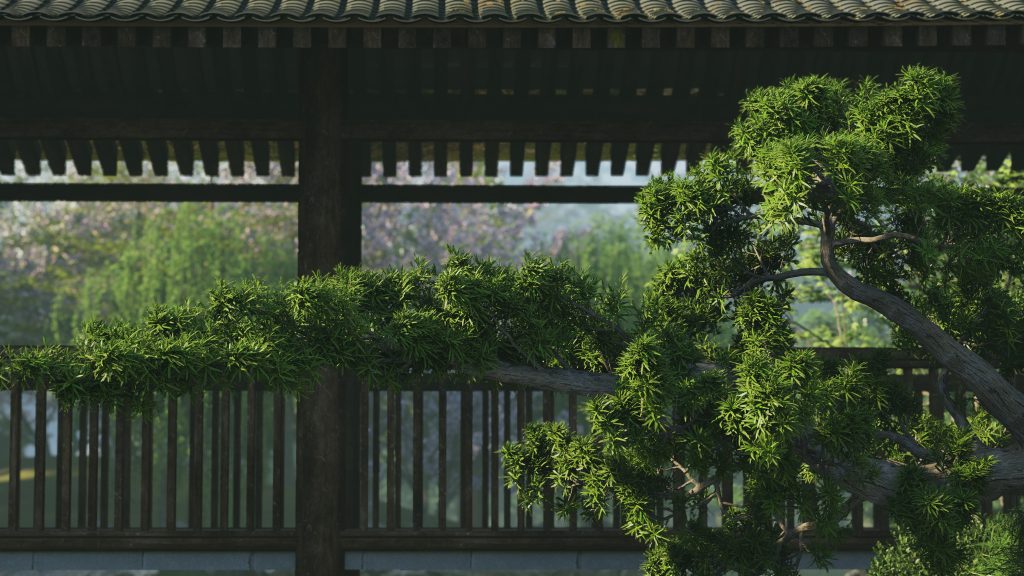
03 | Topiary and flowering trees

20 new topiary trees at Nature > Broadleaf/Conifer

41 new high-precision flowering trees at Nature > Flowering Tree

Shaped and flowering trees add to the beauty of a landscape design. They provide a focal point for space and can create a sense of balance and harmony. These trees can also be used to create different shapes and patterns, adding interest and variety to the overall design.

For this park, we used new animated models, including cherry trees and various shaped pine trees.


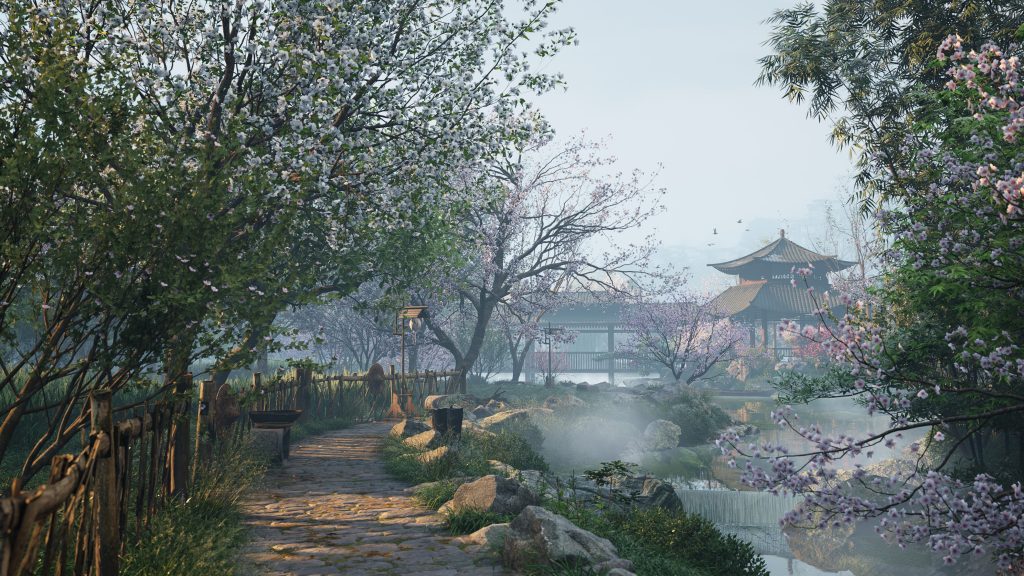
They are highly realistic and detailed, with accurate representation of leaves, branches, and other natural features, making them ideal for close-ups.

04 | Fruit trees

24 new fruit trees at Nature > Broadleaf

There are also new fruit trees such as lemon, cherry, orange and many more.

Don't wait, join the D5 Render discord today: https://discord.gg/bUZQpkMhxr

Download now and experience the constantly updated D5 Model Library that will take your designs to the next level.

D5 Render Free Download

Revit 2024 design & rendering software

Revit is a powerful tool for building information modeling (BIM), which allows architects, engineers, and construction professionals to create, design, and manage building data in a collaborative way.

With the update of Revit 2024 comes some exciting new features including Site Tools for landscape designers and bar bending details. In response to popular demand, Revit 2024 has also introduced a dark theme.

Working with this professional design software, architects and landscape designers may need to visualize their Revit models in a realistic and immersive way, allowing them to quickly make changes, improve collaboration, and better communicate design ideas.

Thus, real-time rendering provided by D5 Render comes in handy for an instant preview of design projects.

Malibu
Victor B. Ortiz Architecture | Revit, Rhino, D5 Render

Real-time rendering for Revit 2024

  • Workflow: D5 Render's perfect compatibility with Revit 2024 takes this BIM software up a notch. It has a livesync plugin to connect with Revit 2024 so that designers can see their projects rendered on the fly.


  • Environment: With D5, Revit designers can see how the architecture will look in the context. To better deliver a building's functionality and aesthetics, architects can make visible environment changes such as the weather, the greenery and the light.
  • Animation: Walkthrough animations provide a virtual tour of the building, allowing viewers to experience the space from a first-person perspective and get a sense of its scale, layout, and functionality. Revit designers can easily make an animation for their projects, delivering design ideas more effectively to clients.
  • Built-in asset library: Architects and landscape designers using Revit 2024 no longer need to search for models or materials over the Internet. With D5's built-in asset library including over 2,000 textures and 9,000 models, it's never been easier to build a rich and touching context for the building.

D5 Render Free Download

Livesync with Revit 2024 for smoother workflow

D5 Render has a livesync plugin, D5 Converter, for livesync with Revit 2024. You can sync perspectives, materials, models, and lights from Revit to D5. Later changes made in Revit can also been synced in real time.

Other advanced features include:

  • Color Filters
  • Separate Export
  • Linked models
  • Consistent Colors Visual Style
  • Surface smoothness

Learn more about livesync plugin D5 Converter

Revit-D5 Render Showcase

César Vilchez Obregon
Victor B. Ortiz Architecture

7 Key elements of Modern Mexican Interior Design in 2023

Are you looking to add a touch of modernity to your living space? Look no further than modern Mexican interior design! This fusion of traditional Mexican design elements with contemporary styles creates a visually stunning and unique aesthetic that is both warm and inviting. In this article, we'll dive deeper into the beauty of modern Mexican interior design and explore its key characteristics, color palettes, and furniture choices.

Anas Bani Khalaf

What is Modern Mexican Interior Design

Mexican modernism interior design takes inspiration from traditional Mexican design elements, such as talavera tiles, hand-carved wooden furniture, and bright, bold colors. However, it also incorporates modern touches such as clean lines, minimalistic design, and a focus on functionality. The result is a perfect balance of old-world charm and contemporary elegance.

1. Color Palettes 

The colors used in modern Mexican interior design are bold and vibrant. They include rich shades of red, orange, and yellow, as well as earthy tones like terracotta and sage green. To balance out these bold hues, designers often incorporate neutral colors like beige, white, and black. These palettes create a warm and inviting ambiance that is perfect for any home.

Kumara

In addition to bold colors and neutral tones, lighting plays a crucial role in Modern Mexican interior design. The use of natural light is highly valued, and that's where D5 Render's HDRI and geographic sun come in. With D5 Render's advanced lighting features, designers can create realistic and dynamic lighting effects that mimic natural sunlight, adding depth and dimension to any interior space. The HDRI and geographic sun features also allow designers to experiment with different lighting scenarios, helping to achieve the perfect balance of light and color in any room.

2. Furniture Choices 

When it comes to furniture choices in modern Mexican interior design, natural materials like wood, leather, and wrought iron are often used. Furniture is often handcrafted, with intricate details and unique designs. Sofas, chairs, and tables are upholstered in rich fabrics like velvet, suede, or cotton, adding an extra layer of comfort and luxury to the space.

D+V STUDIO & ARCHITECTURE

3. Lighting 

Lighting is a crucial aspect of modern Mexican interior design, as it sets the mood and tone of the space. Designers often incorporate traditional Mexican lighting fixtures like colorful glass lanterns or wrought-iron chandeliers. These fixtures not only provide adequate lighting but also serve as statement pieces that add to the overall ambiance of the room.

Daniel Vilchis Vega

4. Accessories and Decor

Accessories and decor in modern Mexican interior design include traditional Mexican pottery, woven textiles, and handcrafted accents like wooden bowls and vases. These unique pieces add a personal touch to the space and serve as conversation starters. Designers also often incorporate plants and greenery, adding a natural element that complements the warm and earthy color palettes.

5. Textures

Texture is another essential element of Mexican interior design. From rustic wood finishes to woven textiles, the use of texture helps to add depth and character to a room. Materials like clay, stone, and terracotta are also commonly used to create a sense of authenticity and connection to the natural surroundings.

FERNANDO MEZA

With D5 Render's PBR (Physically-Based Rendering) material library, designers can take their use of texture to the next level. By using high-quality textures that are based on real-world materials, designers can create a truly immersive experience that brings the beauty of Mexican interior design to life. Whether it's the rough texture of a stone wall or the smooth finish of a clay pot, D5 Render's PBR materials make it easy to achieve an authentic and visually stunning result.

6. Handcrafed items

One of the most distinctive features of Mexican interior design is the use of handcrafted items. From hand-painted tiles to embroidered textiles, incorporating these unique and often one-of-a-kind pieces can add a touch of artistry and individuality to any space.

7. Plants

Finally, plants are a crucial element of Mexican interior design. Whether it's a potted cactus or a hanging fern, plants help to bring a sense of the natural world into any space. They can also add color and texture and help to purify the air, making them both aesthetically pleasing and practical. And by the way, both cactus and fern are so easy to take care of. We strongly recommend them.

With D5 Render's vast asset library of plants, including a variety of cacti and ferns, designers can easily add these elements to their interior designs with just a few clicks. Plus, with D5's hyper-realistic rendering capabilities, the plants will look just like the real thing, adding an extra layer of authenticity to any design.

Conclusion

In conclusion, modern Mexican interior design is a perfect blend of traditional Mexican elements with contemporary design styles. By incorporating bold color palettes, natural materials, handcrafted furniture, and unique accessories, designers can create a warm and inviting living space that is both visually stunning and functional. So, if you're looking to add a touch of elegance to your home, consider exploring the beauty of modern Mexican interior design.

And with D5 Render, bringing your modern Mexican interior design to life has never been easier. With its lightning-fast rendering speeds and high-quality output, you can see your vision come to life in stunning detail. With D5 Render’s light library, you can experiment with thousands of options. Plus, D5 Render's compatibility with external resources and materials means that you can incorporate even more unique and authentic elements into your designs. Don't settle for a mediocre visualization of your design, choose D5 Render and experience the beauty of modern Mexican interior design like never before.

D5 Render Free Download

Quixel Bridge to D5 Render workflow for architecture designers

Quixel Bridge is a powerful asset management tool designed for 3D artists and designers. With Quixel Bridge, you can easily access a vast library of over 11,000 assets, including photorealistic scans, PBR materials, and 3D models, all of which are carefully curated and optimized for real-time rendering.

A real-time rendering tool, like D5 Render, allows you to make changes to your scene on the fly, which means you can see designs visualized and improved before they are exported.

The integration of D5 with Quixel Bridge provides designers and 3d artists with a powerful toolset to visualize their projects quickly and efficiently.

Still struggle to find high-quality 3d assets within a short design period? You should try the Quixel-D5 Render workflow!

Artist: KJJ | D5 Render


Time-and-energy efficient workflow for designers

Nowadays, architectural, interior or landscape designers have a higher demand for realistic real-time visualizations to make informed decisions about the design and test different options before committing to a final design.

In this process, designers will need tons of materials, models or other assets to complete a scene within a very short time. Luckily, Quixel Bridge, one of the largest 3d asset libraries, simplifies the process of finding, importing, and organizing high-quality 3D assets.

Together with D5 Render, a free real-time rendering tool, Quixel Bridge speeds up the scene building for designers so that they can focus more on their creations. As D5 Render also has a built-in asset library that has over 10,000 models, materials and particles, you will no longer need to rummage through the Internet to collect assets.

Free Download D5 Render

Animation with the dynamic assets in Quixel Bridge and D5 Asset Library

Animation is an essential tool for architectural designers to bring their designs to life and create engaging visualizations. When used together with animated assets, such as people, cars, and plants, it can add an extra layer of realism and immersion to the visualization. The high-quality dynamic assets from Quixel Bridge and D5 Asset Library will take your animations up a notch.

Unlike other real-time rendering software that has a obvious inconsistency between preview and output, the real-time raytracing solution of D5 Render enables designers to have a precise preview of how the animation will look, saving time for review after render.

Seamless integration with Quixel Bridge

D5 Render has a Quixel-D5 conversion tool that allows users to convert Quixel assets (.fbx) into D5 format (.d5a), complete with texture maps.

This tool streamlines the workflow between Quixel and D5 Render, making it easy to import high-quality assets into your visualizations.

Download the Quixel-D5 tool

The converted Quixel assets can then be imported into D5 Render, where users can further customize their materials.

Free Download D5 Render

12 Japandi Living Room Design ideas for 2023

Japandi style is a fusion of Japanese and Scandinavian interior design that has gained immense popularity in recent years. It is the perfect blend of the minimalist and functional aesthetic of Scandinavian design with the traditional and natural elements of Japanese design. 

Anas Archviz | D5 Render

In this article, we will explore 12 Japandi living room design ideas that will inspire you to create a serene and harmonious space in your home.

What is Japandi Interior Design?

Japandi style interior design is a combination of two design styles – Japanese and Scandinavian. Japanese interior design emphasizes the use of natural materials, earthy tones, and a connection to nature. Scandinavian design, on the other hand, is characterized by simplicity, functionality, and minimalism. Japandi style combines these two styles to create a harmonious and peaceful space that is both functional and beautiful.

12 Japandi Living Room Design Ideas

1.Use Neutral Colors: Japandi style emphasizes neutral colors such as beige, white, and grey. These colors create a calming and serene atmosphere in the living room.

Nicolas Gaspar | D5 Render

The Material Editor in D5 Render allows you to select a material from the library and modify its properties, including color, texture, and other attributes. To change the color of a material, you can simply select the material from the library and then adjust the color settings in the Material Editor. 

2.Incorporate Wood: Wood is a crucial element of Japandi living room interior design. Use light-colored wood for flooring or furniture to create a natural and warm feel in the living room.

Nicolas Gaspar | D5 Render

3.Set up room divider: A room divider can be a great addition to a Japandi living room, as it adds visual interest and can create a sense of separation without closing off the space completely. Consider using a simple wooden screen or a Japanese-style shoji screen to divide the room while still maintaining a cohesive design aesthetic.

17 Amateur

4.Add Japanese-inspired Decor: Japanese-inspired decor, such as a shoji screen(as mentioned just now) or a tatami mat, adds an authentic touch to your Japandi living room. Incorporate a traditional Japanese shoji screen to create separation between the living room and other areas of the house.

Salgado ArchViz | D5 Render

5.Use Natural Light: One of the key elements of Japandi living room interior design is the use of natural light. To maximize natural light in your living room, consider using light curtains or blinds that allow sunlight to filter through while providing privacy. 

HaoDuoyu

D5 Render's geographic sun feature can simulate the angle and intensity of natural light at different times of day, allowing you to experiment with different lighting scenarios before making any changes to your living room. 

In addition, paper lanterns are a simple and affordable way to add soft lighting to your living room while adding a decorative touch. With D5 Render's PBR materials, you can accurately visualize the way light interacts with different surfaces and textures in your living room, giving you a more realistic idea of how your space will look and feel.

March

6.Create a Reading Nook: Japandi living rooms are all about relaxation and comfort. Create a cozy reading nook with a comfortable chair, soft lighting, and a stack of books.

Nicolas Gaspar | D5 Render

7.Keep it clutter-free: Japandi living room interior design is all about simplicity and minimalism. Keep your living room clutter-free and only add items that serve a purpose.

8.Incorporate panelling: Japandi style emphasizes natural materials, and paneling is a perfect way to add texture and warmth to your living room walls. Consider using wood or bamboo paneling to create a feature wall or to cover an entire room. This technique can be especially effective in large living rooms or open-plan spaces. The paneling can also serve as a backdrop for your furniture and decor, creating a cohesive and harmonious space.

Wonkz Wong

And with the help of D5 Render's PBR materials, the natural texture of the wood or bamboo paneling can be highlighted and enhanced. PBR, or physically based rendering, allows for a more accurate representation of materials in 3D rendering, including how light interacts with them. This means that the wood or bamboo paneling in your living room can look even more realistic, with its unique grain patterns and texture shining through. With the use of PBR materials, your Japandi living room can achieve an even more authentic and inviting feel.

9.Incorporate Textures: Incorporating textures into a Japandi living room is a great way to add depth and warmth to the space. As mentioned earlier, panelling is a fantastic way to incorporate natural wood texture into the room. To add even more texture, consider adding a woven rug or a knit throw blanket to the space. These elements not only add visual interest to the room but also create a sense of coziness and comfort. Textures can also be incorporated through the use of cushions, curtains, and other soft furnishings. Don't be afraid to mix and match textures to create a dynamic and inviting living room.

Wonkz Wong

10.Mix and Match Furniture: Japandi design encourages the use of different furniture styles. Mix and match pieces to create a unique and eclectic look. However, in general, Rounded furniture pieces, like a curved sofa or circular coffee table, can soften the sharp edges of a Japandi living room and create a cozy atmosphere.Tatami mats are traditional Japanese flooring mats that can add a touch of authenticity to your Japandi living room. 

lukes | D5 Render

11.Add Plants: Plants are a crucial element of Japandi design. Incorporate plants in your living room to add a natural and organic touch to the space. Choose easy-to-care-for plants like succulents or snake plants.

Foreverlove | D5 Render

12.Incorporate art: Japandi living room design incorporates art with a minimalist and simple style. Consider using black and white photographs, paintings, or sculptures to add visual interest.

LJF

Conclusion

In conclusion, Japandi living room design is a beautiful blend of Japanese and Scandinavian design that creates a calm and serene atmosphere in your home. With these 12 Japandi living room design ideas, you can create a peaceful and harmonious space that you'll love spending time in.

Don't forget to use D5 Render for visualizing your Japandi living room design and bringing your ideas to life!

Free Download D5 Render

10 Modern Coastal Interior Design Ideas for Tranquil Home in 2023

Embrace the beauty of the seaside with these 10 modern coastal interior design ideas that will transport you straight to the beach. Imagine the salty breeze, the sound of crashing waves, and the warmth of the sun as you infuse your home with the calm and relaxed atmosphere of coastal living. From nautical accents to natural textures, these design ideas will inspire you to create a tranquil sanctuary that reflects your personal style. So, let's dive in and explore the endless possibilities of coastal interior design!

What is Coastal interior design?

Coastal interior design evokes the essence of the seaside, inviting the tranquility of the ocean into your home. By utilizing a soothing color palette, natural textures, and nautical accents, you can transform any space into a serene coastal haven. With the addition of greenery and other organic elements, this style can transport you to the beach even when you're miles away.

1.Embrace Neutral Colors

Coastal interior design is all about using a neutral color palette. Whites, beige, light blues, and greens are great colors to use in your home, especially for modern coastal interior design. These colors create a calm and serene atmosphere and make your space feel light and airy. 

2M Design Lab | D5 Render

By using D5 Render, you can create stunning visualizations of your modern coastal interior design ideas. The software's advanced rendering capabilities allow you to experiment with different color palettes and visualize the effects of different lighting conditions on your space. By incorporating neutral colors like whites, beige, and light blues, you can create a calming and inviting atmosphere that's perfect for coastal living. With D5 Render, you can bring your vision to life and create a truly immersive and engaging visual experience for your clients or potential buyers.


2.Incorporate Natural Materials

To enhance the coastal vibe in your home, it's essential to use natural materials like wood, rattan, and linen. These materials bring a sense of warmth and texture to your space, and they work well with the neutral color palette.

Marfurt 3D | D5 Render

3.Use Blue Accents
Blue is the color of the sea, and it's a great color to use in your coastal interior design. You can use blue accents like throw pillows, curtains, or even a blue accent wall to add a pop of color and bring the ocean into your home.

Óscar Hernández Haro | D5 Render

4.Add Some Plants

Plants are a great way to bring life and energy to your coastal interior design. They add a touch of greenery and freshness to your space, and they can help purify the air. Some great plants to consider include succulents, ferns, and palms.

Filip Lekawski | D5 Render


D5 Render's asset library offers a wide range of 3D plant models that can be easily integrated into your design, allowing you to visualize the perfect placement and arrangement of plants in your living space. Succulents, ferns, and palms are great options that not only add a touch of greenery but also purify the air and provide a refreshing atmosphere.


5.Incorporate Nautical Elements

Nautical elements like rope, anchors, and ship wheels can add a touch of whimsy to your coastal interior design. These elements bring a sense of adventure and playfulness to your space, and they can be incorporated in small details like throw pillows or wall art. In modern coastal interior design, a wide window that lets all the sunlight come in is a perfect element as well.

Filip Lekawski | D5 Render


6.Use Sheer Curtains

Sheer curtains are a great way to let in natural light and create a breezy, beachy atmosphere in your home. They're perfect for living rooms or bedrooms, and they work well with the neutral color palette. On daytime, simply let all the natural light come in is a good idea.


7.Create a Beachy Vignette

A beachy vignette is a small arrangement of items that evoke the feeling of the beach. This could be a collection of seashells, a jar of sand, or even a small piece of driftwood. Creating a beachy vignette is an easy and affordable way to add some coastal charm to your home.
Although these items are very easy to get your hands on, they can still have unexpected decorative effects.

2M Design Lab

8.Mix and Match Patterns

Mixing and matching patterns is a great way to add some visual interest to your coastal interior design. Stripes, florals, panels and even animal prints can be used in your space to add some texture and depth.

 Nicolas Gaspar | D5 Render

9.Use Woven Textures

Think about the case that you live in a decent resort in Bali Indonesia, woven furniture are very popular items that coastal interior design resorts like to use in their balconies. No doubt, woven textures like rattan or wicker are great materials to use in your coastal interior design. They add a touch of texture and warmth to your space, and they're perfect for chairs, coffee tables, or even wall art.

Victor B. Ortiz | Architecture

10.Add Some Art

Bring your coastal interior design to life by incorporating art that speaks to you. Choose paintings or prints that capture the essence of the sea, from breathtaking seascapes to abstract pieces that evoke the ocean's rhythmic ebb and flow. Each piece of artwork adds a unique touch of color and personality to your space, allowing you to showcase your individual style and tastes. Don't be afraid to explore different options beyond what we've suggested. The possibilities are endless, and the right piece of art can truly elevate your coastal interior design.

CYC | D5 Render

Conclusion:

Coastal interior design is a style that's perfect for anyone who wants to create a relaxing and tranquil atmosphere in their home. By using a neutral color palette, natural materials, blue accents, and incorporating nautical elements, you can create a space that's both peaceful and stylish. Remember to use plants and textures to add warmth and dimension to the space. Don't be afraid to mix and match different coastal elements to create a unique and personalized look. Whether you live near the beach or just want to bring a touch of coastal charm into your home, this style can be easily achieved with a few simple design techniques. By following the tips and ideas outlined in this article, you can transform your home into a coastal oasis that you'll love coming home to. Hope you like it.

D5 Render's asset library can help bring your coastal interior design vision to life. With a wide range of textures, furniture, and decor items available, you can easily create a 3D rendering of your design before implementing it in your home. D5 Render's photorealistic renders will allow you to visualize your space and make any necessary changes before committing to a design. So why not give it a try and see how D5 Render can help you create the coastal interior design of your dreams.

Free Download D5 Render

10 Japandi Bedroom Interior Design Trends You Need to Know in 2023

Are you looking for a Japandi bedroom design that combines the simplicity and elegance of Japanese aesthetics with the cozy and warm elements of Scandinavian design? Look no further than Japandi interior design. This hybrid style is gaining popularity for its minimalistic and calming approach to bedroom decor. 

In this article, we'll explore 10 Japandi interior design ideas for your japandi bedroom that will help you create a serene and cozy retreat in your home.


What exactly is japandi interior design?

Japandi interior design is a fusion of two styles: Japanese and Scandinavian. It marries the simplicity and elegance of Scandinavian design with the minimalism and natural materials of Japanese design. Japandi interiors feature a neutral color palette, clean lines, and natural textures such as wood, bamboo, and rattan. It embraces the concept of wabi-sabi, finding beauty in imperfection and simplicity, and incorporates elements of nature to create a peaceful and serene environment. Japandi bedroom is not only aesthetically pleasing but also promotes a minimalist and sustainable lifestyle. It gained popularity particularly in countries such as the United States, Canada, Australia, and many European countries.

Salgado ArchViz | D5 Render

1.Minimalistic Color Palette

Very unlike the bold color postmodern interior design likes to use, one of the key elements of Japandi interior design is the use of a minimalistic color palette, especially for a Japandi bedroom. Stick to neutral shades like beige, white, and grey, with subtle pops of color like muted greens or blues. These colors help create a calm and serene atmosphere.

Manuelemossoni 

2.Natural Materials

Japandi bedroom interior design also incorporates natural materials like wood, bamboo, and linen. These materials add warmth and texture to the room, while also bringing in elements of nature. Use a wooden headboard, bamboo blinds, or linen bedding to create a cozy and inviting space.

Rice Noodle | D5 Render

A minimalistic color palette and natural materials both are hallmarks of this style, and D5 Render can help you achieve it effortlessly. By using their extensive collection of PBR materials, you can choose the perfect shades of beige, white, and grey, and combine natural materials, creating a soothing and tranquil atmosphere in your bedroom. 

3.Clean Lines

Simplicity is a major aspect of Japandi bedroom interior design. Clean lines and simple forms are used in furniture and decor to create a streamlined and clutter-free space. Choose furniture pieces with straight lines and avoid ornate details or intricate patterns.

Andrew | D5 Render

4.Low Furniture

Japandi interior design often uses low furniture pieces like platform beds and low-profile nightstands. These pieces not only create a cozy and intimate atmosphere but also add to the minimalist aesthetic.

AOI SUIKA Studio 

D5 Render offers a vast library of 3D models that can help bring your Japandi bedroom interior design to life. By incorporating low-profile furniture pieces from the asset library, you can easily experiment with different layouts and styles until you find the perfect balance of minimalism and comfort. 

5.Warm Lighting

The right lighting can make all the difference in creating a calming and relaxing atmosphere in your Japandi bedroom. Use warm-toned lighting like soft yellow or warm white bulbs to create a cozy ambiance.

Georgemelkadze 

By utilizing D5 Render's high dynamic range imaging (HDRI) and geographic sun features, you can create a realistic lighting environment for your Japandi bedroom interior design. The HDRI technology allows for accurate lighting and reflections, while the geographic sun feature simulates the position and angle of the sun based on your location. This ensures that your bedroom will have the perfect lighting to create a soothing and comfortable atmosphere.

6.Simple Wall Decor

Wall decor in Japandi interior design is kept simple and minimalistic. Hang a few pieces of artwork or a single tapestry to add some visual interest to the room, but avoid cluttering the walls with too many items.

Georgemelkadze 

7.Greenery

Bringing in plants is a great way to add a touch of nature to your Japandi bedroom. Choose low-maintenance plants like snake plants or a bonsai tree to add some greenery without overwhelming the room.

With D5’s asset library, you can try out different option before you make your decision.

8.Japanese-Inspired Textiles

Japandi bedroom interior design often incorporates Japanese-inspired textiles like shibori or indigo-dyed fabrics. Use these textiles in your bedding, curtains, or throw pillows to add some visual interest and texture to the room.

9.Scandinavian-Inspired Rugs

A cozy rug is a must-have for any Japandi bedroom. Look for a simple, Scandinavian-inspired rug in neutral colors to add warmth and texture to the room.

Óscar Hernández

10.Minimalistic Accessories

When it comes to accessories in Japandi bedroom interior design, less is more. Stick to a few key pieces like a vase or a small sculpture to add some personality to the space without cluttering it.

Pro Estudio Perú - Santiago Nieto 

Conclusion

In conclusion, Japandi interior design is the perfect choice for anyone looking to create a serene and cozy retreat in their home. With a focus on minimalism, natural materials, and clean lines, Japandi bedroom design is both calming and inviting. Incorporating these 10 Japandi bedroom interior design ideas into your space will help you create the perfect environment for rest and relaxation.

Note: D5 Render can help you visualize your Japandi bedroom interior design with its extensive library of 3D models and materials. Try it out to see how your ideas will look in real life! Plus, it’s completely free-to-use.

Free Download D5 Render

7 ideas of Postmodern Interior Design in 2023

You must have heard of postmodern interior design from somewhere and its definition might be vague for you. You must have seen many completely different interior design styles that claim to be “Postmodern interior design.” You might just wonder what exactly is postmodern and how I can incorporate them into my house.

Grzzech | D5 Render

No worries. In this article, we'll explain what is postmodern interior design and explore the key characteristics of postmodern interior design and provide you with tips on how to incorporate this style into your own home.

What is postmodern interior design

Postmodern interior design is a style that is constantly evolving and changing. It is a design movement that emerged in the late 20th century and continues to inspire designers and architects today. This style is known for its eclectic mix of materials, textures, and colors, and its emphasis on individuality and creativity. It values individualism, irony, and self-awareness, making it a unique and dynamic style that challenges traditional design norms.

If you're interested in incorporating postmodern interior design into your home, there are a few key elements that you should keep in mind. Keep reading.

Key characteristics

1. Bold Color Palettes

Postmodern interior design is known for its use of bold and vibrant colors. Designers often incorporate bright hues like fuchsia, turquoise, and chartreuse into their designs, as well as metallics like gold and silver.

Filip Lekawski | D5 Render

2. Geometric Shapes and Patterns

Geometric shapes and patterns are another hallmark of postmodern interior design. From triangular bookshelves to hexagonal coffee tables, these shapes add visual interest and depth to a room.

Thierry Tutin | D5 Render 

D5 Render's asset library can provide an extensive range of 3D models with geometric shapes, such as hexagonal tables, triangular shelves, and other unique designs, perfect for incorporating postmodern interior design into your home. With a vast collection of assets at your disposal, you can mix and match shapes to create a unique and visually striking interior that perfectly reflects your style.

Post-modern furniture from D5 Render

3. Mix of Materials

Postmodern interior design is all about mixing and matching different materials to create a unique look. You might see a leather sofa paired with a Lucite coffee table or a metal chair next to a wooden bookcase.

Anas Shinati 

4. Eclectic mix of styles

Postmodern interior design often incorporates elements from a wide range of design styles, from mid-century modern to industrial to bohemian. This eclectic approach allows for a sense of personalization and individuality within a space.

Victor B. Ortiz Architecture | D5 Render

5. Playful Shapes and Forms

Postmodern interior design often incorporates playful shapes and forms. You might see a chair that looks like a hand or a lamp that resembles a birdcage. These whimsical touches add a sense of fun and playfulness to a room.

AOI SUIKA Studio | D5 Render

6. Sustainability

Sustainability is becoming an increasingly important consideration in postmodern interior design. Many designers are incorporating eco-friendly materials and practices into their work, such as reclaimed wood and energy-efficient lighting.

Davidmeagher96 | D5 Render 

With D5 Render's PBR material feature, designers can take their sustainability efforts even further by utilizing textures that simulate eco-friendly materials like bamboo and recycled glass. These materials not only look great in a postmodern design, but they also contribute to a more sustainable and environmentally conscious home. By incorporating these materials and utilizing D5 Render's PBR feature, designers can make it not only look amazing but also make a positive impact on the planet.

7. Minimalism and Maximalism

Postmodern design is not tied to a single style or aesthetic, and often incorporates both minimal and maximal elements. Minimalism can be incorporated through clean lines and simple forms, while maximalism can be achieved through the use of bold colors, patterns, and textures. To create this balance in your home, consider incorporating a mix of minimalist and maximalist pieces.

F-light | D5 Render

Conclusion

By experimenting with bold colors, geometric shapes, and a mix of materials, incorporating postmodern interior design into your home can be a fun and rewarding experience. 

The best cost-effective way to do it is to do it with D5 render. With features like advanced lighting, material editing, and asset library, D5 Render makes it easy to create the perfect postmodern interior design for your home. Plus, D5 Render is completely free-to-use.


Last, you should always remember that postmodern design encourages individuals to express their unique style and personality through their interior design choices. 

Free Download D5 Render

How to Render in SketchUp Tips 101: From Beginner to Pro in Stunning Visuals

SketchUp is a popular 3D modeling software widely used by architects, designers, and engineers. It is known for its intuitive interface, ease of use, and versatility. However, SketchUp users probably often look for an equally handy rendering tool to work with it.

SketchUp lacks support for advanced lighting and material effects, making it difficult to create realistic visuals in SketchUp. It can be a drawback for architects and designers looking to showcase their designs to clients or colleagues.

While third-party plugins can produce high-quality renders, they can be expensive and require a significant amount of time and expertise to use effectively.

Therefore, we want to offer a time-and-energy efficient visualization solution for architects and designers: real-time ray-tracing rendering, which underlies rendering programs like D5 Render.

Here’s an ultimate guide for you to grasp real-time rendering for SketchUp in a very short time.

Artist: Adhitya | SketchUp + D5 Render


The Best Free Realtime Rendering Tool

  • Free live-sync plugin D5 Converter for SketchUp to sync models, materials and lights to D5 in real time
  • Built-in D5 Asset Library with over 10,000 models and materials
  • Smooth modeling operation in SketchUp with no lagging

Fast and Free Animation Output

Material

Lighting

Interior Design and Rendering

Architectural Design and Visualization

Time-saving Asset Tools

  • One-click hedge filling tool


Free Download D5 Render

SketchUp-D5 Render Showcase

Artist: Rifan Ridwana | SketchUp + D5 Render
Artist: Niel John Salgado
Artist: Gui Giovanoni Gomes

12 Interior Wall Design Ideas to Try in 2023

The walls of a room are like a blank canvas waiting to be transformed into a work of art. With the right design, color, and texture, they can set the tone for the entire space. Whether you're looking to create a cozy atmosphere or a bold statement, there are endless possibilities for interior wall design. In this article, we'll explore 12 interior wall design styles and ideas to elevate your space.

  1. Accent Wall

The first interior wall design idea is accent wall. An accent wall is a great way to add depth and interest to a room. Choose a bold color or texture that contrasts with the other walls in the space. This could be a vibrant red or a textured brick. Not only does it create a focal point, but it also adds dimension to the room.

Artist: Grzzech | Blender + D5 Render
  1. Wallpaper

Wallpaper is back and better than ever. With endless patterns and designs, it's a great way to add personality to a room. Choose a bold floral print for a feminine touch or a geometric design for a modern look. The best part? It's easy to switch up if you ever want a change.

Artist: spotlight-studio | 3ds Max + D5 Render
  1. Textured Paint

For a more subtle approach, textured paint can add depth and interest to a room without overwhelming it. Choose a paint with a slightly gritty texture or add sand to your paint for a more rustic look. The texture will catch the light in a unique way, giving the walls a natural, organic feel. This interior wall design is best for covering minor imperfections and blemishes. However, we should note that while textured paint can absorb some humidity, it may not be the best option for areas that are prone to high levels of moisture.

Artist: Victor B. Ortiz Architecture | D5 Render

  1. Wood Paneling

Wood paneling is a classic interior wall design element that adds warmth and texture to a space. Whether you choose a natural finish or paint it a bold color, it can add a touch of elegance to any room. It's especially popular in living rooms and dining rooms.

Artist: Jimmy3D | D5 Render
  1. Shiplap

Shiplap has become a popular interior wall design element in recent years. It's a type of wooden board that overlaps, creating a distinctive horizontal pattern. It's often painted white and used in rustic or coastal-inspired spaces.

Artist: Vinicious Andrade | D5 Render
  1. Molding

Molding is a timeless design element that adds architectural interest to a room. Whether you choose a simple crown molding or a more elaborate design, it can elevate the look of any space. It's especially popular in formal dining rooms and bedrooms.

Artist: BJ | 3ds Max + D5 Render
  1. Stone Accents

Stone accents can add a touch of rustic charm to a room. Whether you choose a natural stone wall or a faux stone accent, it adds texture and interest to the space. This interior wall design idea is especially popular in kitchens and living rooms.

Artist: Jimmy3D | D5 Render
  1. Murals

Murals are a great way to add a unique touch to a room. Whether you choose a hand-painted mural or a wallpaper mural, it can add personality and interest to a space. Choose a scene that reflects your personality or interests. Choose some timeless design wisely for murals. 

Artist: SINE DESIGN | SketchUp + D5 Render
  1. Gallery Wall

A gallery wall is a great way to display artwork and photos in a cohesive way. Choose a variety of frames and sizes for a more eclectic look or stick to a uniform design for a more streamlined look. It's a great way to add personality to a space.

Artist: Jimmy3D | SketchUp + D5 Render
  1. Ombre Walls

Ombre, which means "shaded" in French, is a mesmerizing painting technique that gradually blends one color into another. This incredible wall design adds a touch of creativity and personality to any space, whether you choose soft pastel shades for a calming effect or bold, vibrant colors for a dramatic statement. The result is a mesmerizing effect that catches the eye and elevates the entire atmosphere of the room.

Artist: VISION | SketchUp + D5 Render
  1. Wainscoting

Wainscoting is a decorative wood paneling that is often used in formal dining rooms or hallways. It typically covers the bottom third of the wall and can be painted in a variety of colors. It adds an elegant and timeless touch to any space.

Artist: XBC, West Wind, JY | SketchUp + D5 Render
  1. 3D Wall Panels

3D wall panels are a modern way to add texture and depth to a room. They come in a variety of designs and materials, from wood to plastic to metal. They're especially popular in contemporary and minimalist spaces.

Artist: Luan Arkitet | D5 Render

Conclusion

In addition to the 12 styles and ideas for interior wall design, it's important to consider how the final product will look in your space. One tool that can help with this is D5 Render, a 3D visualization software that allows you to see your design in a realistic way.

D5 Render's free-to-use platform means you can try out different designs without any financial commitment. Its PBR materials and asset library make it easy to find the right textures and finishes for your project. With its user-friendly interface, you can quickly experiment with different lighting conditions, camera angles, and other settings to create the perfect look for your space.

By using D5 Render, you can visualize your design in 3D and get a realistic preview of how your walls will look before you make any permanent changes. You can experiment with different color schemes, textures, and finishes to find the perfect fit for your space, and see how it will look at different times of day or under different lighting conditions.

So if you want to bring your interior wall design ideas to life, try D5 Render today. It's a powerful tool that can help you create the perfect look for your space and ensure you'll love the final product.

Free Download D5 Render

Refreshing Interior Design: How D5 Render Accelerates the Work Process

Amila Sithara, who emerged in the "renderedwithd5 - Happy Holidays" event

📍Colombo Sri Lanka

  • Freelancer of 3D animation and visualization
  • Once a consultant on 3D animation at college

Amila has been captivated by the charm of 3D visualization since studenthood. After getting a diploma in 3D Animation and Multimedia at college, he gained valuable experience at various construction companies and architectural firms.

"I have always had a keen interest in 3D creation and is constantly improving my skills in the field. It was through my research that I stumbled upon D5 Render, which interested me a lot. Upon recommendation from my company’s head architect, I began studying D5 Render and completed my first project using D5 in January 2021."

Behind the Scene

"My project aimed to create a warm and welcoming living room for all family members to gather during the Christmas season. The theme of the room is centered around the concept of home, with decorations, gifts, and preparations for the holiday creating a space of joy, laughter, and love. "


The built-in D5 Asset Library of D5 Render played a significant role in making this design a success. Most of the models used in this project are from the D5 Asset Library. The animated models, such as the crystal ball and the pumpkin coach ornament, were useful for creating close-up frames that highlighted essential details in the design.


Lighting is Amila's favourite aspect of 3D creations because it connects all the moments and emotions together. Lighting, especially warm lighting, can evoke a feeling of comfort without changing the surroundings.

"With D5, I was able to efficiently control the sunlight and balance the necessary light settings."

The optimized GI of D5 Render 2.4 powered by real-time raytracing further enhances convenience.


Render Showcase

One of the primary reasons that I chose D5 Render as my rendering engine is to save time.

The program has a very user-friendly interface, making it easy to learn without the need for extensive training. As a result, I have been able to complete projects that would have taken several weeks in a couple of days.


No description available.

Additionally, D5 Render provides a variety of unique materials, models, and particles (animated 3D components), making it easier to create highly realistic design renders.

Free Download D5 Render

7 Low Budget Small Cafe Interior Design Ideas to Transform Your Space for 2023

The interior design of a small cafe can make or break the customer experience. It needs to be visually appealing, functional, and cost-effective, especially when operating on a low budget. Designing a small cafe with a limited budget can be challenging, but there are creative ways to make the most of the space without compromising the overall look and feel. In this article, we'll explore some low budget small cafe interior design ideas that can help you transform your space and make it stand out.

Keep It Simple and Functional

One of the most effective ways to make the most of a low budget small cafe interior design is to keep the design simple and functional. Avoid cluttering the space with too many decorations or furniture items, as it can make the cafe feel cramped and unwelcoming. Instead, opt for a minimalist approach that highlights the unique features of your cafe. Focus on incorporating simple yet stylish furniture and accessories that complement the overall design.

Artist: Chae with D5 Render

When choosing furniture and accessories, think about the functionality of the space. Consider what customers will need and how they'll move through the cafe. For example, if you're serving food, you'll need tables and chairs that can accommodate dishes and utensils. Check out this kind of table.

Utilise Natural Light

Maximizing natural light is a great way to create an airy and spacious feel in a Low budget small cafe interior design. Large windows or skylights can let in plenty of natural light, creating a warm and inviting atmosphere. If your cafe doesn't have many windows, you can still use mirrors to reflect light and make the space appear larger.

Artist: BKsama with D5 Render

Using natural light not only makes your cafe look more inviting, but it can also reduce your energy costs. By relying on natural light during the day, you can save on electricity and create a more eco-friendly space.

Artist: BKsama with D5 Render

To take it a step further, you can also try D5 Render's geographic sun and HDRI features, you can easily experiment with different lighting scenarios and find the perfect balance for your cafe. The geographic sun feature allows you to simulate the position of the sun at any given time of day, giving you precise control over the lighting in your cafe. Additionally, the HDRI feature allows you to use high-quality images to create realistic lighting environments, making your cafe feel like it's located in a particular setting or environment. By incorporating these features into your design process, you can create a space that feels warm, inviting, and perfectly suited to your brand and style.

D5 Render Geo & Sky system

Incorporate Color

Color is an essential aspect of interior design that can make a significant impact on the ambiance of a space. When choosing colors for your low budget small cafe interior design, consider the psychological effects of different colors and how they can influence customers. Warm colors like red, orange, and yellow can create a cozy and welcoming atmosphere, while cool colors like blue and green can evoke a sense of calm and relaxation.

Artist: Zerolune with D5 Render

Using color doesn't have to be expensive. You can incorporate color into your cafe through paint, artwork, and accessories like pillows and tablecloths. Don't be afraid to mix and match colors to create a unique and vibrant look.

Artist: Zerolune with D5 Render

Bring in Nature

Incorporating natural elements like plants and greenery into your cafe's design can add a touch of warmth and vibrancy to the space. Plants not only enhance the aesthetic appeal of your cafe but also have several health benefits. They can purify the air, reduce stress, and improve the overall mood of customers.

Artist: D5 Creative

There are many ways to incorporate plants into your cafe, even if you don't have much space. Hanging plants, potted plants, and wall-mounted planters are all great options. You can also choose low-maintenance plants like succulents or herbs that are easy to care for and add a pleasant scent to the space.

With D5 Render, you can make it easier. D5 Render offers a wide selection of plant elements that you can use to enhance your cafe's design. From small potted plants to large trees, these elements can help create a lush and inviting environment. By integrating D5 Render's plant elements into your design, you can experiment with different plant arrangements and find the perfect combination for your space.

Plant models in the D5 Asset Library

Create a Focal Point

A focal point is a design element that draws the eye and creates a visual center in your cafe. It can be a piece of art, a unique light fixture, or a statement wall. By creating a focal point, you can add visual interest to your cafe and make it more memorable for customers.

Choose a focal point that reflects the theme and style of your cafe. For example, if you're creating a cozy reading look, a bookshelf or artwork related to literature could be an excellent focal point. 

Artist: DIFOCA GROUP ARCH with D5 Render

If you're creating a modern space, a unique light fixture or a striking piece of artwork can make a bold statement. Whatever focal point you choose, make sure it's positioned in a way that draws the eye and enhances the overall ambiance of the cafe.

Use Creative Lighting

Lighting is an essential aspect of cafe interior design that can make a significant impact on the mood and ambiance of your cafe. Creative lighting can add depth and dimension to a small space, making it feel larger and more welcoming. There are many ways to use lighting to enhance your cafe's design.

Artist: Yoga Binhar with D5 Render

For example, you can use pendant lights to create a warm and intimate atmosphere over tables. You can also use track lighting to highlight certain areas of the cafe, such as the bar or counter. 

Another option is to use candles or lanterns to create a cozy and romantic ambiance. Be creative with your lighting choices, and don't be afraid to mix and match different types of fixtures.

By using D5 Render's ray tracing technology, you can create realistic lighting effects that mimic natural light, allowing you to experiment with different lighting scenarios and find the perfect balance for your cafe. This feature allows you to adjust the color temperature, shadows, and reflections, creating a unique and personalized lighting design for your cafe.

Real-time raytracing of D5 Render

Incorporate Textures and Patterns

Textures and patterns can add depth and interest to a small space, making it feel more dynamic and inviting. You can incorporate textures and patterns into your cafe's design through furniture, accessories, and even wall coverings. For example, you can use patterned wallpaper to create an accent wall or add textured throw pillows to your seating areas.

When choosing patterns and textures, consider the overall theme and style of your cafe. You can mix and match patterns and textures to create a unique and eclectic look or stick to a more cohesive theme. Just be sure to balance the use of patterns and textures so that they don't overwhelm the space.

Artist: Bruno Clemente with D5 Render

With D5 Render's PBR material feature, you can choose from a wide range of materials, including wood, stone, metal, and fabric. These materials are created using physically based rendering (PBR) technology, which accurately simulates the behavior of light and materials in the real world. This feature allows you to experiment with different textures and materials, creating a unique and personalized design for your cafe.

PRB materials in the D5 Asset Library

Conclusion

In conclusion, designing a low budget small cafe can be a daunting task, but with the right tools and techniques, it can be a fun and rewarding experience. By incorporating D5 Render's features, such as realtime raytracing, PBR materials, and plant elements, you can bring your design ideas to life and create a truly unique and personalized space. D5 Render's technology allows you to experiment with different lighting scenarios, textures, and materials, helping you to find the perfect balance for your cafe. By integrating D5 Render into your design process, you can create a space that not only looks beautiful but also functions efficiently and meets the needs of your customers. So, whether you're starting from scratch or looking to make some updates to your existing cafe, consider integrating D5 Render into your design process for a truly exceptional result.

Free Download D5 Render

Real-time raytracing close to Vray for interior design | GI, SSS and dynamic assets

We're glad to tell that the updated D5 Render 2.4 takes interior designers to a new render world, in which the brand new GI, subsurface scattering materials, dynamic assets and combination with DCC software help you work in a more efficient way.

The rendering tool we use here is D5 Render, which is a free standalone real-time rendering software.

Free Download D5 Render

D5 GI

With the new D5 GI, you only need an HDRI to light up your scene! You can get detailed shadows and sufficient lighting in deep interior spaces, which frees designers from setting artificial lights. The increased skylight bounces in D5 2.4 work particularly well to handle backlighting, solving a big challenge for interior design.

Dowload the scene for free

Let's check out this scene which uses HDRI and only 1 artificial light. Thanks to the optimized GI in D5 2.4, the natural lighting looks awesome even deep inside this space. It enhances many details, like the carpet textures and the lighting transitions.

Download the scene for free

Then we place a rectangular light by the window to add more specular details. By far, the result has looked almost as good as Corona's.

Plus, the shades which could have seemed pitch-black in other renderers are also well approached in D5 Render 2.4.

Subsurface scattering(SSS)

Subsurface scattering(SSS) materials are now supported to simulate semi-translucent objects such as jade, wax, and fruits.

It gives an object a clearer and more natural look. Take the grapes as an example. Without subsurface scattering, they look like green dates. But when turning SSS on, they become super crystal! The rendering further displays the translucency of the grapes, just like in real life.

Before

After

A collection of subsurface scattering assets are available now in the D5 Asset Library. You can find them by searching "sss".

Animated Assets in D5 Asset Library

The built-in D5 Asset Library has over 10,000 models, materials, and particles, including about 650 animated assets that can breathe life into your scene when used together with animation.

In the D5 Asset Library, check the "Dynamic only" option and select an animated ornament as you need.

This elaborate vinyl record player, for example, can help us create some touching close-up shots. You just need to create a frame on the timeline, rotate the camera, and add the second frame. Done! Is it way more convenient than what you need to do in offline renderers? Make sure to give the animated assets in D5 Render a shot!

Integration with DCC software

D5 is compatible with 3ds Max, SketchUp, Revit, Rhino, Archicad, Blender, and Cinema 4D. You can import models, scenes, lights, and materials from DCC software into D5 with its live-sync plugin D5 Converter.

Why should you do that? For one thing, D5 is capable of handling complex scenes with high-poly models, which could have caused the lagging issue in SketchUp.

For another, the ability to build a real-time rendering workflow with SketchUp and 3ds Max makes D5 a handy tool for designers to revise their projects. You can model walls, grounds, and ceilings in SketchUp and build furniture in 3ds Max.

Check the best free rendering software for SketchUp

How SketchUp landscape design benefits from real-time rendering

For a long time, we have believed that "slow and steady wins the race," which seems to imply a trade-off between speed and quality. However, as technology advances, we now have better options.

D.R. LANDSCAPE (hereafter referred to as D.R.), a team of only ten designers, completed more than 200 garden design projects in 2022. This young team earned widespread praise for its high-quality work.

D5 Render played a critical role in helping D.R. accelerate every step, from customer acquisition and design to the exhibition.

Credit: D.R. LANDSCAPE

Free Download D5 Render

01 Perfect the design with real-time rendering

At the schematic design stage, designers have to consider not only the clients' preferences but also factors like budget, environment, and space size.

The designer has to be strict about materials and plants to build a harmonious and unique look of nature.

For a long time, the preview and optimization of plants and materials requires importing extra vegetation models since there are few available in SketchUp. But designers will face issues like lagging and crash at the modeling stage, seriously affecting work efficiency.  

Proxy models may relieve the overload problem, yet their results are not convincing enough to be the final design.

Besides, clients may find it hard to tell apart the materials of stone, wood, rockery, and stream which are not lifelike in SketchUp. Designers need a more straight way to better communicate with the clients.

Having known that many interior designers preview and revise their projects with D5 Render, D.R. attempts to integrate D5 with garden design.

The built-in D5 Asset Library is hosted on the cloud. Designers can drag and drop its plant models without having to import extra ones.

The handy asset tools like brush and path make it convenient to place plants and try more vegetation combos.

The plants in the D5 Asset Library are 1:1 scale models that can help designers decide which one fits the space.

As D5 is capable of handling large scenes, you can enjoy a smooth operation even when there are many high-poly models.

The 2,000 out-of-the-box materials in D5 Asset Library, powered by real-time raytracing, also displays the garden look to clients clearly and lively.

02 Get started with ease

Now D.R. has fully shifted to D5. The user-friendliness of D5 ensures new designers can quickly output high-quality results as well.

D.R. has high requirements on project visualization including "materials, light ans shadow, and atmosphere."

With offline renderers, high quality often demands proficiency of complex parameters, which posts a challenge to new designers lacking experience.

Yet the intuitive UI of D5 Render can create realistic environment within a few clicks. For example, designers can check how the garden looks on a rainy/snowy/foggy/sunny day by switching an option on.

Previously, when the team members used to use different software, they struggled to find a standard to review the renderings.

The problem was solved after D.R. shifted to D5. Designers can speed up collaboration and share with each other the visualization skills.

A stunning effect comes in easy reach with the help of D5's advanced real-time raytracing solution.  

03 Instant and lively preview of design

After optimizing the visualization process, D.R. took a step further to apply the walkthrough animation as a demo for clients.

The animation made with D5 can breathe life into the design. Designers output impressive videos after setting keyframes and camera views, which is simple and convenient.

D.R. often shares its animations on the social media platform to attract more targeted audiences.

Besides, clients can "walk around" the garden in the D5 scene to see the details of each corner. D.R. designers prefer this virtual walk-through as they can make immediate adjustments based on the client's feedback.  

04 Epilogue

As the technology advances in leaps and bounds, "fast and furious" can also win the game if designers choose the right tool.

In the future, D5 Render will accompany designers creating more aesthetic works in an efficient and expressive way.

Free Download D5 Render

What's z-depth and how to use it

Cover image credit: Filip Lekawski

Z-depth is important to rendering images because it provides a way to calculate depth and distance in a scene, which is crucial for creating realistic lighting and shadow effects. Without z-depth, 3D graphics would appear flat and unrealistic. In addition, z-depth is used to create depth-of-field effects, which can make images look more natural and cinematic. Overall, z-depth is an essential component of the rendering process and plays a key role in creating stunning graphics.

Luckily, D5 Render includes the z-depth channel feature to help designers achieve better visual effects.

Free Download D5 Render

What's Z-Depth

Z-depth works on a grayscale value range, and the colors of points range from black to white based on their distance from the camera, with black being closest to the camera, white in the background, and gray in between.

In D5 Render, Z Depth is supported as a rendering effect for images or videos, and also as channel export. It's often used to add depth of field effect or to simulate fog.

How to use z-depth in D5 Render

1. As a rendering effect, Z Depth mode is available in Effect > Style.

You can use it together with the outline effect to create a stunning visual. For example, this image combines vignette, chromatic aberration, outline and z-depth.

2. For post-processing, you can export the z-depth channel map when rendering the image. It's worth noting that the z-depth rendering effect can be adjusted as a preview of the z-depth channel. After getting the satisfied distance of black and white points from the camera, you can switch off the z-depth rendering mode. The z-depth channel map will inherit this effect.

How to fake depth of field with z-depth in Photoshop

Take this rendering image and its z-depth channel as an example.

Rendering

Z-depth
  1. Open them in Photoshop.
  1. Select the z-depth channel with the hotkeys Ctrl+A and copy it.
  1. Create a new Channel named "Alpha-1" for the rendering and paste the z-depth info into it.
  1. Click the blank space to select the RGB channel.
  1. Select the rendering. Go to Filter>Blur>Lens Blur.
  1. Set the Source of the Depth Map information to the "Alpha 1" channel that we created in advance.
  1. The value range of the Blur Focal Distance is 0-255, which corresponds to the 0-255 color values of the Z-depth map. Objects with a Z-depth value of Blur Focal Distance will be in focus and will not appear blurry.
  1. We can increase the Iris Radius to achieve a stronger depth of field blur effect (consistent with real-life experience).
  1. Click on the Set Focal Point button and simply click on the object in the screen to define the focus, which is very intuitive and convenient.

Render Showcase

Artist: Niel John Salgado
Artist: Kiamo Izapia

Free Download D5 Render

12 tips for interior rendering from expert designers

Welcome to our article on interior render tips! Whether you're a professional interior designer or simply looking to spruce up your living space, creating a realistic and stunning interior render can take your design to the next level. In this article, we'll be sharing some expert tips and tricks to help you achieve the perfect interior render every time. So, sit back, relax, and let's dive into the world of interior design!

The rendering tool we use here is D5 Render, which is a free standalone real-time rendering software. You can give it a try, or use your own renderer.

Free Download D5 Render

Photographic Composition

Great composition can take a design from basic to breathtaking, making all the difference in the final product. In rendering, composition allows you to create a scene that is both visually appealing and realistic, drawing the viewer's eye towards the key elements of your design while maintaining a sense of balance and harmony.

  1. Use the rule of thirds

Divide your frame into thirds and place your key elements along those lines, rather than directly in the center. The composition grid of D5 Render can do a favor. You can turn it on at Display > Option.

  1. Pay attention to the field of view

The update of D5 Render 2.4 enables an automatic conversion between the field of view and the focal length. Put simply, the longer the focal length, the narrower the field of view, the less of the scene you can see.

It's better to avoid a wide field of view in interior rendering like 90 degrees, which could cause a distortion along the edge of view.

Artist: YYR | A wide FOV
Artist: YYR | A narrow FOV
  1. Consider the focal point

Choose one element of your design to be the focal point and build your composition around that. A good point is to use the depth of field which could blur the part around the focal point. This is especially helpful when you want to display a specific area or object.

Go to Camera > Depth of Field in D5 to set the effect.

The depth of field can be used in animation as well. Read this blog How to create cinematic animation in D5 Render with Depth of Field to learn more.

Interior design with D5 Render
Artist: BKsama

High-quality textures

The quality of textures can greatly impact the overall look of your interior rendering. Low-quality materials can detract from the realism especially when you need a close shot of them.

We will offer some tips to create detailed textures with the user-friendly texturing system of D5 Render.

You can also choose from over 1,000 high-quality PBR materials in D5 Asset Library including wood, wallpaper, wall paint, ground surface and many other kinds, all of which are ready-for-use.

Learn about the free textures in D5 Render

  1. A proper UV

When you stretch the UV of a texture, its format will look denser. So, make sure to give it a proper scale according to the actual condition. You can also switch on 'Triplanar' to get a smooth and continuous texture UV on an irregular-shaped object.

Triplanar Mapping
  1. Round Corner

The Round Corner option could bring an obvious rounding effect at the edge of the material, making it look more realistic.

  1. Some dirt or scratches on the surface

You can import a dirt image to the Roughness column to simulate the imperfections on the furniture surface.

Dirt maps from Quixel
The dirt on the cabinet

Proper lighting

Realistic lighting underlies the quality of rendering. With the advanced global illumination solution of D5 Render, interior designers can get a stunning lighting effect within a very short time.

HDRI

1. Choose an HDRI for the scene when you want a particular vibe for the space.

2. To quickly create an atmospheric light and shadow, place some trees outside the window, so the sun will leave a nice projection.  

Artificial lighting

1. Add a large rectangular light outside the window to cover the whole model, which can add more reflection details on the metal objects.

2. Add some strip lights in the dark corners, such as a cabinet, as accent lighting. This can make the space look more layered.

Ambient lighting
Accent lighting

Animation with dynamic models

Animation is an advanced tool for interior designers who wants to breathe life into their scenes. So, how to acquire vivid animation? We also have some recipes.

  1. Use dynamic assets in the D5 Asset Library.

  1. Use the keyframe feature to make an animation of turning on a light.

More info: Attract more audience with cinematic animation in D5 Render | Full guide on how to make one

FREE Download D5 Render

How to set realistic background for render in 1 minute

For architectural visualization, environment setting is critical because it directly tells your audiences the story of the architecture. It includes sky, weather, surrounding landscape, backdrop context and many other elements. How they interact can greatly impact the realism and quality of the final render. For example, the glass facade usually reflects the surroundings. You don't need to spend hours placing buildings around to have such a beautiful reflection. All you need is a backdrop plane from D5 Asset Library.

Artist: Tomorrow with D5 Render

Free Download D5 Render

What's backdrop plane and why 

Backdrop plane is like an entire context in one polygon. They can decorate the distant skyline, add nice glass reflections and adorn the view outside the window.

With D5 Render 2.4, new backdrop planes are updated for urban, mountainous, and wooded contexts. You can use them for architectural and interior design.

Drag and drop a backdrop plane from D5 Asset Library into the scene. With a few tweaks in a minute, you can get a stunning background for your render, which is very convenient.

Backdrop plane for architecture | Artist: Light

Backdrop plane for interior | Artist: Andrew

How to use it

After setting the foreground, go to D5 Model Library > Landscapes. Select the backdrop plane you need and import it into the scene. Scale it properly to cover the skyline. Done! That's all you need to do.

Render Showcase

Artist: Shawn

Camera setting tips must known for archviz

Architectural rendering is inextricably linked to architectural photography. Architects need to tell stories about architecture through the camera so that viewers can immersively interact with the building through imaginative. If you only display the building, without adding a human touch, the design will look cold and empty.

So, how to express your design in a warm and attractive way?

We get you some most commonly used tips for setting the camera in the rendering. It is important to note that the following tips are interrelated and can be used together to better express the language of the camera.

Here we use D5 Render, a free rendering tool, as an example.

Free Download D5 Render

1. Perspectives and Camera Heights

- The eye-level camera view: It is the most common sight used in architectural rendering, which corresponds to a camera height of 1.5m-1.8m in a rendering tool like D5 Render. This height simulates the effect of an architecture as seen by the human eye, which helps the realism of the rendering. At the same time, because this camera view displays a limited area, it helps architects save a lot of work in the process of architectural visualization as well.

- The aerial view: It refers to the view of a building taken from the air. The corresponding camera height depends on the volume of the building you need to show. Generally speaking, the higher the camera, the more surroundings will appear in the sight.

Eye-level rendering by A R C H I T I S S with D5 Render
Aerial view

High aerial view / Low aerial view

2. Field of View (FOV) and Focal Length

FOV decides how much of the scene we're seeing.

Focal length refers to the distance between the center of a lens or curved mirror and its focus.

They are both interrelated, and closely relevant to lens in the real world.FOV is directly determined by the Focal Length. The larger the Focal Length, the farther you can see, but the smaller the FOV.

Think about the telephoto lens and the wide-angle lens. The former has a long focal length and a small field of view, while the later is opposite. So, when you change one of the parameter, don't forget the other one.

Here's a table that can help you understand the relationship between the FOV and the focal length.

Take this scene created with D5 Render 2.4 for example.

Reproduction rendering of the architecture
Photography of the architecture

Download this scene for free

Free Download D5 Render

Evermotion x D5 Render 2.4 Interior Challenge | Yearly subscriptions are waiting for you!

The new version of D5 Render 2.4, which was released last week, comes with 35 updates, of which D5 Global Illumination (GI) is the most impressive one. The upgraded D5 GI not only ensures the speed of real-time rendering but also approaches the quality of offline rendering.


Lighting is made so easy for interior designers with D5 Render 2.4 because they can achieve a good lighting effect with natural light alone, without having to spend a lot of time adjusting artificial lights. With increased bounces of skylight, D5 GI brings sufficient lighting even deep inside an interior space.


Committed to helping designers effectively design high-quality projects, D5 teams up with Evermotion to hold this interior rendering challenge and sincerely invites you to experience the user-friendly workflow.

"Evermotion is a company specializing in 3D graphics and visualization. We create high-quality 3D models, textures, and visualizations for use in architectural and product design, animation, film and television, and video game development. Our products include collections of 3D models, textures, and shaders for 3D rendering and visualization. Evermotion is known for attention to detail and quality, and our products are used by professionals and hobbyists in the 3D industry worldwide."

Free download D5 Render

D5 Render 2.4 Interior Challenge x Evermotion


Prizes

Winner (x 1): 1-year D5 Pro subscription, 1-year Evermotion Newbie subscription

Runner-up (x 2): 6-month D5 Pro subscription, 1-year Evermotion Newbie subscription

Community's Choice (x 2): 1-month D5 Pro subscription

Results

1st Prize

F L O A T I N G C A P S U L E S | Anas Shinati

"A creative animation using keyframes in D5 Render to present floating furniture. Good use of D5 Model Library. Stunning lighting and texturing."


2nd Prize

The Green House | THINKK3D

"Detailed and realistic textures: glass, wood, and many more. Soothing atmosphere."


The Serenity | Salgado ArchViz

"Calm and peaceful environment. Skillful use of camera movement."


Community's Choice

Warmth in Motion | atmos visualization

The number of Facebook likes: 62


S T R I V E | Mon Cubillo

The number of Facebook likes: 62


Timeline

Submission: February 27, 2023 - April 2, 2023 at GMT 11:59 PM

Judging: April 3, 2023 - April 9, 2023

Announcement of the winning entries: April 10, 2023

Rules

Download the Challenge Kit

  • Participants need to adapt and render the provided bare model which is contained in the challenge kit.
  • There are no requirements for the style and theme of the entries.
  • Participants should use and only use D5 Render for the rendering part.
  • Submit 3 rendered images and a rendered video no shorter than 15 seconds with a minimum resolution of 1080P.

*The model file of the .skp format is also provided. Competitors can alter the model but the house structure shouldn't be changed.

Submission

1. Upload your entry video to YouTube following the rules stated below:

Video title: [The title of your work]丨D5 Render 2.4 Interior Challenge

Please include “D5 Render 2.4 Interior Challenge x Evermotion” in the description box.

2. Post your entry images on one of the following platforms:

  • Facebook with the tag #d5render2.4
  • Instagram with the tag #d5render2.4

*The winner and runner-ups will be required to submit the YouTube and Facebook/Instagram links.

Judging Criteria

1. For the jury's choice, your work will be judged by the D5 Team and the Evermotion Team from the following aspects:

  • Quality of the scene/materials
  • Knowledge/Techniques of using D5 Render
  • Concept of the work in relation to the theme of this Challenge
  • Animation and editing performance

The jury from Evermotion:

Maciej Dawidowicz

For the past eighteen years I have been involved with 3D graphics. I ran my own company for seven of those years dealing exclusively with 3D graphics. I have built over 1k projects into my portfolio. These projects are viewed internationally. I am a problem solver and multitasker. I am proud to be recognized with my team at Evermotion Company.

2. For the community's choice, your work will be awarded based on your posts’ popularity on Facebook/Instagram.

  • The post which gets the most number of likes on each platform, i.e., Facebook and Instagram, will be awarded the Community’s Choice Prize.

Note

Participants must ensure the originality and integrity of their entries, and must not infringe any legal rights such as copyrights, patents, trademarks, portrait rights, and privacy rights of others.


Plagiarism and misappropriation of other people’s works are strictly prohibited. Entries must not violate relevant laws and regulations, and participants must guarantee that the copyright of entries is not transferred to others and that the entries are not commercialized or authorized for use by others.


By submitting your entry, you agree that D5 Render can share your works on the official website and other social media platforms.

Free download D5 Render

Groundbreaking 3D Update: D5 Render 2.4 Release Note

D5 Render 2.4 Available Now: ultimate real-time rendering with a leap in effects and performance.

The latest version comes with 35 updates including the brand new D5 GI, subsurface scattering material, optimized emissive effect, path tool, and multiple frame rate options.

In this release, the D5 Asset Library is also updated with 582 new assets that include SSS models&materials, dynamic landscapes, holiday assets and backdrop planes. You can find them by searching "2.4" in D5 Asset Library.

Free Download D5 Render 2.4

1 | Rendering

D5 GI

We're proud to introduce the brand new D5 GI, the updated Global Illumination solution developed by D5 Team, which is a milestone in this release.

Applying advanced algorithms including ReSTIR and Surfel, the new D5 GI ensures your smooth and stable real-time rendering experience while providing a boost in the accuracy of lighting.

One of the biggest noticeable changes is increased bounces of skylight, which leads to sufficient lighting, even deep inside an interior space.


HDRI only: 2.3 vs. 2.4

Indirect lighting cache of high precision is supported to bring more realistic lighting transitions into the scene.

The new D5 GI retains more high-frequency details of the shadows, and tackles the problem of rendering a flat-looking scene caused by denoising.

The transmission effect of foliage is significantly improved, so that the leaves of vegetation assets will have a clearer look.

With the breakthroughs in real-time rendering effect and performance made by optimized D5 GI, the inconsistency between viewport preview and the final output is almost eliminated in this version.

Optimized emissive effect

Multiple bounces emitted from emissive materials supported, you are now able to generate precise global illumination with only emissive light sources. With the new algorithm, emissive lighting in D5 avoids completely dark corners in the scene like cornice while presenting a softer lighting effect.

Precise global illumination with only emissive light sources

The color emitted from emissive maps was previously in D5 a result of the average color of the maps. We've corrected it with the new algorithm to calculate the color of the maps with more precision, so the emissive materials give off lights accordingly. This comes in handy when applying emissive material to LED light signs or billboards.

Subsurface Scattering material

Subsurface scattering materials, or SSS materials, are now supported to simulate translucent objects such as jade, wax and human skin.

You can use the "Subsurface scattering" material template to create real-time sss effect for the selected texture. Adjustable parameters include SubSurface Color and Scattering Intensity.

Z-Depth

Z Depth mode is now available in Effect > Style.

It works on a grayscale value range, and the colors of points range from black to white based on their distance from the camera, with black being closest to the camera, white in the background, and gray in between.

Z Depth is supported as a rendering effect for images or videos, and also as channel export. It's often used to add Depth of Field effect or to simulate fog.

Cull Distance

Cull Distance is added in Preference > Rendering. When you specify a cull distance value for preview and output respectively, the smaller models(mainly grass and other plants) beyond that distance will not be rendered in preview or final work, as you chose.

Grass Material Blend Amount

Blend amount setting is newly added to grass material to control the blending level of the base color maps for the ground model and grass material. The larger the value, the more influence the base color map of grass has on the overall color.


2 | Optimizations

Optimized Path tool

Path Tool is also optimized to make scene building more convenient with customizable path corner nodes: curve or linear.

You can set it to Linear to draw right angles and adjust the Smoothness parameter to customize the corner angles, which helps a lot when it comes to rendering an avenue or crossroads.

For vegetation paths, we supported setting fixed spacing distance between the vegetation assets. You can use it to generate a corresponding number of models according to the spacing distance value.

Random Offset is no longer related to the length of path, so there won't be the problem of a larger actual offset distance for a relatively small offset value caused by a longer path.

Higher Output Frame Rate Options

More frame rate options are supported to bring better visual experience and more freedom in editing. You can choose from 24, 25, 30, 60, or 120 FPS for output in video rendering settings.

Note that the default frame rate options are 30 and 60 FPS. You need to go to Menu > Preferences > Widget to enable more options.

Improved Two-point Perspective View

We fixed the unexpected tilting and perspective distortion by correcting the two-point perspective algorithm, and now the animation transitions between two-point perspective and perspective view in video mode will not produce flickering.

Another change is that you would need to press F8 or P to exit the two-point perspective view now.

Group Assets & Save to Local

D5 vegetation, characters, animals, vehicles and more models can now be added to your local library and exported as .d5a models. It is also supported to group any of these assets and add them to local, so you can easily grab and use the combo in other projects.

Optimized Scatter & Hedge assets

The algorithm of vegetation scatter tool has been optimized to fill a chosen material with vegetation and avoid leaving a gap, making a lush and dense hedge look.

Scatter models with "Single series" in their names from Nature > Hedge category, set the density parameter, and check "Align to Terrain" to quickly fill the block and create realistic hedges.

Drop Models on the Ground

For models in the object list, you can now right-click on it to choose "Drop vertically" so that it lands vertically on the nearest object surface.

Check "Drop along the terrain" so when the model falls on the nearest model, it also rotates itself according to the normal of the model surface.

Camera Focal Length

A Focal Length parameter is added under Field of View which can be used as the equivalent focal length of film in real life photography.

When matching a real camera and rendering camera setting, you can align the picture information by entering the corresponding focal length value in D5. This helps you get the same view in D5 as the reference photo.

Optimized Eraser Tool

Using the eraser or clear tool, you can apply it to only a selected surface by holding the shortcut key Shift.

Action Tips

To make D5 even easier to get started with, Action tips are added to the lower left corner of the viewport. You can turn it on in Menu > View to see corresponding tips and shortcuts while rendering.

Clear Auto-saved Backups/Imported Models

Clearing auto-saved backups/imported models is supported in Menu > File > Clear data, to delete the backup files automatically saved and imported models (except for those already placed in the current project). This helps reduce project file size, making file storage and management easier.

D5 AutoClose after Rendering

Another update to help you with resource management is the option in rendering queue to close D5 automatically when rendering is finished.

3 | New Assets in the D5 Asset Library

You can quickly find these new assets by searching "2.4" in the D5 Asset Library.

Vegetation Models

13 new Hedges, which have "single series" in their names, include Buxus megistophylla Levl., Camellia sasanqua Thunb., Ligustrum × vicaryi Rehder and Bambusa multiplex. You can use the scattering tool to quickly achieve a dense hedge effect.

37 new animated Macrophanerophytes include Yew, Metasequoia, Euphorbia, Cherry and other trees.

Backdrop Planes

New Backdrop planes in Landscape category to decorate the distant skyline for urban, mountainous, and wooded contexts


Animated Water Particles

New animated water particles under Particles > Fluid including fountains and water flow particles with scale, reflection and color parameters enabled.

New "Low resource consumption" option for fountain particles. Turn it on to reduce resource consumption in both preview and output.

Subsurface Scattering Assets

New SSS assets include silica gel, jade, wax materials and jade Buddha, candle, fruit models.


Character Models

30 slightly moving characters that have small movements, waving hands for example, that are close to their posed gestures.

78 posed Asian characters and more characters from different regions are coming.


Holiday Assets

New Holiday assets --- a special collection exclusive to D5 that includes firework particles, animated decorations, and holiday accessories.

Set off customizable 3D fireworks in D5 to light up the sky.

Animated vehicle Models

4 new animated vehicles include electric cars, subways and high speed rail.

Interior Parallax Color Temperature Control

New color temperature control for Interior Parallax models to suit different vibes of the scenes.


To learn more about D5 Render 2.4 updates, please visit D5 Forum.

6 tips you must know for archviz tested with real projects

With the development of computer graphics, architectural visualization is gradually shifted from 2D to 3D. 3D archviz is not only the display of models and materials, but also the expression of atmosphere and design concepts. Therefore, we summarize some techniques that are proven practical in real projects to help architects better deliver their ideas.

The following two projects were optimized with the techniques we will show, and you can see the change in the overall effect:

Detailed info:

Archviz project review Vol.01 | How to render shopping mall

Archviz project review Vol.02 | How to render a commercial plaza

Download the rendering tool for free

  1. Set perspectives like in architectural photography

Architectural rendering has much to do with photography. A proper perspective can tell your audience a lot about the design and atmosphere you want to create.

There are several perspectives that you should learn how to use in archviz:

  • Eye-level view: This is the most common perspective that can simulate human eye sight. For rendering, you should set the camera at a height of 150-180cm.
  • Aerial view: This view usually displays the building as well as the surrounding context. With a proper use of this perspective, you can create stunning works.
  • Worm's view: a view as seen from below or from a humble position. It allows you to fit very tall subjects in the frame, such as skyscrapers.
Aerial view rendering with D5 Render
Aerial View | KREATIV studio
Worm's view | D5 Render official

  1. Pay attention to glass reflections

Nowadays, glass facade is widely used in architectural design as it provides both functional and aesthetic benefits. However, in archviz projects, many people ignore the surrounding environment resulting in a very messy reflection of the glass, thus destroying the overall aesthetic.

Before
After

In this project, the original glass facade reflected buildings around, and revealed harsh lighting inside the architecture. We placed a panel with a sky image on it on the opposite side, thus giving the glass a clear reflection of the sky.

Then we adjusted the transparency and roughness of the glass to a matte frosted effect. The overall vision becomes clean and fresh.

You can also use backdrop planes from the D5 Asset Library to quickly get a beautiful context.

  1. Notice the contrast of warm and cold tones

Maintaining tonal balance is an important aspect of architectural rendering. Too cold or too warm tones can lead to visual imbalance and a flat, monotonous image.

If the overall environment seems cool, then adding some warm lighting is an ideal choice.

  1. Surround your building with plants

Greenery is an integral part of architectural design. It not only softens the lines of the building, but also relaxes people's mood. In architectural visualization projects, we can follow the following principles to place plants:

  • Greenery close to the camera: shrubs and broad-leaved trees. You can increase the brightness of leaves a bit.
  • Greenery in between the buildings: tall trees like arbors.
  • Greenery far away: smaller trees with low crowns.

In this way, the greenery will form foreground, middle-ground and background for the image.

Another tip is to place warm lights under the trees to make them look soft and vivid.

How to place plants
Lights under the trees
  1. Decorate the building's interior

In archviz projects, many will neglect the refinement of building interiors, resulting in a hollow, dissonant look, which is especially evident in large architectural projects. Here we provide two tips for quickly enriching building interiors:

  • Add lights to illuminate the building inside
  • Use Interior Parallaxes to decor the building windows with one click (Interior Parallax is a faux window display of decorated interior scenes)

Download D5 Asset Library which has free Interior Parallaxes

Interior Parallax from D5 Asset Library

  1. Breathe life into your scene with animated models and particles

Nowadays, animation has become a hot trend on social media platforms. Architects are following this trend to attract more audiences. To make full use of this feature, you will need animated assets to work with it.

Yet it might be a bit difficult for individual designers or small businesses to make animation, because it's expensive to acquire both animation rendering tools and dynamic assets.

Here we recommend the rendering software D5 Render, which is free to use and has its own asset library with animated characters/plants/vehicles/particles.

Download D5 Render for free

AI-Powered Architecture Design | How to use AI with 3d rendering software D5 Render

1 Introduction

At the beginning of the 20th century, Industrial Revolution profoundly influenced the whole world, changing the way humans had long been accustomed to living and building.

The great master Corbusier, along with other artists, pointed out that the traditional design industry also needed a revolution. Modernism thus began.

Mankind has been moving “Towards a New Architecture (Vers Une Architecture)” ever since.

Vers Une Architecture by Le Corbusier

Today, in the 21st century, we are facing another big change in the design industry: the rise of Artificial Intelligence. How to judge this new tech? Can designers find a way to work with AI? The answers are still in the air. There is no doubt that we are standing at a crossroad.

Luckily, we received an "AI-powered" architectural project created with D5 Render by the Studio of Urban Studies (hereinafter referred to as SUS), which has been approved by the client and professional architects. This project may offer some insights into the relationship between AI and designers.

2 Behind the project

Studio of Urban Studies focuses on urban design. They hope to solve real issues with creative and inspiring designs.

Unlike traditional arch studios, SUS embraces new technologies to improve the efficiency and quality of their work.

The recent big-hit, design for Rain Moment Street, is a project of SUS, which aims to build a small commercial complex that is cozy to live and work in.


Rain Moment Street is like the courtyard in our memories. After a day of work, you can go downstairs and take a breath.
That's why we wanted to attenuate the sense of building volume. Rain Moment Street should break the boundary between the office building and the leisure area. Residents can see one area extend into another.
Based on this conception, we had multiple choices to create the facade. After rounds of discussion, we finally used Stable Diffusion.

3 AI + D5: the productivity tool kit of the new era

SUS integrated AI into their workflow by first producing 2D images with AI, then modeling and rendering accordingly.  

Sketch production | Why AI

Usually, there were no clear objectives at the beginning of the project. Thus, after generating a large number of sketches, SUS made constant adjustments to see if there would be more possible design plans.

During this process, an architect first drew a rough sketch and then gave AI some prompts to create many similar works.

Yet not all of them were practicable. So the architect had to choose some feasible sketches and gave AI more prompts to optimize their light and shadow. Meanwhile, tags of master architects will be added as a reference for the architectural style.    

There was trial and error at this stage before the designer could confirm the architectural volume including concave or convex, curved or straight lines, and so on.

Adjustment of the light and shadow
Architecture styles of Zaha, Foster and Gehry

Move on to fine-tune the prompt and try different CFG Scale* and Denoising Strength*. This would produce images of various design styles. The architect chose an appropriate one from them and made inpainting on some important or unsatisfactory details.

For example, the roof of Rain Moment Street was inpainted to have a look of a hollow net-like form resembling dragon scales.

The CFG scale adjusts how much the image looks closer to the prompt and/ or input image.

Denoising strength controls how many changes it will make compared with the original image.

At this point, the design had taken shape, but the image was limited to a size of 512 x 512. SUS extended it to supplement the rest part.

Modeling and visualizing | Why D5

Now it came the time to turn the AI-generated sketch into 3d models. Since the sketch was complete and concrete, it didn't take much time to build the models. Architects could add more details as well.

For the part of visualization, SUS chose D5 Render as the ultimate tool.

At first, they had other selections. But after the further experience, D5 became their go-to tool for some special reasons.


Visualization:

The ray-tracing technology used by D5 is especially helpful when SUS wants to quickly build an atmospheric environment for the building.

Efficiency:

For one thing, D5 Render adopts PBR texturing system, which is also used by the mainstream DCC software. The one-click material sync feature builds a streamlined workflow for architects and designers. For another, designers can import assets from Bridge into D5, which helps them conveniently enrich the surrounding context.

The models built by SUS are often full of details, such as curtain wall frames, expansion joints, and openings, which resemble their look in the real world. So, the large file is usually split for several architects to model at the same time.

Yet the split parts have to be merged in the rendering software, leading to many times of model sync. It is troublesome in other software, yet not the case in D5 Render. D5's one-click sync feature allows each model sync to save ten seconds or more. Think about thousands of times of sync in a project and you'll see how much time D5 has saved for SUS.


4 Visualization

Rain Moment Street becomes a big hit not only because of the involvement of Artificial Intelligence but also because its animation render is superb.

SUS talked about how they viewed archviz in the interview:

We hope to produce an architecture design, not only the archviz but also the real building, that audiences can experience as immersively as in a movie.

There is another stronger connection between AI and archviz:

SUS will select the form of visualization based on the image atmosphere generated by AI.

"AI created some art-like images with a settled color tone, vibe, and composition. Yet the process to find these styles requires manual operation. So, there should be a tool that comes in handy to solve this issue."

This might be the first time D5 met AI, but not the last time.


5 The future

Just as the pioneers of modernism faced changes at that time, we stand at the crossroads of a new revolution in science and technology.

Designers have lived through the days of drawing with pencil and ruler, the era of CAD replacing tablets, and are now experiencing a shift from 2D to 3D, and the gradual involvement of AI in the project.

Although each technological innovation brings about a debate about the "survival" and "extinction" of designers, in retrospect, there are always people who embrace changes, master new tools and improve productivity.

SUS and D5 believe that AI is only a tool, and designers are the masters. SUS also mentioned an interesting phenomenon:


Some designers call Prompt 'a spell'. Technology, just like magic, needs humans to decide how it's applied. AI will make design itself more demanding, so we have to keep up with that demand.

As for how to follow the trend of AI, SUS also has some suggestions:


Architects should be familiar with the whole workflow including planning principles, codes, construction, and other knowledge. Without enough experience, you can't master AI and make the right choice of solutions. In this case, the design will be empty and boring. Don't turn your design into a black box driven by AI. Don't be lazy. Otherwise, you'll suffer the consequences.


D5 Render, together with SUS, will explore more opportunities with AI, helping designers move "Towards a New Architecture".  

Free Download D5 Render

D5 SSS | The beauty of translucent materials with flowing light in real-time rendering

Know your tools: what Ambient Occlusion is and how to make use of it.

Archviz project review Vol.02 | How to render a commercial plaza

Free 3d textures within easy reach!

Best real-time rendering workflow for interior designers using AutoCAD-SketchUp

D5 Render 2022 Wrap-Up | For a better real-time rendering and 3d creation experience

Seeking D5 Render Crack? Look no further than this.

What is TDR and how to solve the TDR(Timeout Detection Recovery) problem when rendering?

All you need to know about glass material in D5 Render

Professional landscape architecture software: D5 Render for better, easier 3d visualization

Using Blender for Archviz? Work more smoothly with D5 + Blender Workflow

A quick, easy way to make displacement texture

Full guide on how to make cinematic animation in D5 Render

How D5 Render's real-time ray tracing rendering benefits our company | Spotlight vol.05

Free Educational Licence for D5 Render! | How to apply

How to render a snow scene in D5 Render

How to create a detailed rendering with decals in D5 Render

Want scenes to have different vibes? Turn off Camera Switch Only

Create exquisite materials with Round Corner in D5 Render

Best practices of interior lighting for SketchUp

D5 Times Vol.08 | D5 Render Software Tips, News, and Updates

How to create cinematic animation in D5 Render with Depth of Field

How to Better Your Landscape Render with Water Particles in D5 Render

Archviz project review Vol.01 | How to render a shopping mall

More flexibility in design & higher efficiency in visualization: Why choose D5 for your growing business | Spotlight vol.04

How to use keyframes to create animations in D5 Render

Archicad Interior Visualization with D5 Render User Showcase

Natural sunlighting for realistic architectural visualization with Geo&Sky in D5 Render

Postprocessing Vignette, Chromatic Aberration for Photorealistic 3D Rendering

Add your artistic taste to the render by LUT in D5 Render

NVIDIA RTX 4090 4K Review running D5 Render: Ultra-efficient Real-time Rendering, Archviz, 3D Animation

Choose an ideal power supply for D5 Render

Windows 10 or 11? Choose a suitable operating system for D5 Render

Architecture Landscape Interior 3D Rendering All-round Player | D5 Render Spotlight vol.03

Best Interior 3D Rendering Visualization with D5 Render | Spotlight vol.02

Game Ready or Studio? Choose the Right Video Driver for Real-time Rendering

Outstanding Water Textures Taking Your Renderings up a Notch

Faster & Easier Architectural Visualization with D5 Render Built-in Asset Tools

Best Real-time Rhino Rendering Workflow for you with D5 Render

Leading Architecture Firms Choose D5 Render as BIM Software

How to Use Emissive Material in D5 for Better Lighting of Your Renders

Architecture students winning in global Design Competition with D5 Render

How to add realistic fog to archviz rendering with D5 Render

D5 Render User Showcase 3D Rendering Visualization | Spotlight vol.01

Out-of-the-box Interior Parallax Assets Available in D5 Library to Save Your Time

D5 Times Vol.07 | D5 Render Software Tips, News, and Updates

How to Create Stunning Facade Design / Visualization with D5 Render

"Glad I switched to D5 Render" | The Better Option for 3ds Max Workflow

Archicad 26 Supported | Streamlined Workflow with D5 Render for Intuitive 3D Rendering

D5 Render 2.3 | Release notes | Free 3d render software

How Award-winning Architectural Visualization Studio Uses D5 Render

The Necessity of Real-time Visualization in BIM & Architecture

7 Reasons Why D5 Render is a Must-Have Tool for Architectural Visualization

D5 Times Vol.06 | D5 Render Software Tips, News, and Updates

How to Render an Amazing Interior Scene with SketchUp-D5 Workflow

C4D to D5 | Cinema 4D Render Software

Real-time rendering is a process in which GPU produces images while calculating huge amounts of data, so you can have a preview of the results while adjusting in the interface. It enables you to see the changes as soon as they are made, and your operations are usually conducted with a minimum frame rate of 30.

Cinema 4D Real-time Rendering with D5 Render

For C4D users, for a long time they could only turn to offline renderer because there wasn't much choice. While now equipped with RTX technology for acceleration, rendering engines like Octane and Redshift still have a hard time offering a smooth rendering experience because of the low FPS that hinders the process.

Now with D5 Render's integration with Cinema 4D, it's obviously a great oppurtunity for C4D users to enter the real-time rendering world.

Learn more: Workflow | D5 Converter-Cinema 4D

Free Download D5 Render

Why D5?

Enter the World of Real-Time Rendering

Compared with traditional renderer used to work C4D, D5 Render is such an "intuitive" tool.

Material  

Forget about the complex material nodes, nerve-wrecking lighting settings, and the frustrating trial and error you have to go through in those renderer. In D5, with fewer parameters, fewer adjustments, you get to achieve results of similar or even better quality within a shorter time.

Material panel in C4D

Material panel in D5 Render

D5 Render adopts the mainstream PBR material system. It simplifies the process of editing materials as much as possible through preset parameters for various material templates.  You can find over 1,500 preset materials in D5's built-in Asset Library and directly apply them to the models in your scene with just one click.

Synchronization of materials from C4D, Octane, Corona and Redshift is supported in D5, yet you'll still find it easy and fun to edit materials in D5 yourself. Even for normals and reflections that are usually resource-consuming on computations, results can be shown immediately on the model's surface as you adjust parameters.

Judging from the works posted by D5 users, you can tell that D5 Render's equipped with a production-class material system with amazing performance in output.

Speed

In offline rendering software, all those effects, reflection, transparencies and complex lighting often  come with a price, which is multiplied rendering time.

That is not the case in D5:
Ray tracing technology is a fundamental part of D5 Render that enables GPU to render complex models and scenes with physically accurate shadows and reflections. Normally the most basic one can also handle D5 well and surprise you with its amazing rendering speed.

Even for scenes heavy on reflection(image above), it takes only 36.8 seconds to render an image in 2K resolution, and 15 minutes for an 8-second video.

Learn more


The ongoing evolution in technologies is going to continue, and it would definitely speed up your workflow if you're better equipped.
For anyone that owns a graphics card supporting ray tracing, such as Nvidia RTX series, AMD RX 6400 and above, or the coming Intel ray tracing GPU, D5 Render is bound to be your best choice.


Free

D5 Render releases a new version every three months to meet the needs of its users from all walks of life.
With previous updates, D5 Render has become a fully functional, stable and reliable real-time rendering software. On top of that, D5 is also free to download with 90% of all its features accessible to everyone. In today's design and art market, it's not always easy to find a tool that offers a free version for commercial projects like Blender. Luckily enough, D5 is here to help. If you are using C4D, and would like to switch to another rendering software, don't hesitate to give D5 a try.
Free Download: https://www.d5render.com/download

Guide on How D5 Render works with C4D

Download and installation

Go to D5 Render official website > Download and find the livesync plugin for Cinema 4D.

Or you can also go to Welcome Page > Workflow to download.

Supported versions: The current D5 converter for Cinema 4D supports C4D versions from R20 to R26 and 2023.

UI and Features

After installing, open your C4D and you'll find D5 Render Converter. Click on it, and a panel for D5 will pop up with 7 icons:


1. Start/Stop D5

Click on it to start/stop D5 Render in your C4D.

Select "OK" to open a new project in D5 and the C4D model will be imported into D5.

If you've applied materials to your model in C4D, then you'll find the model comes with materials because D5 can map those materials.
Apart from C4D Standard materials, D5 also supports most of the materials from other renderer including Octane(Blend material, toon material and procedural textures are not supported yet), Corona, and Redshift materials.

2. Sync

Click on this button, and the scenes in D5 will be updated. You can use it to sync models, materials and scenes from C4D to D5.

3. View sync

Click on this button, and the scenes in D5 will be updated. You can use it to sync models, materials and scenes from C4D to D5.

4. Camera sync

Turn it on to synchronize the cameras you set in C4D to D5's scene list.

5. Light sync

Support the sync of spotlight, point light and area light.

6. Export .d5a file

You can either export the whole project or export certain objects to D5.    
.d5a files can be directly read by D5

C4D - D5 Workflow Made Easy


Multi-sync with various modeling solutions

With multi-sync support of D5 converters, you can simultaneously synchronize files from multiple CAD/BIM software into one D5 scene using different plugins. That is to say, your workflow can be streamlined beause you get to focus on modeling an architecture in Archicad, design a particular furniture with C4D, and render in D5 at the same time. Multiple software work simultaneously as one in D5 Render, saving your valuable time for further improvement of the project.

Product design and rendering

An important part in product rendering has to be setting up a background with appropriate lighting that goes well with the product itself. Rendering with D5, you can save the scene you carefully crafted as your go-to scene for future projects. In this way, next time you need to render a new product, you just drag and drop the model into that perfect scene. What a time-saver!

Cinema 4D is known for having this amazing fur function to simulate realistic fur materials /textures which can be used on interior furniture. Most rendering software is unable to produce satisfactory fur, so with C4D-D5 workflow, you might see your interior renderings at another level using the fur materials mapped from C4D.

Image courtesy: Furkan Ahlat, atmos visualization, Jimmy3D, KJJ, Wonkz Wong, Flamingo

Free Download D5 Render

System Requirements for D5 Render

Meet the Winners | D5 Render Challenge II, A Global Rendering Contest

Top-notch rendering workflow for landscape designers | Speed up visualization with D5 Render

Loudly Quiet - Let the renderings speak for me | A virtual exhibition film rendered with D5 Render

D5 Times Vol.05

D5 Render for Revit | Best Real-time 3D Rendering Workflow for BIM Professionals

How 3ds Max works better and faster with D5 Render for animation

Work & Life made easy with D5 Render animation and 3ds Max

“With D5 Render, we not only get to meet the deadline, but also live up to clients' expectations. ”
—— An interview with Arthur Studio

Arthur Studio: Architecture visualization, animation making, BIM consulting, real estate development, landscape design, architecture planning, construction organization, municipal bridge design, etc.
Current Workflow:
3Ds Max + D5 Render(for animation), VRay(for still frame).

Reasons for changing the workflow

Let's just face it, still frame rendering alone can not satisfy our clients these days. In the era of short videos, rendering industry has followed suit. Clients tend to see the visualization moving, for animations do display the project more vividly and precisely. It goes without saying that animation also helps when bidding. Some may call it a result of fierce peer competition. Well, I believe this is the current trend, and we are going to follow it.

However, with more projects in progress came a shorter production period. That, to be honest, is a headache for us.

Luckily we discovered D5 Render. With D5, we not only get to meet the deadline, but also live up to clients' expectations. During the process, D5 has made it possible to improve our working efficiency and saved us a ton of time. Production takes less time to finish, and negotiation with clients gets much easier, which is exactly what we need with such a tight working schedule.

Large-scale bird's eye view rendering

Real-time rendering process

Let's take a look at a project we've done. We were assigned the Yinhe Cold Chain Industry Complex project with only 2 days for production. We first negotiated with the client, and they gave us some unexpected advice after seeing the demo. So the demo ended up needing a lot of changes including skyline, rescaling the vegetation and adjusting some assets. In that case, all of the cameras need to be rendered again, which, surprisingly,  only took D5 several hours. We couldn't have made it without D5 Render.

Working with 3Ds Max and D5 Render

I first learned about D5 on a work-related forum last June. A peer worker shared his works rendered with D5, and that led me to search for what D5 Render is. At that time, D5 1.9 was in beta besting. I thought to myself: "why not give it a try?", and the outcome was quite surprising. After 2 months of testing, D5 was put into practical use in all my animation projects at hand. From then on D5 has been the first renderer I turned to for visualization.

For every project, it starts with modeling. Materials we get from clients usually include SketchUp models, CAD floor plans, but sometimes we get only part of the image information.

We would first deal with all the models needed in this project with Max.

Then, we export these models with D5 Converter - 3Ds Max as .d5a files into D5 Render for animation making.

The exporting process with D5 Converter makes our work much easier, and the workflow of 3Ds Max and D5 is such a convenience. As is often the case, we need to edit or change some of the models in the renderer, which can be quite time-consuming. Now, we just replace them with a click in D5.

After the modeling is confirmed, the project goes to rendering artist who is in charge of archviz and animation making.

And in this process, D5 strikes us as efficient and speedy.

For a 2-minute animation, we usually had to spend more than 10 days in making. The animation takes a long time to render, and we even had to send some of the cameras to rendering farms. These are all the costs of production. So we tried some of the real-time render engines, but they took 5-7 days. To be honest, rendering was such a laborious task.

However, D5 was able to shorten the time waiting for output and greatly improved our working efficiency. I got to spend more time digging into the production of animation including camera movement, detail of the scene, light and shade, material adjustment, etc. If I stuck to my previous workflow, then I couldn't have afforded the time for that. Now the whole process of animation making takes about 3 days, and short scenes take only one day to finish. (rendered with RTX 2060)

D5 does not compromise on rendering quality for a shorter rendering time. Quite the opposite, D5 impresses me with the best rendering quality among all the real-time renderers that I've used. How the materials and texture look in D5 is surprisingly close to the physical objects in real life.

Other than that, D5 has so much more to discover. Here's another thing that surprised me: I made models of light strips and trees with hanging string lights inside 3Ds Max, then exported them directly into D5 Render. See how they fit into the scene! You can see below. I've created my own local asset library in D5 and enriched its contents. As a Max user, I find it extremely easy and convenient. The imported models are orderly categorized and easily accessible for use in D5.

As anyone in this industry might know, working overtime or even through the night is part of our everyday life. D5 has really helped me in saving working time. Doing this job, we can't expect too much leisure, but I do have more free time to myself now. I use it either to better the production, or to give myself a rest. I used to dream of this work-life balance, and now I have it thanks to D5.

D5 Times Vol.04

AMBITION|D5 Render Challenge Interview with Best Original Award Winner

A Work of Tadao Ando | NYC Fair-faced Concrete Luxury Condo, 152 Elizabeth Street

Pushing the Art of Architecture to the Public | RayingLab Special Report

D5 Widget | Tap into Infinite Imagination of 3D Storytelling

D5 Smoothness|Large Scene Capability and Real-time Interactivity

Real-time interactivity with photo-realism quality is the core value of D5 Render. D5 GI ensures the performance of real-time rendering, but as the complexity of the scene increases, the rendering overhead will gradually increase and the real-time FPS inevitably decrease.
With a large number of faces, lights, models and textures, whether D5 can still guarantee responsiveness and FPS in real-time is of great importance for the user experience.

Optimization of Model loading

Many 3D assets have an extremely large number of faces, and some consist of countless sub-objects that affect rendering efficiency. D5 Render automatically merges models of the specific kinds of asset, combining multiple small models into one large model for a reduced DrawCall* and improved efficiency.

Since D5 version 2.0, models have been loaded with a more efficient polygon rendering method, which has greatly improved real-time performance. Version 2.0 has seen a significant improvement in FPS and responsiveness comparing with version 1.9.

*DrawCall: The rendering command sent from CPU to GPU. Too many DrawCalls will cause the GPU to wait for a long time and hinder the efficiency.

Optimization of Material Texture

The new version of D5 Render uses Texture Streaming to dynamically load texture maps, ensuring that material textures are loaded only when they are in the camera, and store other textures temporarily on the disk. This technique, together with mipmap, ensures that material textures look just right at all distances with minimal overhead.

In a comparative test, both RAM and VRAM usage are reduced and frame rate is slightly improved with texture streaming enabled. For some scenes, the memory usage was saved by more than 40% (from 11G to 6.2G).


Optimization of Scenes with Many Lights

In general, the number of light sources will have a direct impact on the live preview responsiveness (frame rate).

In this night scene below, there are several hundreds of light sources:

In the old version, the memory cannot be dynamically allocated according to the number of lights when calculating shading, so it must be allocated in advance according to the maximum number of lights (e.g. 1024 lights). Higher screen resolution means higher memory overhead, which poses a challenge to the performance of the real-time preview.

To solve this problem, D5 optimized the strategy of sampling lights. First, D5 divides 1024 lights into groups, calculating the total brightness of lights in each group, and then further sampling the specific lights in the groups that contribute more to the scene. With this optimization, the time of calculating GI for a scene with 1024 lights drops from 23.84 ms to 11.54 ms, and memory usage is reduced by about 150MB.


Optimization of GI algorithm

The optimization of the new D5 GI sampling algorithm above will also improve the frame rate for large scenes. Version 2.1 is enabled with 2-4 times faster reflection calculations and nearly 4 times faster GI calculations. That's why D5 2.1 always has a higher frame rate than 2.0 in the same scene.


D5 "Smoothness" Summary

“Smoothness” can be measured with 2 indicators:

  • The time between the mouse click on the user interface to the first frame of response from the D5 viewport preview.
  • The frame rate for real-time rendering when the viewport changes dynamically.

The example below shows a comparison of the "smoothness" of D5 version 1.9 and D5 version 2.1:

Note: You can see that the new version of D5 on the right responds to commands (click to move camera views) significantly faster than the old version (it always moves faster than the left one). And, the frame rate of the new version is nearly doubled when shaking the viewport.

D5 GI|Striving for Offline Rendering Quality with Real-time Experience

D5 Times Vol.03

D5 Times Vol.02

D5 Times Vol.01