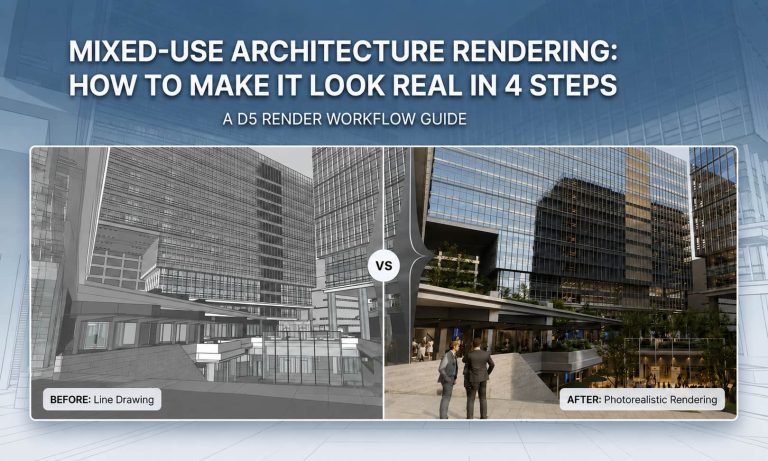
실외 장면을 생생하게 만들고 싶으신가요? D5 Render에서 사실적인 비 효과를 마스터하면 시각적 효과를 좋은 수준에서 진정한 시네마틱 수준으로 끌어올릴 수 있습니다. 많은 사용자들이 기본적인 비 토글에 만족하지만, 진정으로 몰입감 있는 비 배경을 위해서는 단순히 물방울이 아니라 의도적인 기법이 필요합니다.
인위적으로 보이는 "칼날 비"와 실제 같은 강수 효과의 차이는 네 가지 핵심 요소에 달려 있습니다.
- 정밀 입자 제어 - 자연스러운 변화를 위해 비 배경의 강도와 밀도를 미세 조정
- 환경 조명 – 주변광과 인공 조명이 떨어지는 비와 상호 작용하는 방식
- 전략적 표면 습윤 – 물웅덩이, 축축한 질감, 습기 확산
- 동적 바람 효과 - 방향, 난기류 및 중력 조정
이 튜토리얼에서는 실제처럼 보일 뿐만 아니라 실제처럼 느껴지는 비 배경을 제작하는 전문적인 워크플로우를 자세히 설명합니다. 건축 공간, 게임 환경 또는 영화 장면을 렌더링할 때 이 기술을 사용하면 프로젝트에서 비 배경이 날씨와 분위기를 전달하는 방식을 완전히 바꿀 수 있습니다.

1. 야외 시각화에서 사실적인 비 효과의 중요성
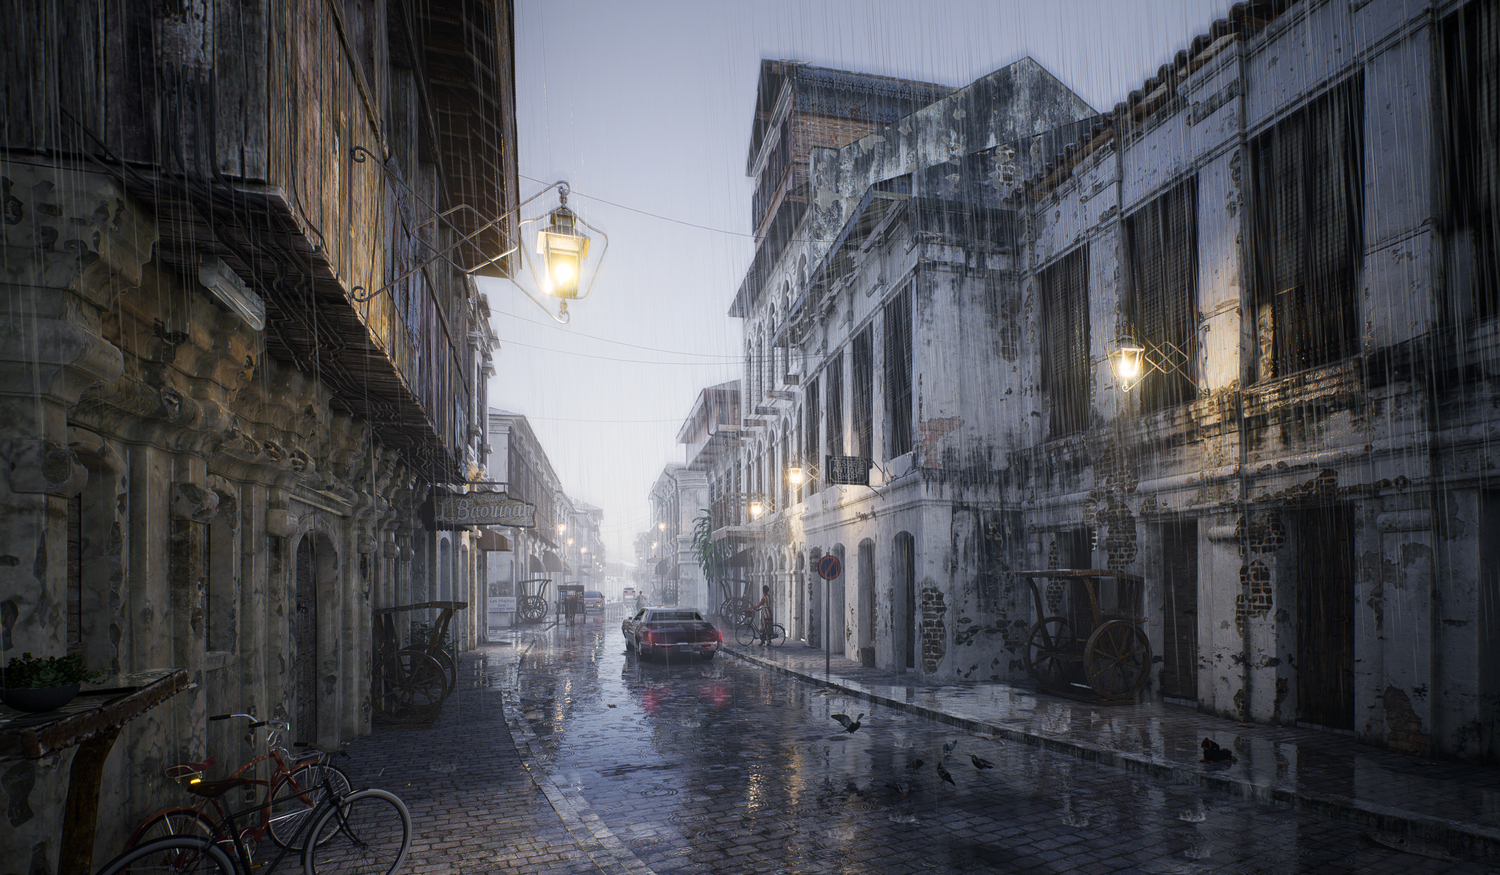
야외 시각화 작업에서 사실적인 비 배경을 추가하면 프로젝트의 수준을 한 단계 더 끌어올릴 수 있습니다. 비는 장면을 더 역동적으로 보이게 할 뿐만 아니라 분위기와 느낌을 완전히 바꿔줍니다. 도시 거리, 시골 풍경 또는 숲속 길 등 어떤 장면을 작업하든 비의 존재는 생동감과 사실감을 더해줍니다.
D5 Render와 같은 도구를 사용하면 생각보다 훨씬 간단하게 사실적인 비 배경을 구현할 수 있습니다. D5의 실시간 렌더링 엔진을 사용하면 날씨 설정, 조명 및 반사를 빠르게 조정하여 실제 같은 장면을 만들 수 있습니다. 사실적인 비는 프로젝트의 시각적 스토리텔링을 강화하여 관객을 몰입시키고 디자인이 더욱 실제처럼 느껴지도록 만듭니다. 극적인 폭우나 가벼운 이슬비를 디자인할 때 적절한 비 배경은 분위기를 조성하고 전체 야외 장면을 한층 업그레이드할 수 있습니다.
2. 야외 프로젝트를 위한 D5 Render 시작하기
극적인 비 효과를 추가하기 전에 장면이 완벽하게 준비되었는지 확인하세요. 최대한의 사실감을 위해 야외 장면을 준비하는 방법은 다음과 같습니다.
먼저 3D 모델을 가져오고 환경 설정을 제어하세요. 여기서 마법이 시작됩니다! 시간대와 구름 설정을 조정해 보세요. 이는 미래의 비 배경이 어떻게 보이고 느껴질지에 극적인 영향을 미칩니다.
이제 조명에 대해 알아보겠습니다(모든 차이를 만들기 때문입니다). D5에서 조명 강도와 각도를 조정하여 완벽한 무드 있는 분위기를 연출하세요. 부드럽고 확산된 조명에 음영이 있는 톤을 생각해 보세요. 마치 본능적으로 우산을 찾게 만드는 그런 조명 말이죠!
하지만 잠깐! 비 레버를 당기기 전에 마무리 작업인 머티리얼 조정을 잊지 마세요. 도로와 지붕은 효과를 살리기 위해 제대로 젖어 보여야 합니다. D5를 사용하면 표면 텍스처를 방금 흠뻑 젖은 듯한 모습으로 쉽게 조정할 수 있습니다.
D5에서 더 나은 조명을 위해 발광 재질을 사용하는 방법
3. 사실적인 빗방울 효과를 위한 단계
D5 Render에서 사실적인 비 배경을 만들려면 다음으로 이동하여 환경 오른쪽 패널의 섹션으로 스크롤을 내려 활성화 강수 즉각적인 비 효과.
하지만 진정으로 설득력 있는 비 배경을 구현하려면 이 설정을 활성화하는 것 이상이 필요합니다. 비가 과장되지 않고 자연스러워 보이도록 하려면 세부 사항에 주의를 기울이고 몇 가지 주요 조정이 필요합니다. 장면이 비현실적으로 보이게 만드는 거친 "칼날 같은" 비 효과를 피하려면 D5 Render에서 비 효과를 설정할 때 다음 네 단계를 따르고 환경을 더욱 몰입감 있고 실제 같은 장면으로 변환하세요.
1단계: 부드러운 이슬비를 위한 투명도 조절
첫 번째 단계는 빗방울의 투명도를 미세 조정하는 것입니다. 투명도를 약 0.5, 을 통해 가벼운 비의 모습을 재현하는 부드럽고 이슬비 내리는 효과를 얻을 수 있습니다. 이 설정은 거칠고 곧게 내리는 폭우와 달리 비를 더 미묘하고 사실적으로 만듭니다. 비의 불투명도가 너무 높으면 "칼날 같은" 폭우처럼 보여 부자연스럽게 느껴질 수 있습니다. 가벼운 소나기의 부드럽고 흩뿌려진 모습을 포착하려면 투명도의 적절한 균형을 찾는 것이 중요합니다.
2단계: 비의 강도를 조절하기 위해 강도 조정
다음으로 비의 강도를 제어해야 합니다. D5 Render에서는 비가 너무 많이 내리지 않도록 하는 것이 중요합니다. 너무 많이 내리면 눈에 띄는 줄무늬나 과장된 비 선이 생길 수 있기 때문입니다. 강도를 조정하면 비가 장면을 압도하지 않으면서 자연스러운 흐름을 유지하는 데 도움이 됩니다. 적당한 강도는 비를 부드럽고 연속적으로 보이게 하여 환경이 물에 잠긴 것처럼 보이지 않으면서 깊이를 더해줍니다. 이는 비가 너무 딱딱하거나 기계적으로 느껴지는 과도한 "칼날 같은" 모양을 피하려고 할 때 특히 중요합니다.

3단계: 현실감을 더하기 위해 물안개를 추가하세요
사실감을 더하기 위해 D5 Render에서 물안개 효과를 활성화하세요. 이 기능은 특히 강우량이 많거나 물에 잠긴 표면이 있는 지역에서 비와 함께 자주 나타나는 미세한 안개를 시뮬레이션합니다. 미묘한 물안개 효과를 적용하면 장면의 전반적인 분위기를 향상시킬 수 있습니다. 이 안개는 비와 잘 어우러져 더욱 몰입감 있고 자연스러운 모습을 만듭니다. 젖은 도로, 안개 낀 숲 또는 비가 주변 환경과 완벽하게 어우러지는 도시 환경과 같은 시나리오에 적합합니다.
4단계: 동작에 바람 효과 적용
마지막으로 더욱 사실감을 높이기 위해 비에 바람 효과를 추가할 수 있습니다. 바람 방향과 세기를 조정하면 똑바로 떨어지지 않고 옆으로 불리거나 약간 흔들리는 비를 시뮬레이션할 수 있습니다. 이 움직임은 비에 역동적인 특성을 더하여 더 자연스럽게 느껴지도록 만듭니다. 도시 거리나 외딴 풍경 등 어떤 장면을 작업하든 바람 효과는 비가 환경과 상호 작용하는 것처럼 느껴지도록 도와줍니다. 가벼운 산들바람을 원하든 더 강력한 폭풍을 원하든 원하는 효과를 얻기 위해 바람 설정을 실험해 보는 것을 두려워하지 마세요.
지금 풀 장면을 다운로드하세요! 시도해 보세요!
4. 현실적인 비 효과: 대부분의 사람들이 놓치는 것
비 배경을 만들 때, 주의하고 피해야 할 몇 가지 작은 사항들이 있습니다. 이러한 점들을 염두에 두면 놀랍고 사실적인 시각 효과를 얻을 수 있습니다:
- 폭우 강도: 강도가 너무 높으면 비가 부자연스럽고 지나치게 극적으로 보일 수 있습니다. 장면을 압도하지 않는 더 사실적인 효과를 위해 적당하게 유지하세요.
- 재질 조정 무시: 젖은 표면에 맞게 장면의 머티리얼을 조정하는 것을 잊으면 비가应有的 영향을 미치지 못합니다. 도로, 지붕 및 기타 요소의 텍스처를 조정하여 젖은 상태를 반영하도록 하세요.
- 바람 효과 무시: 정적인 비는 가짜처럼 보일 수 있습니다. 바람 효과가 없으면 비는 똑바로 떨어지며 장면과 상호 작용하지 않습니다. 약간의 바람을 추가하여 움직임을 만들고 비를 더 역동적으로 느끼게 하세요.
이 작지만 아주 중요한 디테일들이 여러분이 거의 물방울을 느낄 수 있을 만큼 사실적인 비 장면을 연출하는 비밀 병기입니다.
5. 결론: 비 배경을 생동감 있게 만들기
D5 Render에서 사실적인 비 배경을 만드는 것은 단순히 비 효과를 켜는 것 이상입니다. 투명도, 강도를 조정하고 물안개를 추가하며 바람 효과를 통합하면 야외 장면을 역동적이고 몰입감 있는 환경으로 변환할 수 있습니다. 작은 세부 사항을 잊지 마세요. 머티리얼을 적절히 조정하고 비에 움직임을 추가하면 큰 차이를 만들 수 있습니다. 이제 여러분의 차례입니다! 이 팁들을 실험해 보고 완벽한 비 오는 분위기로 야외 프로젝트에 생명을 불어넣으세요.
계속 읽기: 장면 분위기를 미세 조정하는 더 많은 팁
D5 Render로 사실적인 안개 효과를 아치비즈 렌더링에 추가하는 방법
렌더링 조명 개선을 위한 D5에서 발광 재질 사용 방법
AI 에이전트란 무엇인가? D5 2.11은 조경 설계를 어떻게 자동화하는가?
D5 Render에서 비 배경 최적화에 대한 FAQ
1. 제 비가 D5 Render에서 부자연스러워 보이는 이유는 무엇인가요?
빗줄기 효과를 개선하려면 투명도를 다음으로 낮추십시오. 약 0.5 강도를 낮춰서 너무 거센 폭우처럼 보이지 않도록 합니다. 그런 다음 바람 설정을 높여 실제 폭풍에서 볼 수 있는 자연스럽고 흘러가는 움직임을 빗줄기에 부여합니다.
2. 세차게 쏟아지는 비 대신 부드럽게 내리는 이슬비를 만들려면 어떻게 해야 하나요?
부드럽고 안개 낀 비 효과를 위해 강도를 낮추고 투명도를 높입니다. 그런 다음 미세한 안개 레이어를 추가하여 한 단계 더 발전시킵니다. 이렇게 하면 공기 중의 습기가 거의 느껴질 듯한 초현실적인 비 오는 분위기가 연출됩니다.
3. 젖은 표면이 비에 제대로 반응하지 않는 이유는 무엇입니까?
비 온 뒤 갓 완성된 듯한 느낌을 제대로 살리려면, 도로와 지붕의 재질 설정을 조정해야 합니다. 반사도를 높여(촉촉하게 반짝이는 효과를 위해) 빛나는 느낌을 더하고, 거칠기 값을 낮춰(표면을 부드럽게 만들기 위해) 완벽하게 물웅덩이가 생길 수 있는 표면을 만들고 비 효과에 자연스럽게 반응하도록 하십시오.
4. 비가 바람과 사실적으로 상호 작용하도록 어떻게 만들 수 있습니까?
환경 설정으로 이동하여 바람 효과를 켜서 비에 생명을 불어넣으세요. 바람 각도와 강도 슬라이더를 조정해 보세요. 이 간단한 조정만으로 뻣뻣하게 직선으로 떨어지는 비가 자연스럽게 쏟아지는 소나기로 변합니다.
5. 안개/박무를 비와 어울리도록 개선하려면 어떻게 해야 합니까?
D5 Render에서 비 환경을 만들 때 사실감을 높이려면 낮은 밀도 설정으로 볼류메트릭 포그를 활성화하세요. 이 미묘한 안개는 강수 효과와 아름답게 레이어링되어 장면의 선명도를 유지하면서 분위기 있는 깊이를 더합니다. 핵심은 적절한 균형을 찾는 것입니다. 습기를 머금은 공기를 암시할 만큼 충분한 안개를 사용하되, 세심하게 디자인한 디테일이 흐려지지 않을 정도로 너무 많이 사용하지 않는 것입니다.
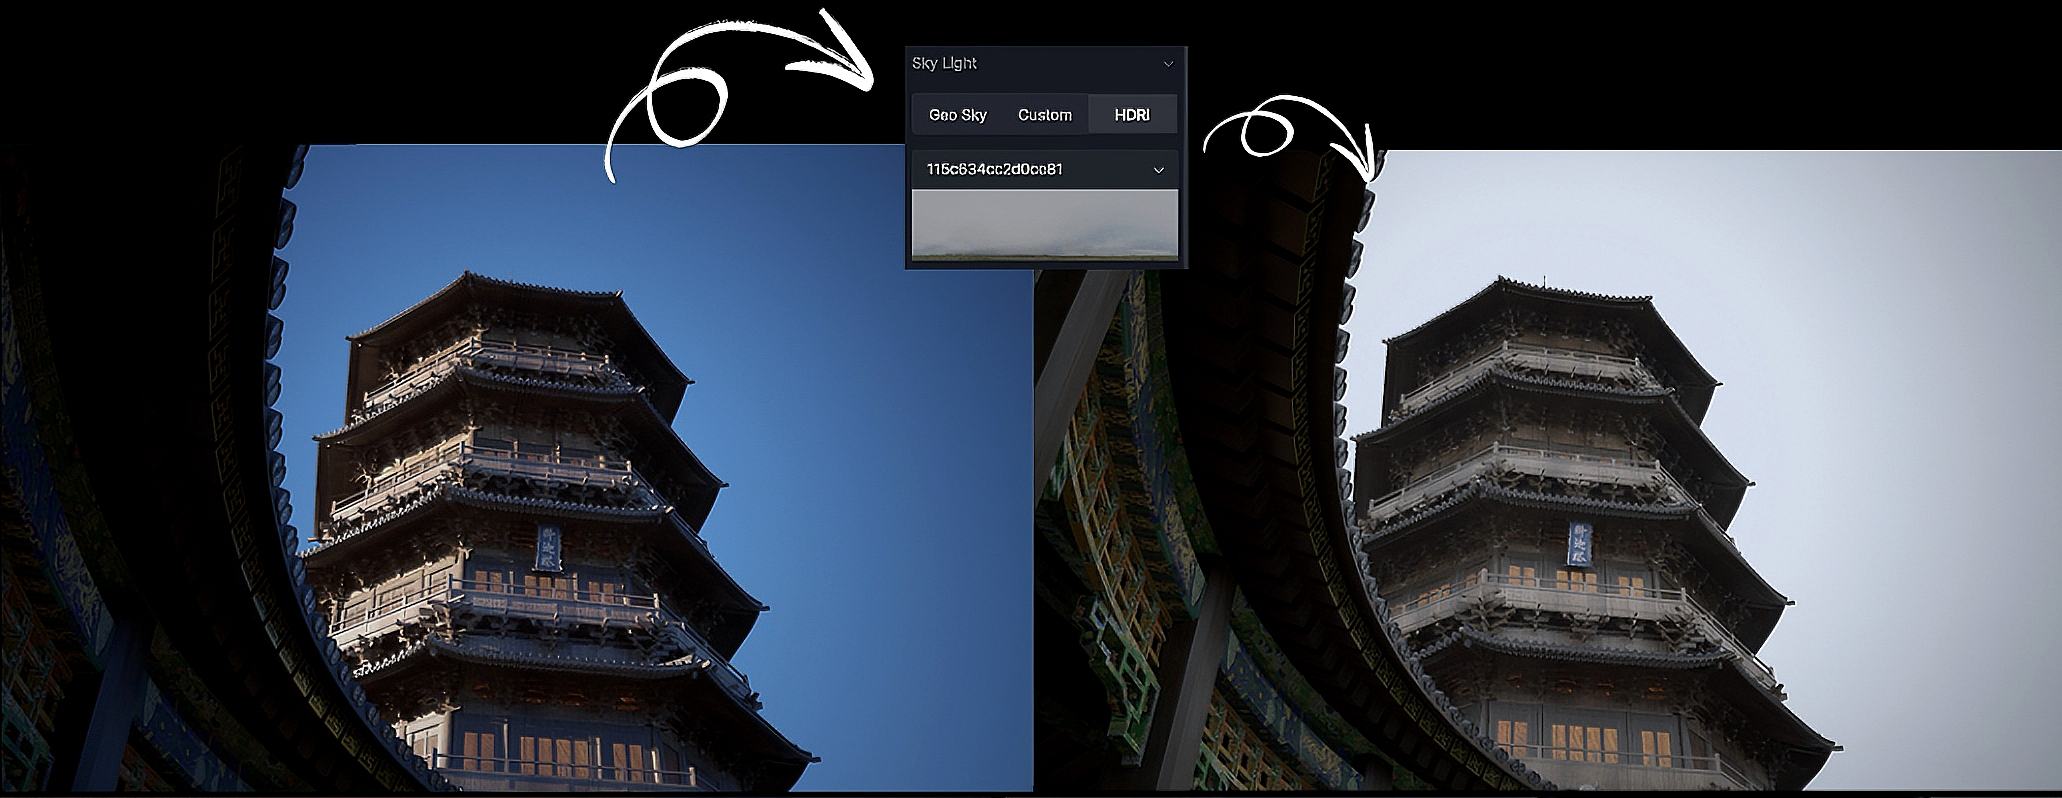
6. 비를 활성화했을 때 제 장면이 너무 어둡게 보이는 이유는 무엇인가요?
균형 잡힌 비 장면을 위해, 비가 내릴 때 자연스럽게 어두워지는 효과를 상쇄하기 위해 주변광을 높이거나 HDRI 하늘 설정을 조정하세요.