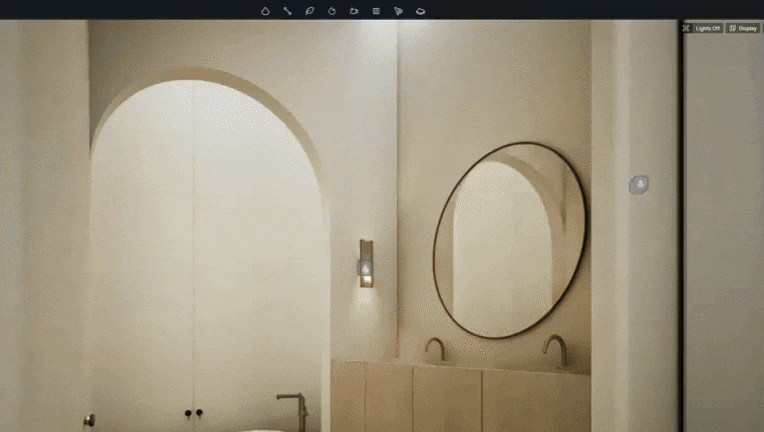
In the world of interior design, light doesn’t just illuminate—it defines a mood and tells a story. But what happens when there’s no natural light to work with? Crafting compelling interior lighting for windowless rooms is a delicate art, where the line between a warmly inviting retreat and a dull, “CGI” box is exceptionally fine. But don’t worry — with D5 Render ‘s powerful global illumination , even deeply recessed spaces don’t have to fall into total darkness naturally.
To help you elevate your scenes, we’ve prepared a professional guide packed with practical lighting tricks and a clear, reusable D5 Render workflow for transforming dim interiors into soft, warm, and beautifully balanced environments.
Key Takeaways on Mastering Interior Lighting with D5 Render
- D5 Render ‘s powerful global illumination helps prevent dark rooms from becoming entirely black, even in windowless spaces.
- Start your lighting process in D5 Render with a Section Plane to set up and visualize your scene before finalizing your fixtures.
- Use D5 Render’s real-world light fixtures and IES profiles to create authentic, believable lighting in your interiors.
- Leverage D5 Render’s fill lighting tools, like strip lights and emissive planes, to enhance your scene’s depth and atmosphere.
- Finalize your lighting balance in D5 Render with real-time path tracing , adjusting exposure and intensities for a photorealistic finish.

1. Lay Your Interior Lighting Foundation: See Clearly to Start
First, here’s a pro tip that might feel counterintuitive: the first step to crafting beautiful interior lighting isn’t about placing a single lamp. It’s about giving yourself the light to see what you’re doing.
Before you get lost in the dark, open up D5 Render and drop in a section plane . Make sure to check the “Affected by Light” box—this lets you borrow some temporary daylight from your Environment HDRI . Think of this as your “worklight” mode; it’s not the final look, but it lets you arrange your scene and evaluate materials clearly, without the guesswork.
Once your layout is set, simply disable the section plane. This initial setup is a game-changer—it prevents those frustrating exposure swings later and sets a solid foundation for the authentic artificial interior lighting you’re about to build.
2. Build Your Core Interior Lighting with Real Fixtures
The most believable interior lighting always honors the architecture. In D5 Render , please always start by placing lights exactly where the real-world fixtures belong.
- Anchor Your Scene with Realitys : Populate your scene with sconces, under-cabinet strips, and ceiling cans first. This foundational step ensures your interior lighting scheme is believable and architecturally grounded from the start.
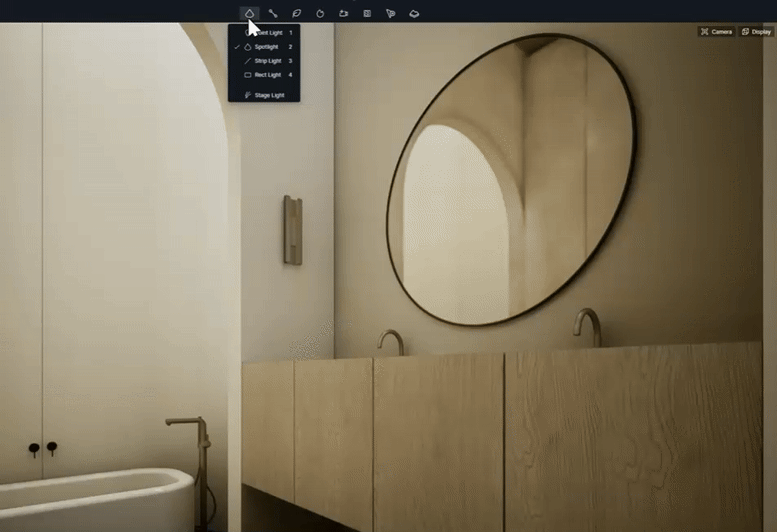
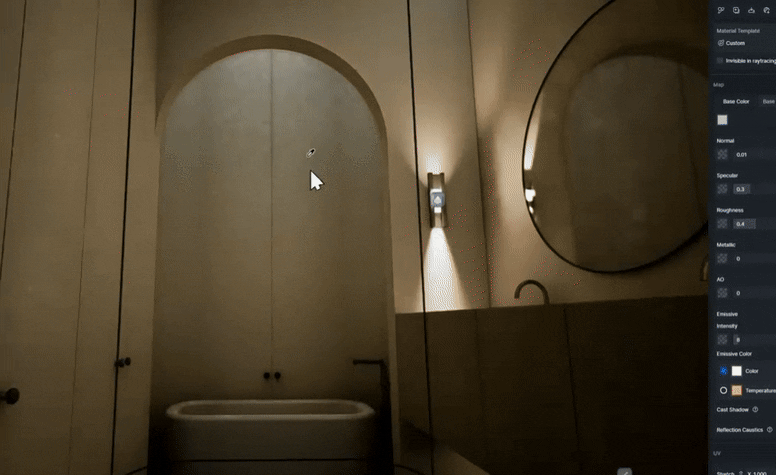
- Use D5’s Built-in IES Profiles for Authentic Lighting Behavior : For fixtures like a sconce that casts light both up and down, leverage a bidirectional IES profile (like IES 05 ). This instantly replicates complex, real-world light distribution, making your scene look professional.
- Dial in Warmth & Avoid Overload : Set the mood intentionally with color temperature. A warmer range (around 4000–4300K) often feels inviting in spaces like powder rooms. The key is to keep the intensity modest—you want warmth, not an overwhelming orange glow that flattens your materials.
- Soften Edges to Kill the “CGI” Look : This is a game-changer—increase the Light Source Radius. This simple tool in D5 Render softens harsh edges and eliminates those unnatural “scallops” on walls. A larger radius creates beautifully diffused, flattering gradients that scream high-quality interior lighting, not a basic render.

Here’s a golden rule: perfect a single fixture first, then copy and paste. This ensures your lighting remains beautifully consistent from every angle.
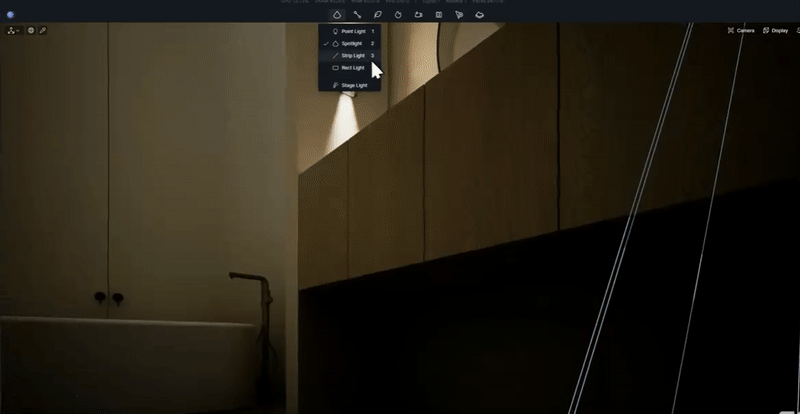
3. Enhance Your Interior Lighting with Subtle Fill Layers
Once your main fixtures are set, it’s time to add depth and dimension. This is where subtle fill lighting comes in, and D5 Render offers some fantastic tools to get it right.
Use strip lights to create a soft under-cabinet glow. Keep the intensity low and pay attention to the Attenuation Radius—that handy cyan sphere in the viewport. It shows you exactly where the light’s influence falls off, helping y ou control spill and create a natural look, especially when using real-time path tracing .
What Is Real-Time Path Tracing in D5 Render & Why It Matters
For a broad, even wash of light on a wall, try using a subtle emissive plane or a Rectangular Light—size it to the wall itself, but avoid stretching it edge-to-edge, as this can create unnatural hard seams. Start with a very low intensity (think single digits!) and gradually increase until you get a soft, velvety lift that enhances your materials without drawing attention to itself.
Think of these fill lights as your “ambient painters.” Their job isn’t to be the star of the show, but to create the overall atmosphere that makes your interior lighting feel cohesive and complete.
How to Use Emissive Material in D5 for Better Lighting?
4. Balance and Bring Your Interior Lighting to Life
Now for the magic that brings your interior lighting together in D5 Render . Begin with a “temperature check,” balancing warm sconces with cooler (~6000K) overhead lights to keep material colors accurate—and remember to fix issues at the source, not in post. Once your color balance is set, ensure all light intensities are within a similar range so that no single fixture dominates, allowing the entire scene to emit a cohesive glow.
Then, switch to real-time path tracing with Accumulation, set the SPP value to 100, and increase Max Bounces—increase GI Precision and Reflection Depth as needed. This is where the magic happens: light bounces softly into corners, edges glow naturally, and your materials gain beautiful depth.
D5 GI | What’s Global Illumination and Why We Need It?
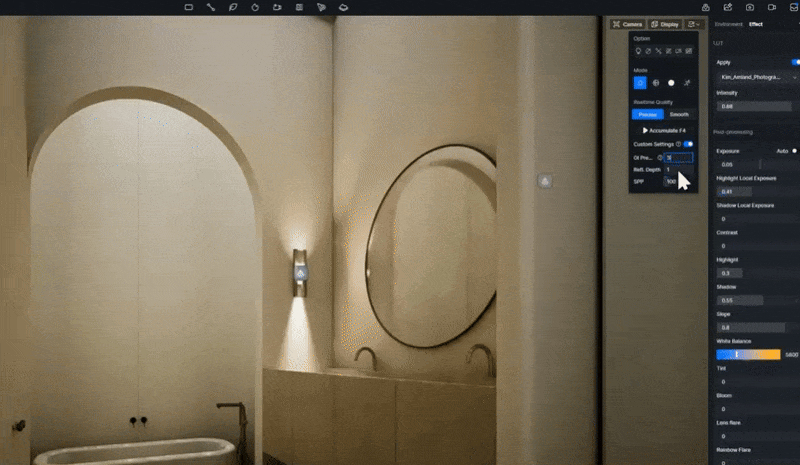
A quick tip: if your scene looks too bright, lower the camera exposure first before adjusting individual lights. This preserves the perfect balance you’ve worked so hard to create, giving you that photorealistic finish we’re all after.
5. Conclusion on Layering Your Interior Lighting
Lighting a dark space is all about layering and balance—not just flooding it with brightness. By starting with real light fixtures, fine-tuning their warmth and softness, then adding subtle fill layers, you can turn any deep or windowless room into a cozy, believable scene.
Now it’s your turn—You can try all of these techniques right now in D5 Render , it’s free to use ! So jump in, experiment with light, and bring your interior visions to life. We can’t wait to see what you create!!!
Discover More Pro-Level Lighting Secrets
Best practices of interior lighting for SketchUp
AI Lighting Mastery: D5 for Realistic Archicad Visuals
How to Use Emissive Material in D5 for Better Lighting?
D5 GI | What’s Global Illumination and Why We Need It?
Advanced D5 GI with enhanced shadows, reflections, and light bounces
FAQs on Creating Realistic Interior Lighting
Q. How do I improve lighting in a dark room with no windows?
To light a dark, windowless room, it’s essential to replicate natural light using artificial sources. Start with ambient lighting from ceiling fixtures or floor lamps and layer with task lighting for specific areas.
To create a soft, inviting atmosphere, focus on using light sources with adjustable color temperatures. Tools like D5 Render ‘s powerful global illumination allow you to achieve a naturally balanced light, ensuring your room doesn’t appear artificially lit or too flat.
Q. What can I do to make my rendered interiors look more realistic?
Realistic interior lighting requires thoughtful placement and intensity control. Start by placing lights where real-world fixtures would go, like sconces or ceiling cans.
It’s crucial to use lighting profiles that mimic real-world behavior—something D5 Render excels at with its built-in IES profiles. These tools help replicate the light’s distribution, creating a more authentic feel to your rendered interiors.
Q. How do I avoid harsh lighting and shadows in my renders?
Harsh lighting and unnatural shadows can make a render look “CGI.” To soften light edges, increase the Light Source Radius, which will create smooth, flattering gradients. D5 Render ‘s advanced lighting tools help eliminate the harsh, sharp edges typical of basic renders, making your scenes look high-quality and realistic.
Q. How can I enhance the atmosphere of my interior renders without overwhelming the space?
To enhance atmosphere without overpowering a room, use subtle fill lighting. Adding small light sources like under-cabinet strips or small wall fixtures can add depth without drawing attention to themselves. With D5 Render ‘s lighting features, you can control light falloff and intensity precisely, making it easy to create a harmonious, well-lit environment.
Q. What should I consider when setting the color temperature for interior lighting?
The color temperature you choose can drastically change the feel of a room. Warmer temperatures (around 4000–4300K) are ideal for intimate spaces like powder rooms or bedrooms. D5 Render allows you to dial in the perfect color balance easily, ensuring a natural, welcoming atmosphere that feels true to life.
Q. How can I make my room feel cozy yet not too dim or dark?
To achieve a cozy but balanced feel, use a combination of warmer light tones and subtle accent lighting. D5 Render ‘s global illumination ensures that even rooms with deep plans or limited natural light won’t feel too dark or disconnected. Adjusting intensity levels to maintain consistency across fixtures will help keep the overall atmosphere inviting.