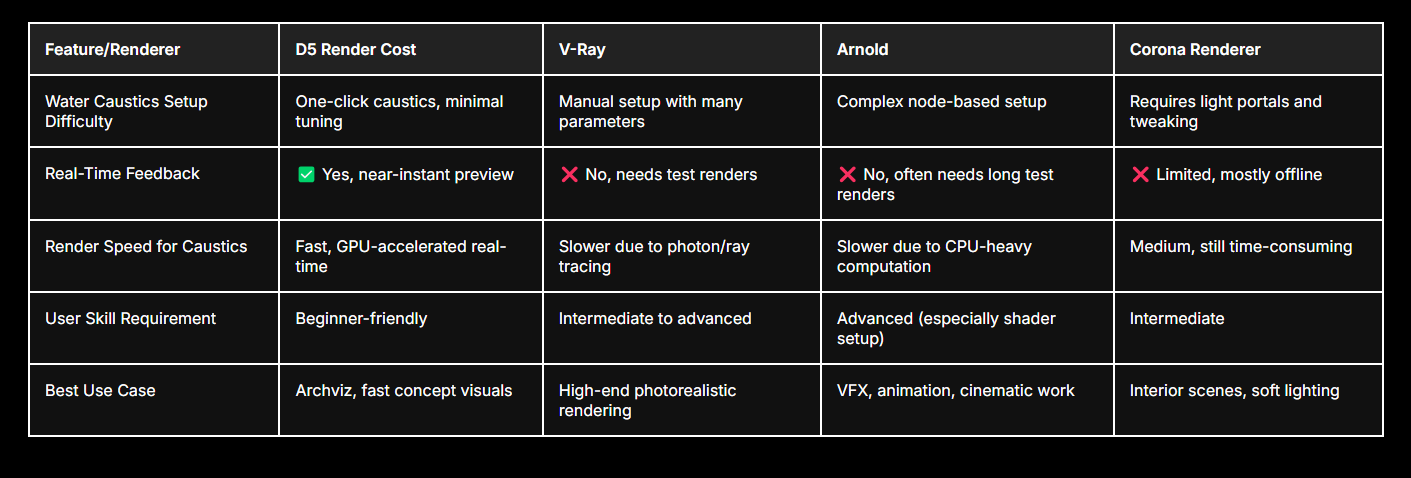
V-Ray や Arnold などの従来のレンダラーを使用する場合、ウォーターコースティクスの設定には時間がかかり、複雑になることがあります。多くの場合、何十ものパラメーターを手動で調整しなければならず、最終結果が出るまで何時間も待たなければなりません。これらのツールはフォトンマッピングやレイトレーシングに大きく依存しているため、正確ではありますが、特にリアルタイムのフィードバックを目指す場合は、ワークフローが大幅に遅くなる可能性があります。
D5を使うのにモンスターマシンは必要ありません。このソフトウェアは品質と速度のバランスが取れるように最適化されているため、お使いの PC がハイエンドでなくてもアクセスできます。D5 Renderは、「中程度のハードウェアでもスムーズなワークフローと素晴らしい結果が得られるように構築されています。」そのため、ラップトップや古いリグで作業している場合でも、システムをクラッシュさせることなく、光に満ちた美しい水景を作成できます。
Creating realistic water caustics in D5 Render can really take your scene to the next level. If you're new to this, don’t worry—I’ll walk you through every step in a clear and simple way.
A. Set Up Your Scene with Water
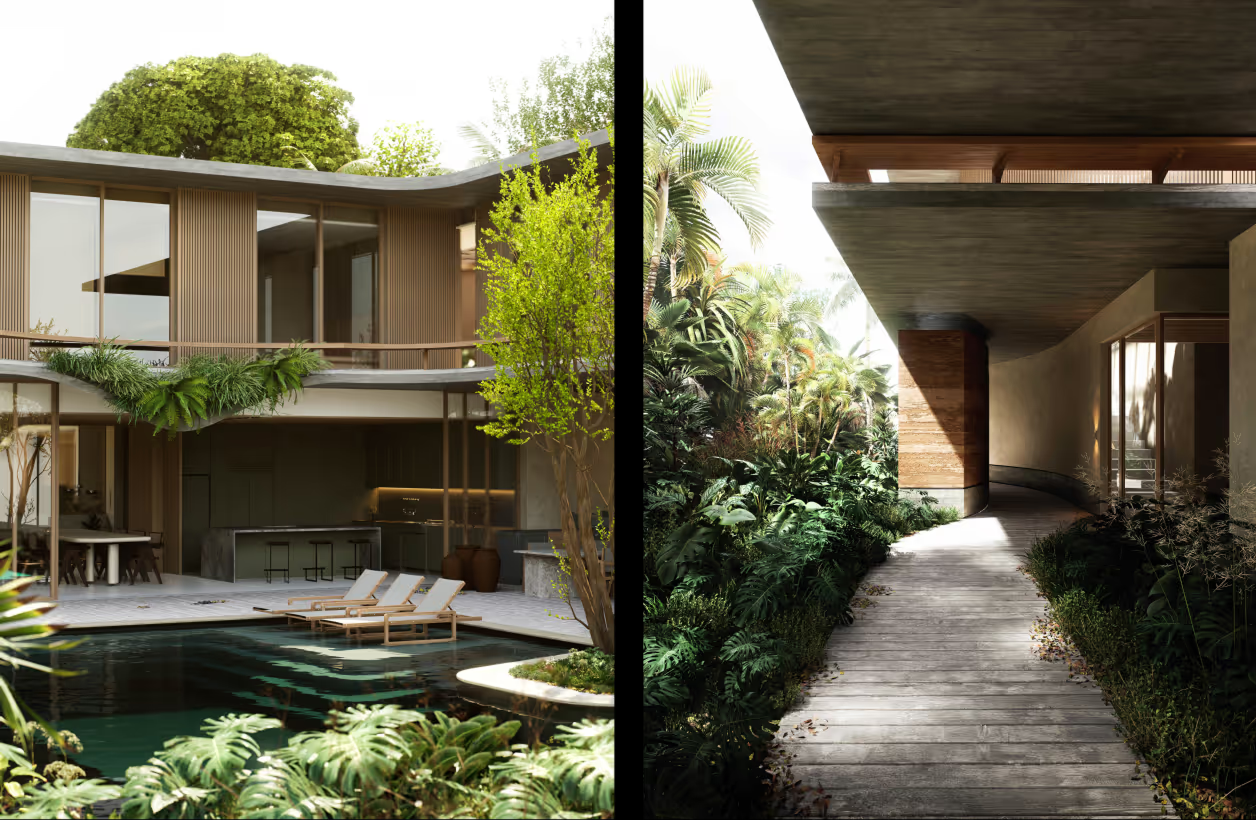
First, make sure your scene has a water feature—like a pool, fountain, lake, or even a puddle. Anything with a water surface will work.
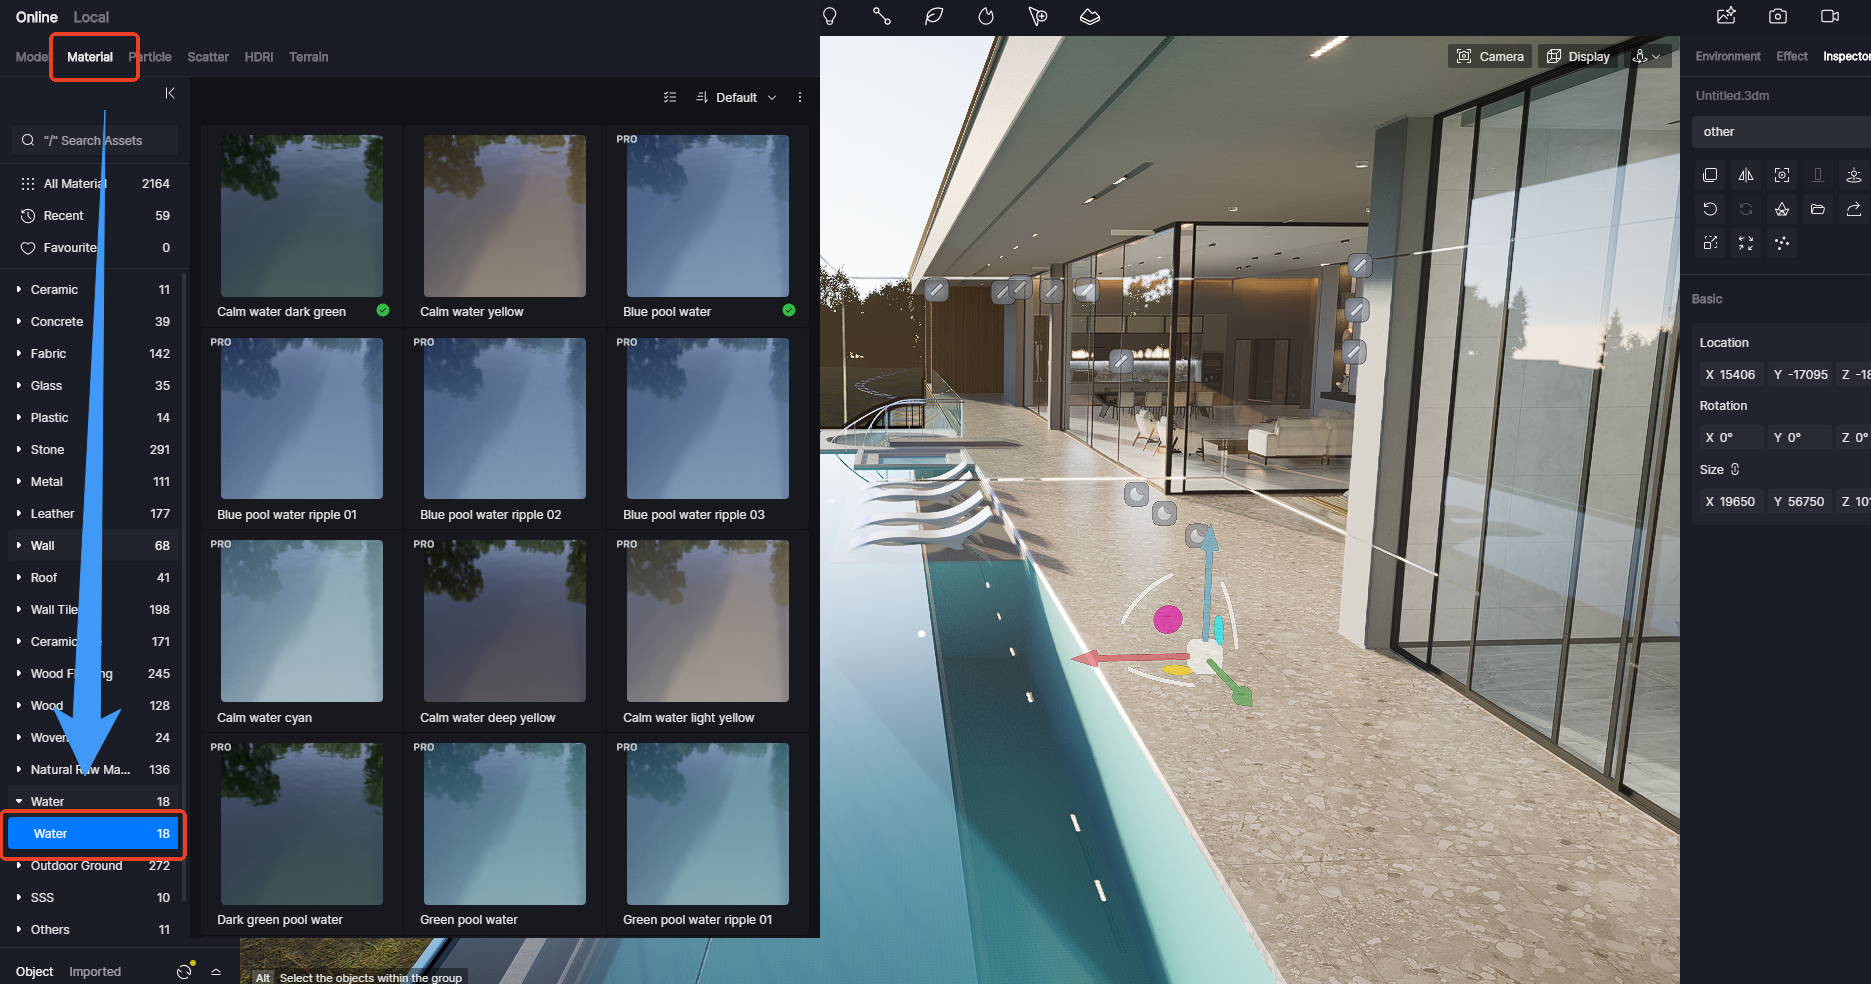
Then, go to the Material Library in D5 and apply the built-in 'Water” material to those surfaces. If you want a more custom look, you can open the Material Editor and tweak it to suit your style. D5 makes this pretty intuitive, even for beginners.
Note: The swimming pool needs a bottom, and the water surface should be a single-sided model.
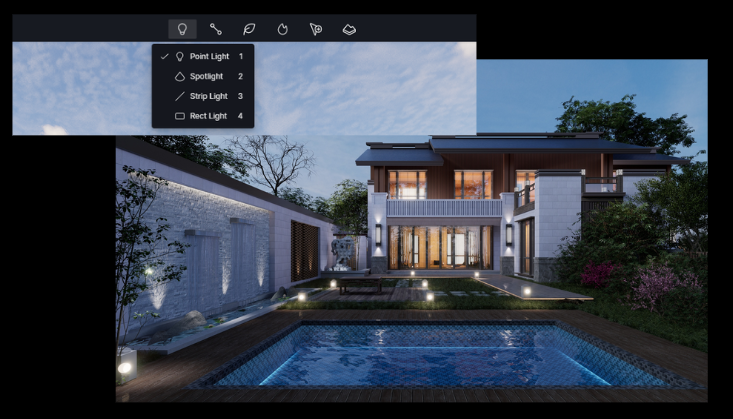
B. Set the Light Source
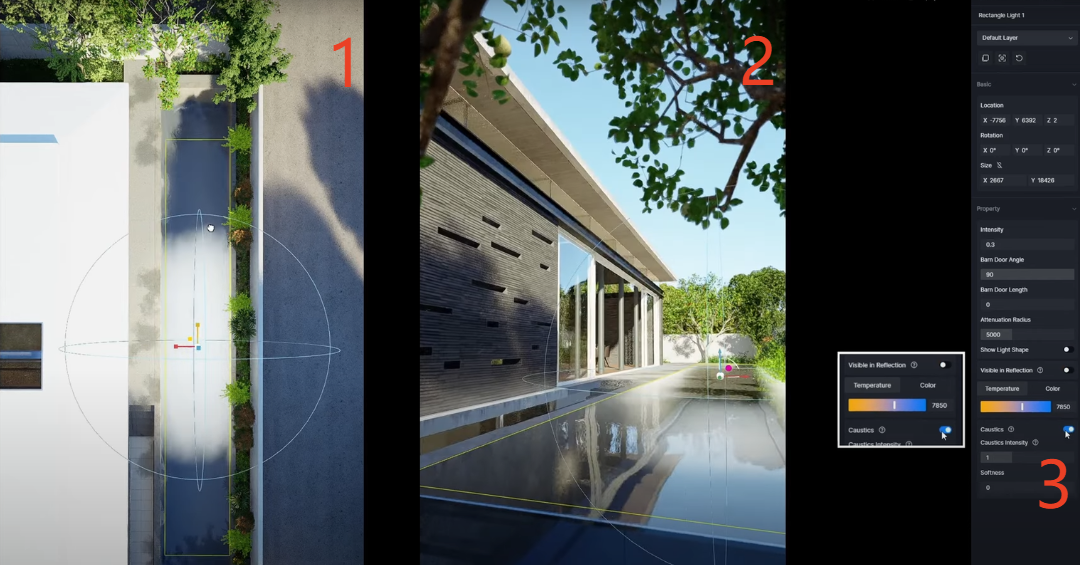
Water caustics rely on light to create their shimmering effect. Try adding light sources like point lights or spotlights to your scene—you'll find these options in the toolbar under the lighting section.
Once you’ve placed a light, click on it to open its Settings Panel. Here’s the important part: 👉 Enable the 'Caustics” option. This tells D5 to simulate how light bends and scatters through the water—this is what creates those gorgeous dancing light patterns on nearby surfaces.
C. Enable Caustics in the Water Material
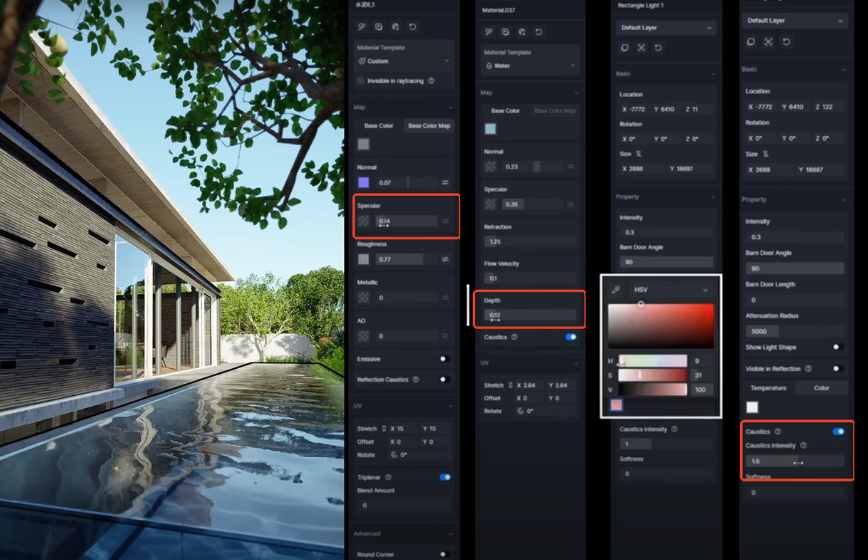
This step is just as crucial. Select the water material you applied earlier. In its settings, you’ll see a checkbox or toggle for 'Caustics.”Make sure it’s turned on!Now you’ll have access to additional options, like:
Intensity – controls how strong the light effects are.
Softness – adjusts how sharp or blurry the caustic patterns look.
Play around with these sliders until the water looks just right. You might want a soft, dreamy shimmer or a bright, dynamic sparkle—it’s all up to you!
Note: The normal map controls the look of patterns while flow velocity influences the wave speed.
D. Uther Adjustment
Reduce Material Specularity for Better ClarityTo make underwater caustics more visible, consider lowering the specular value of the pool bottom’s material. A less reflective surface helps the caustic patterns stand out more clearly.
Keep Water Depth Low Caustics become harder to see as water gets deeper. For a more pronounced effect, set the water depth to a relatively low value so that light can travel through more effectively.
Adjust Light Color to Influence Caustic HueThe color of the caustics is directly affected by the light source. Try experimenting with different light colors to create unique caustic moods and underwater atmospheres.
Control Caustic Spread with Light DistanceThe distance between the light source and the water surface plays a big role in how far caustics will spread. Moving the light closer or farther can change the size and intensity of the light patterns.
Fine-Tune Brightness and SoftnessIncreasing the scattering intensity will make the caustics appear brighter and more vibrant. Meanwhile, adjusting the softness setting controls how sharp or diffused the edges of the caustic patterns appear.
3.2 Tips for Enhanced Realism in Water Caustics
To achieve more realistic water caustics, start by incorporating normal maps. These maps add intricate surface detail to the water’s texture, helping to break up the light as it passes through, creating more organic, natural patterns. This subtle touch can significantly enhance the appearance of the caustic light, making it feel more authentic.
Additionally, consider animating both your water and light sources. Real-world caustics are never static—water is constantly moving, and the light shifts over time, causing the caustic patterns to evolve. By animating these elements, you can mimic this behavior and bring a greater sense of life to your scene.
For an even deeper level of realism, combine this with volume lighting techniques and weather effects. Adding volume lighting can help simulate the way light interacts with particles in the water, such as mist or fog, creating a more atmospheric look. Weather effects like rain or waves can further enhance the dynamic nature of the scene, making it feel like the environment is alive and constantly changing. When combined, these elements can take your visuals from realistic to truly immersive.
If you’ve ever tried rendering water caustics in traditional software, you know how tough it can be. Setting up realistic lighting, fine-tuning materials, and waiting hours for a final render is not just time-consuming—it’s frustrating. That’s where D5 Render changes the game. Let’s break down why D5 makes working with water caustics faster, easier, and way more fun.
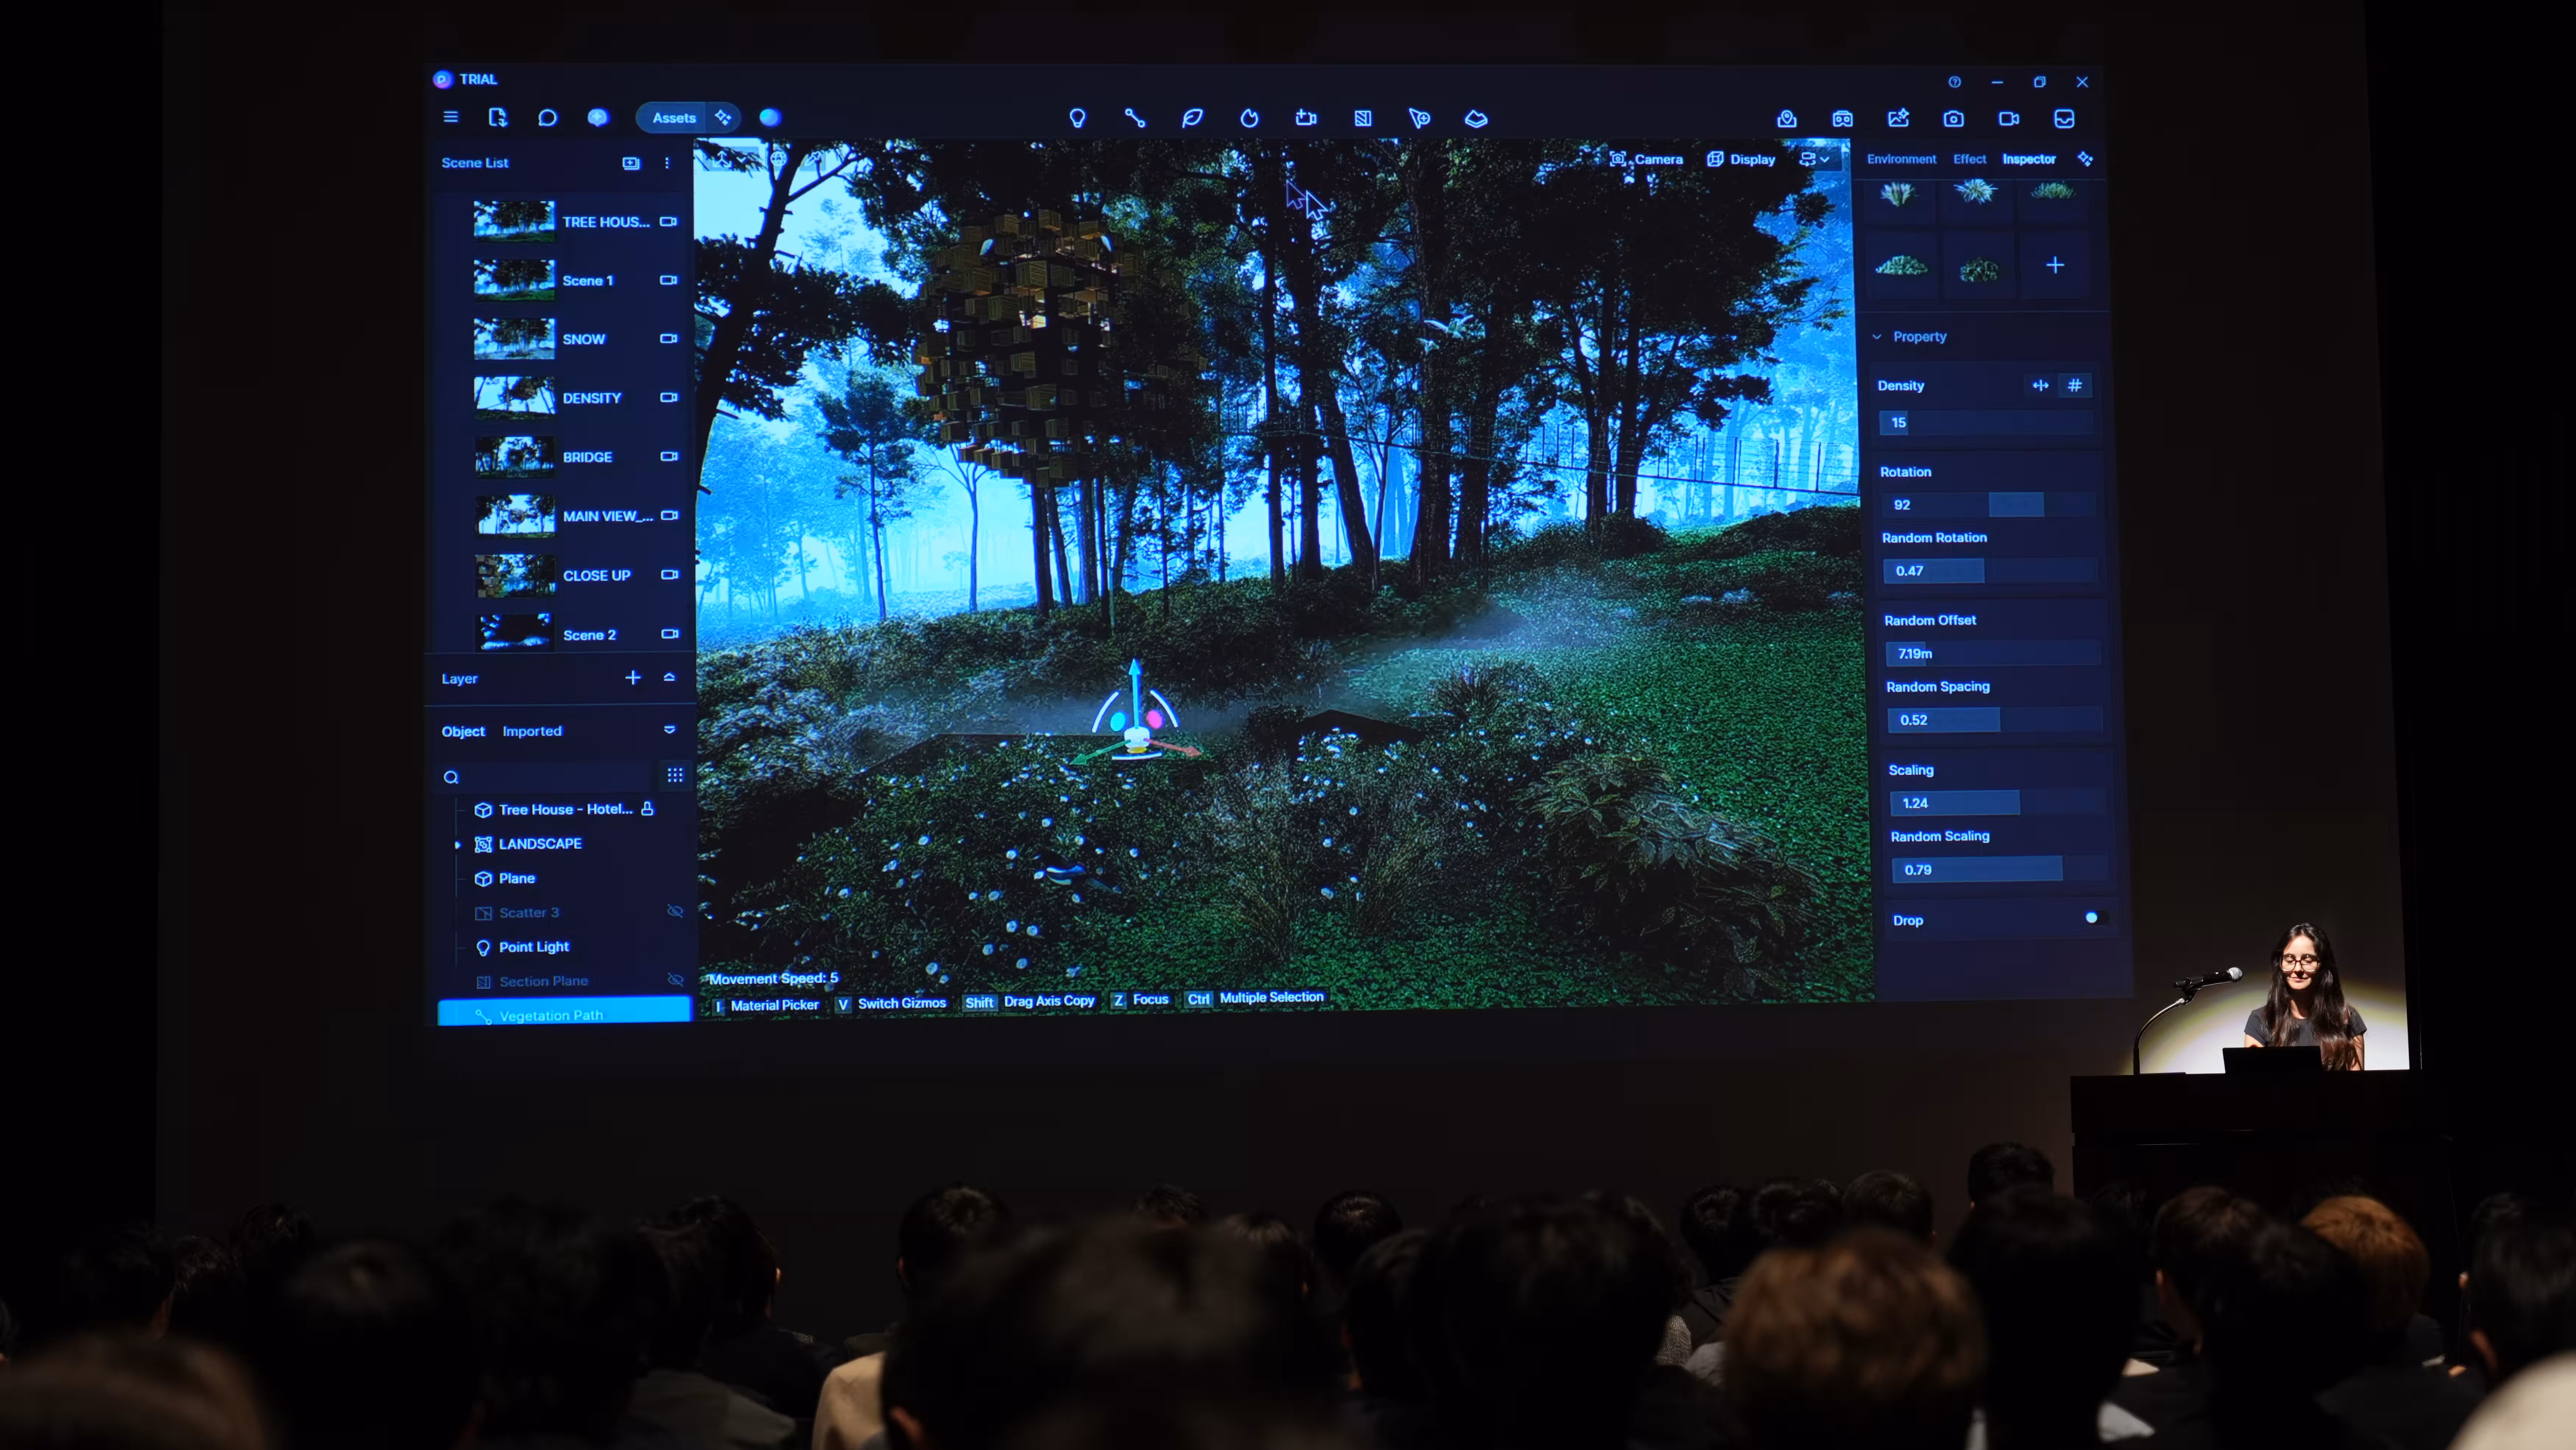
4.1 User-Friendly Interface
First off, D5 Render is designed with simplicity in mind. You don’t have to dig through endless settings or use third-party plug-ins just to get caustics working. With just a few clicks, you can turn on the caustics effect in your light source settings and assign compatible materials like 'water' or 'glass'. 'Users can simply toggle the Caustics switch on applicable lights and see the result instantly.' That means less technical headache and more creative freedom—especially helpful if you're not a rendering expert.
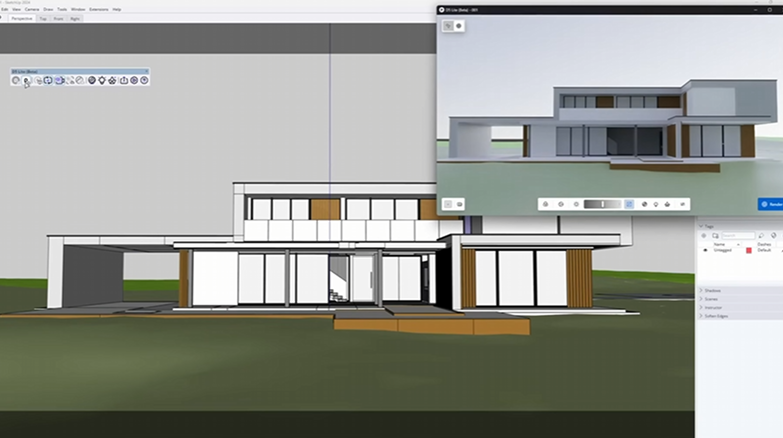
4.2 Real-Time Rendering
Unlike most traditional renderers that require long waiting times, D5 gives you real-time feedback. This is huge. As you move your light or adjust your water material, you’ll instantly see how the water caustics change in your scene. This is possible thanks to D5’s GPU-powered engine, which is built for speed and visual accuracy. D5 Render introduced real-time caustics as a core feature, so you’re not sacrificing quality for convenience.
4.3 Optimized Performance
You don’t need a monster machine to use D5. The software is optimized to balance quality and speed, making it accessible even if your PC isn’t high-end. D5 Render is 'built to deliver smooth workflows and stunning results, even on moderate hardware.” So if you’re working on a laptop or an older rig, you can still create beautiful, light-filled water scenes without crashing your system.
One of the coolest things about D5 is how well water caustics work alongside other effects. You can mix caustics with features like volumetric lighting, animated water surfaces, or even real-time weather effects. The result? Deeply immersive environments that don’t just look good—they feel real. Everything blends seamlessly, which helps tell a better visual story whether you're working on an architectural project or a product showcase.
Understanding and applying water caustics in your 3D scenes can make a huge difference in how real and engaging your renders look. These light patterns help bring scenes with water or glass to life, adding that extra layer of detail that makes your work stand out.
With D5 Render, you don’t need to stress over complicated setups. If you’re serious about improving your renders, now’s the perfect time to explore what D5 Render can do. Try adding water caustics to your next project—you’ll see just how much they elevate the final result.
1. What causes inaccurate or distorted water refraction in D5, and how can it be fixed?
Water refraction issues usually stem from incorrect model setup. Make sure the water material is applied to a single-sided surface. Also, fine-tuning the depth parameter of the water material can help achieve a more physically accurate appearance.
2. Why does the water surface in D5 appear flat or visually unappealing?
This typically results from insufficient surface detail. Users should enhance the water material by adjusting the normal map settings, which control the appearance of ripples and waves. Increasing the normal intensity can significantly improve visual fidelity.
3. Why do white highlights or visual artifacts appear during animation renders involving water?
This issue often arises from inconsistent lighting or shader behavior between static and dynamic frames. Ensure that lighting settings remain stable throughout the timeline, and avoid extreme refraction values. If the problem persists, contact D5’s support team for further assistance.
4. What causes the water material to render incorrectly or not at all?
Always apply the water material to a single-sided model, as D5 does not support backface rendering for transparency. In some cases, placing a ground plane just below the water surface can help maintain optical consistency and prevent rendering glitches.
5. Why are water caustics not visible on the bottom of pools or underwater surfaces?
This is usually due to insufficient lighting intensity. Caustics effects require strong directional lighting, typically from the sun or high-powered artificial lights. Increasing the light strength and adjusting the angle can make caustics more pronounced.


.gif)


.png)


.png)


.jpg)


.png)

1%20(2).png)


%20(1).png)
.png)
.png)