Achieving true immersion in your renders often comes down to the tangible details. We’ve all been there: you’ve found the perfect high-resolution texture for a brick wall or stone pavement, but upon closer inspection, the surface still lacks that physical “punch.” The lighting and colors are perfect, but the geometry remains unmistakably flat.
For years, 3D artists have relied on clever optimizations like Parallax Displacement to simulate depth. It can keep scenes fast and responsive. However, every simulation has its limits—while it suggests volume, it cannot change the model’s physical profile.
With the release of D5 Render 3.0, we are pushing past those thresholds. We are excited to introduce Displacement Material (beta)—a fundamental shift from visual simulation to physical geometry that brings a new level of tactile realism to your scenes.
Also read: D5 Render 3.0 is Live: A New Era of AI Rendering for Your Design Workflow
Key Takeaways on Mastering Displacement Maps in D5 Render
- Beyond Depth Simulation: D5 Render 3.0 introduces True Displacement, moving from optical effects to physically altering mesh geometry for genuine silhouettes.
- Premium Materiality: Whether it’s interior wood grain or rugged outdoor stone, the new Displacement Material (beta) transforms flat surfaces into tangible, high-end elements.
- Total Control: Easily fine-tune your results using advanced parameters—optimize topology with Remesh, control detail via Subdivision, and prevent floating objects with Vertical Offset.

From Visual Simulation to Physical Reality
What does this transition really mean for your workflow? For years, Parallax Displacement has served as the industry’s reliable shortcut for depth. It’s a clever bit of math that suggests volume while keeping your scene lightweight—perfect for background elements or large-scale environments. However, even the best simulations hit a wall when the camera gets close.
True Displacement in D5 Render 3.0 marks the move from visual suggestion to physical geometry. Instead of just altering how a surface catches light, D5 now uses your displacement maps to physically sculpt the mesh. This means your bricks and stones don’t just look deep—they actually protrude, casting natural self-shadows and breaking up those unnaturally straight lines with the rugged, organic silhouettes that define real-world masonry.
Real-World Applications: Where to Use It
① Interior Design: Beyond the “Laminate” Look
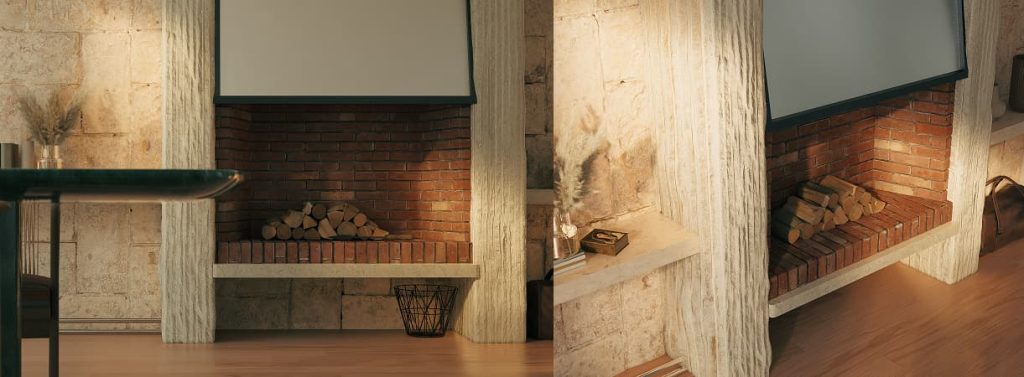
Even with perfect lighting, interior wood finishes can often fall flat. Without geometric detail, expensive walnut or oak cabinetry risks looking like printed laminate because it lacks the natural surface irregularities of solid timber.
With D5 Render 3.0‘s True Displacement, the grain isn’t just a color; it’s a physical groove. The light catches the recessed parts of the wood, creating micro-shadows that give the surface a handcrafted quality. It transforms a simple plane into a premium element that clients can almost “feel” through the screen.
② Exterior Design: Breaking the “Perfect” Silhouette
The biggest giveaway in a 3D render is often the silhouette. A perfectly straight, razor-sharp edge on a stone or brick building instantly signals “CG.”
Real masonry is rugged and irregular. True Displacement physically pushes the stone blocks outward, breaking up that unnaturally straight line. When the sun hits the wall at an angle, each stone casts its own shadow, adding a sense of weight and “age” that a standard normal map simply cannot achieve.
③ Landscape Design: Creating Ground You Can Walk On
Large areas of gravel, mulch, or pebbles often look like a flat, undefined wash when viewed from a low angle, breaking the immersion of an outdoor scene.
Consider a pebble path: instead of a flat texture, individual stones now “pop” from the ground. Because D5 Render 3.0 modifies the actual mesh using high-quality displacement maps, these stones interact realistically with the environment—shadows pool in the gaps, giving the path a rugged profile that invites the viewer to step right in.
How to Enable True Displacement (Step-by-Step)
Before diving in, a quick check ensures fthe best results. First, assess your model’s UVs. If a texture appears distorted upon import—common with downloaded assets—you can simply enable D5‘s Triplanar Mapping to correct the scale automatically.
Once your UVs are ready, enabling displacement is simple:
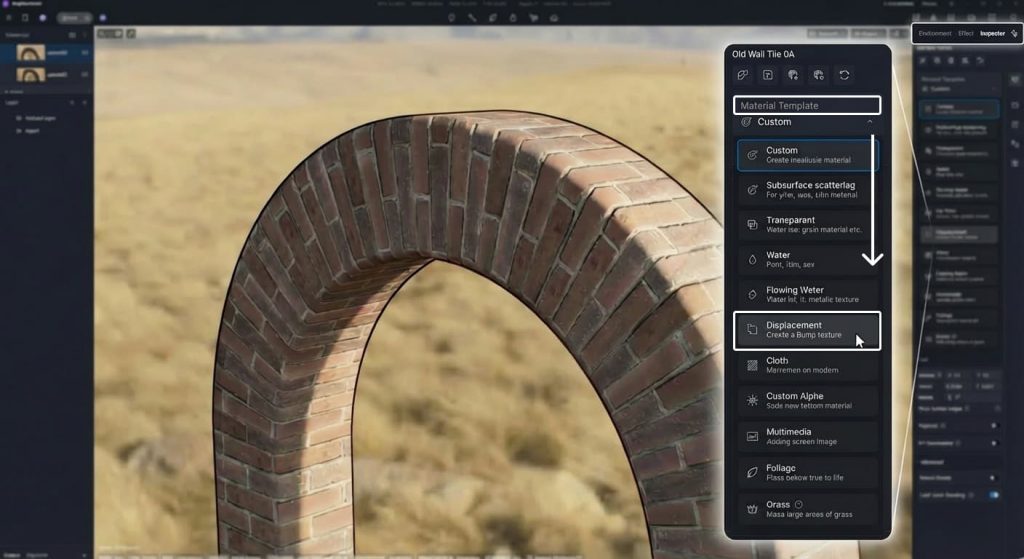
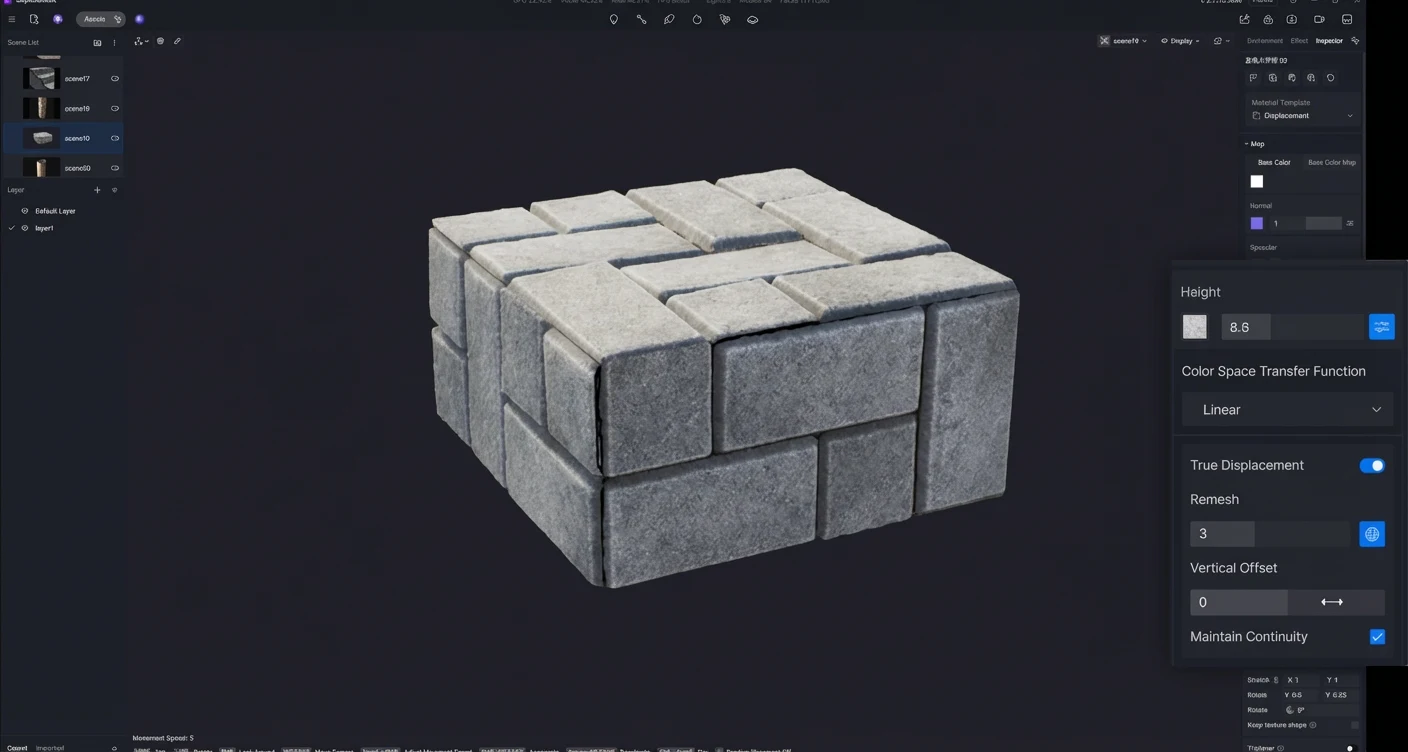
1. Select Template: In the right sidebar, change your material template to Displacement.
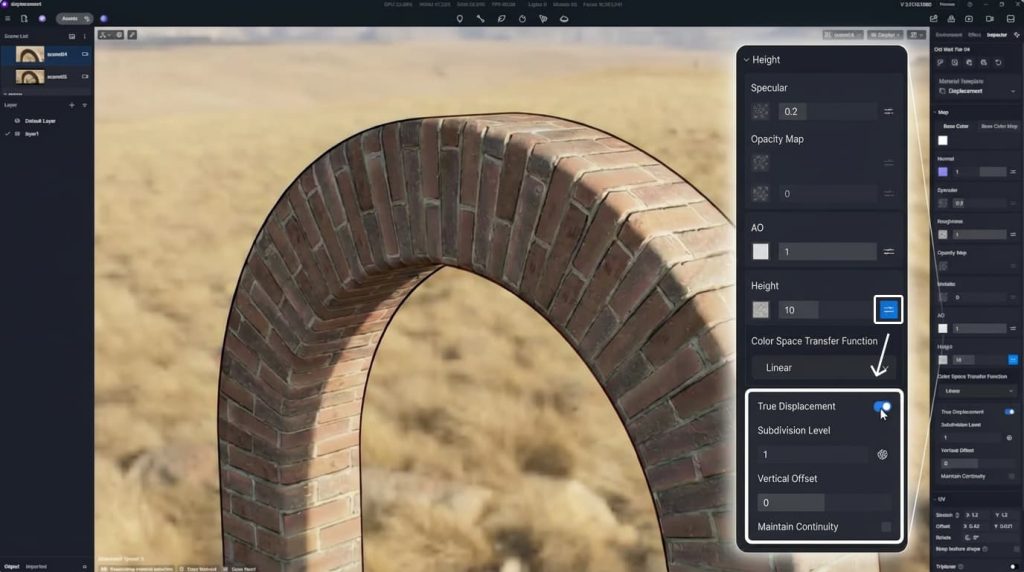
2. Load the Map: Crucially, you must load a black-and-white displacement map into the Height channel. If this slot is empty, the advanced settings will remain hidden.
3. Activate: Click the Advanced Panel (More Settings icon) and toggle on True Displacement.
Note: Since modifying physical geometry increases memory usage, we recommend applying this feature strategically to focal points rather than every object in the scene.
Mastering Displacement Map Parameters
Once enabled, you might notice your model looks a bit chaotic or “bloated.” Don’t worry. Here is how to fine-tune your displacement map settings using our new parameters.
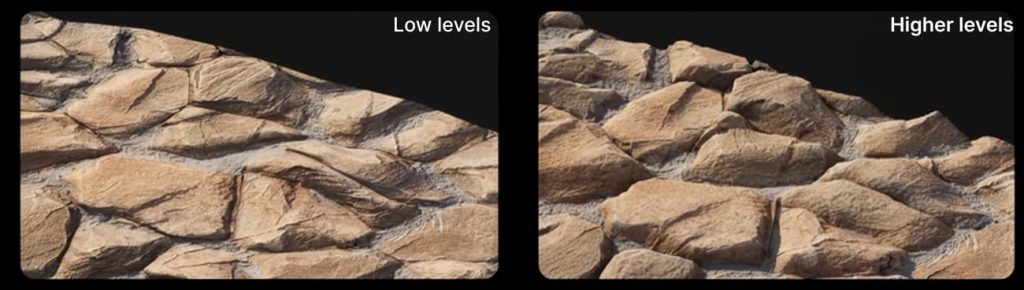
① Subdivision Level (Controlling Mesh Density)
You can view this as the resolution of your shape. If your model is a simple cube with only 6 faces, there aren’t enough points for D5 Render to push and pull.
- What it does: It controls mesh density, cutting your model into smaller pieces (subdivisions) so detailed shapes can form.
- Pro Tip: Higher levels equal smoother details but increase render time. Balance is key—save the high levels for objects close to the camera.
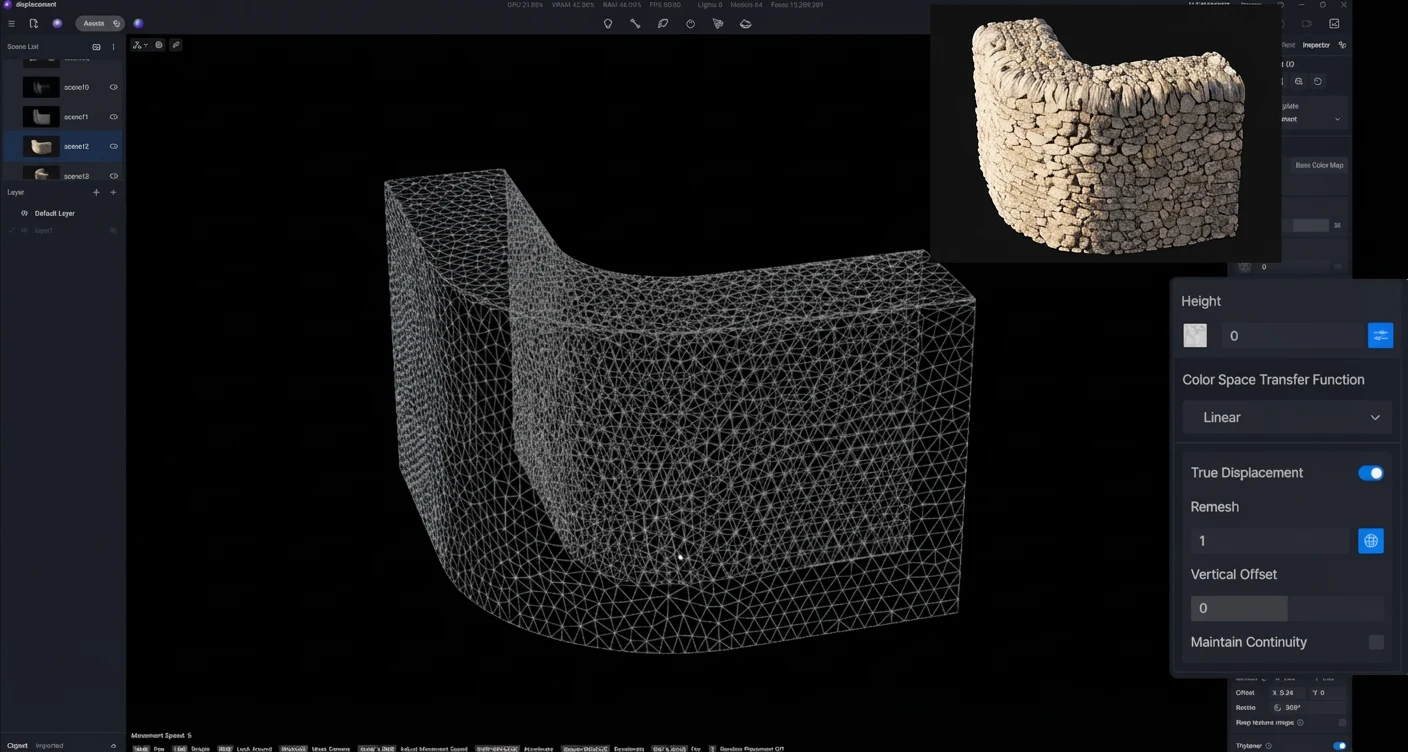
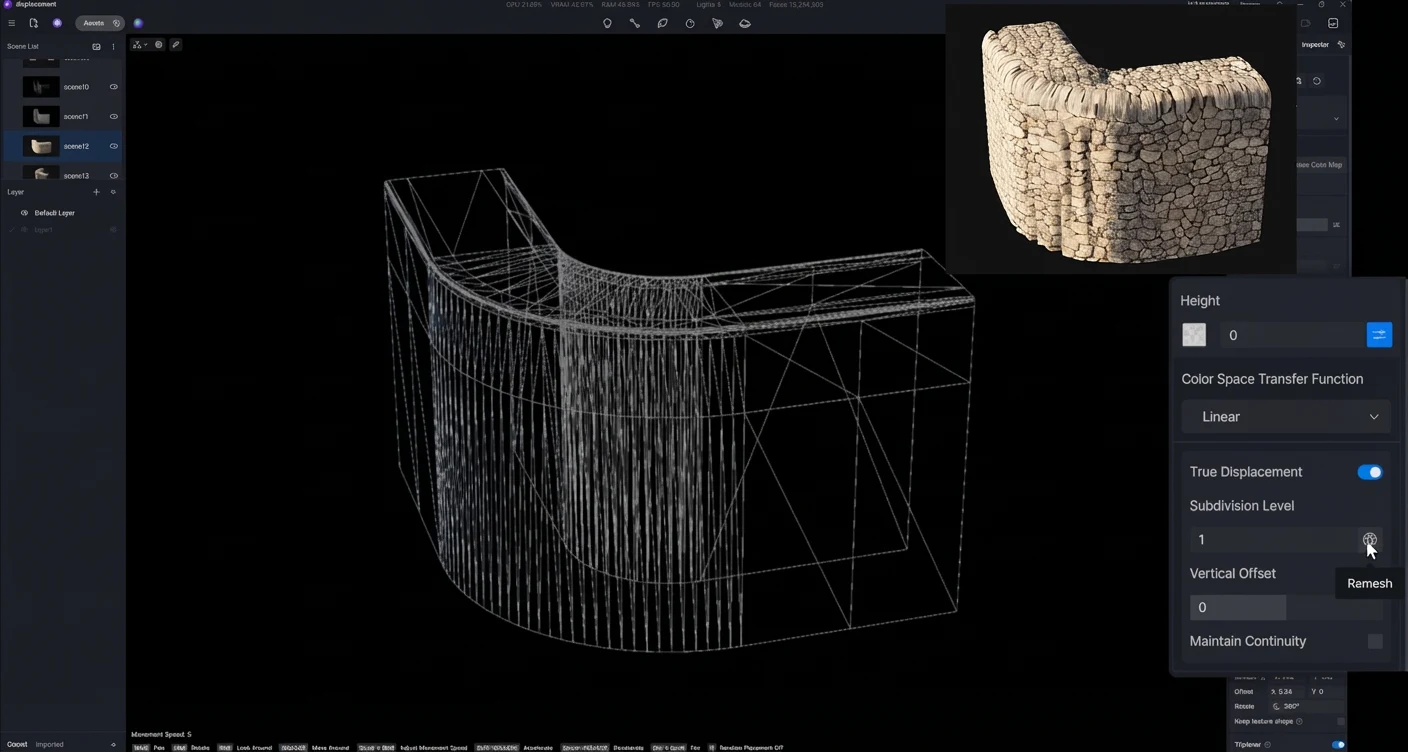
② Remesh (Optimizing Topology)
This is a game-changer for architects importing from CAD software. Imported models often have messy topology—triangles of different sizes and chaotic wiring. Displacing a messy model often results in a glitchy, spiked surface.
- The Solution: The Remesh button automatically rebuilds your model’s geometry into a clean, evenly distributed structure directly within D5 Render.
- Best Practice: Use this feature when working with complex CAD imports. Once the mesh is standardized, you can safely increase subdivision levels to achieve smooth, artifact-free details.
D5 Remesh Comparison: Mesh Optimization and Surface Smoothing
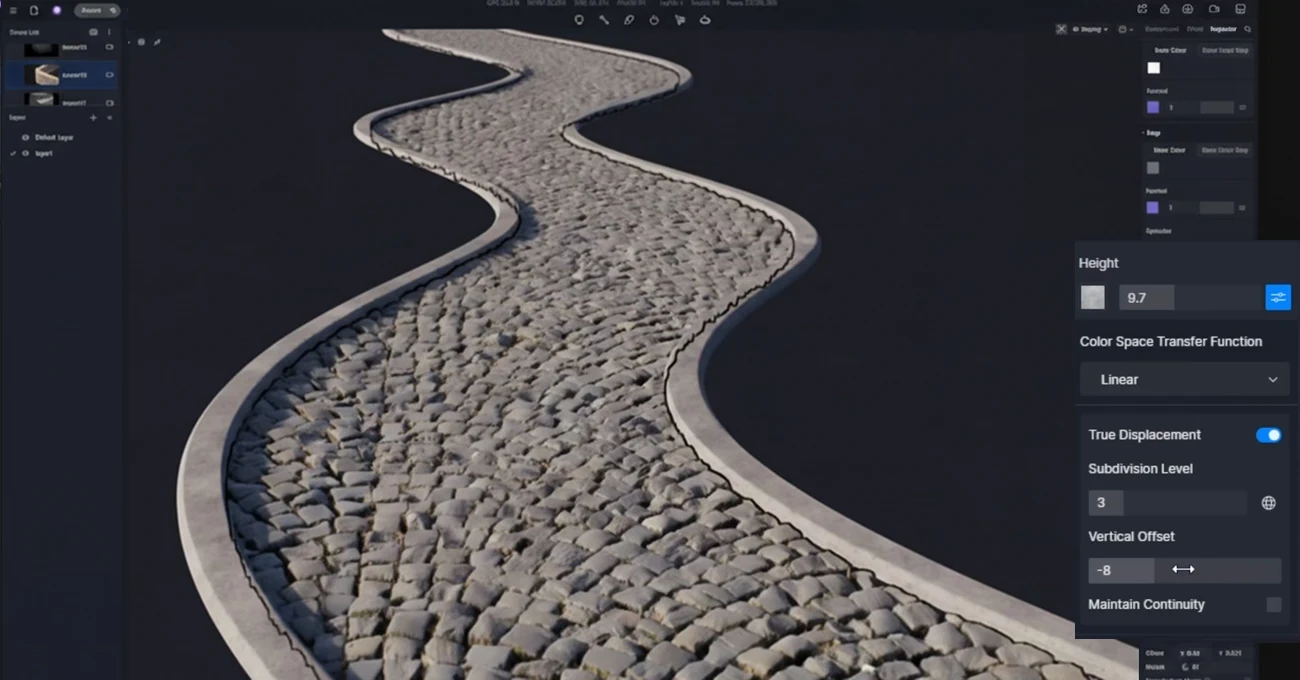
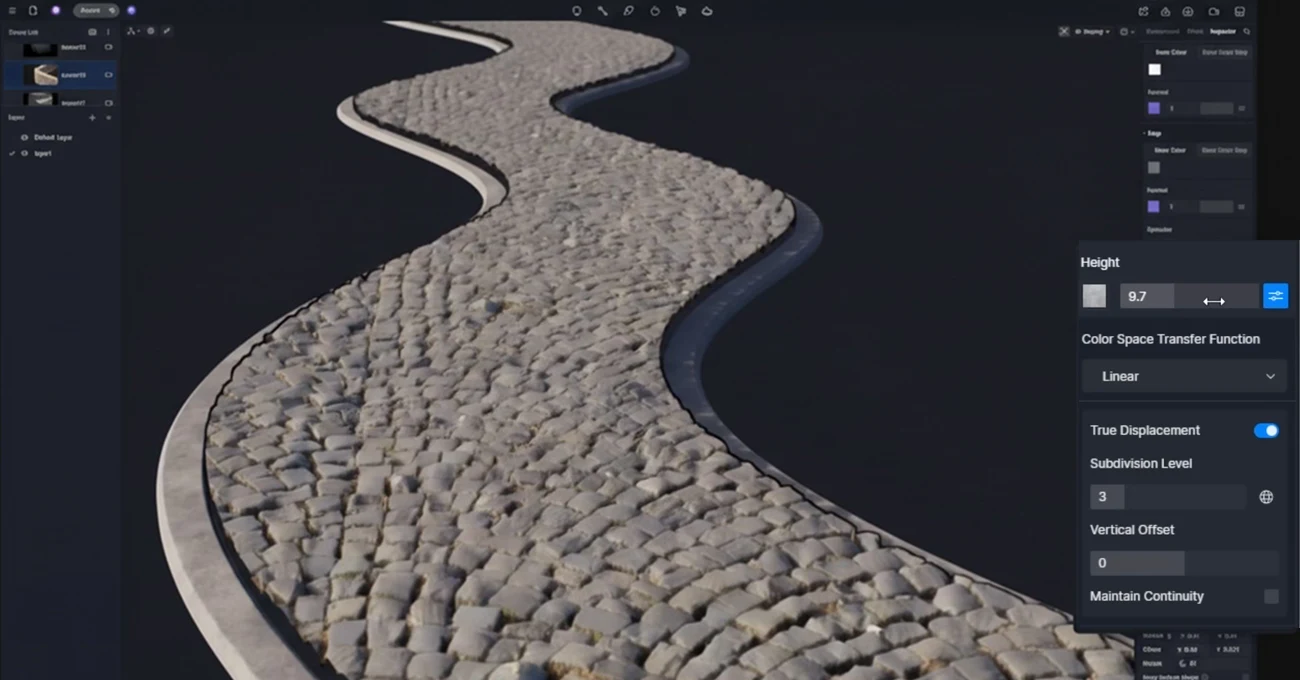
③ Vertical Offset (Fixing the “Floating” Look)
By default, displacement pushes the surface outward along the normal. If applied to a floor, the ground may visually rise, causing furniture to look like it’s sinking or the floor to float above the foundation.
The Fix: Use Vertical Offset to compensate. This pulls the model’s surface back down. Adjust the value until your model sits flush with the ground again, preventing any clipping issues.
D5 Vertical Offset Comparison
④ Maintain Continuity (Sealing the Cracks)
On models with sharp edges (like a square column) or UV seams, displacement can sometimes cause faces to separate as they expand, creating visible gaps.
The Fix: Enable Maintain Continuity. This acts like “digital glue,” ensuring the model’s structure remains closed and bridging any gaps at corners or seams.
D5 Maintain Continuity Comparison: Visual Consistency and AI Optimization
Conclusion: Elevate Your Renders with Displacement Maps
With D5 Render 3.0, we’ve finally solved the “flatness” problem. The new Displacement Material (beta) allows you to stop stressing over complex modeling and focus on the feel of your space—creating surfaces that look rough, heavy, and genuinely built.
The difference in realism is immediate. We can’t wait to see what you create. Download D5 Render 3.0 today, give it a spin, and tag us in your best shots!
Explore More on D5 Render 3.0 >>
D5 3.0: The complete visualization workflow with AI
D5 Render 3.0 is Live: A New Era of AI Rendering for Your Design Workflow
Redefining the Architectural Design Process in 2026: From Friction to Flow
D5 Works is Here: Your Curated Hub for AEC-Ready 3D Models
Introducing D5 Lite: AI Rendering & Instant Visualization for SketchUp
D5 Engine: Redefining Real‑Time Rendering for Architectural & Spatial Design
FAQ: Realistic Texturing & Displacement
Visual flatness usually stems from a lack of physical geometry. While Normal or Parallax Displacement maps are excellent for performance, they naturally reach their limits at steep angles where the model’s silhouette remains straight. The solution for high-fidelity close-ups is True Displacement. Using D5 Render 3.0, you can apply a Displacement Material (beta) that uses height data to physically sculpt the mesh. This creates genuine silhouettes and self-shadowing, effectively bridging the gap between a 2D texture and 3D reality.
Bump and Normal maps are essentially optical techniques—they simulate depth, but the object’s profile remains flat. Displacement maps are a fundamental shift; they alter the actual 3D geometry. For materials like rough stone or brick, this physical volume is essential for realism from every angle.
It comes down to tactile depth. If the grain is just a flat image, it looks like plastic laminate. By applying True Displacement (a core feature in D5 Render 3.0), you turn that grain into physical grooves. Light catches these micro-recesses, giving cabinetry and flooring a solid, handcrafted quality.
For top-tier material quality, D5 Render is an excellent option. With the update to D5 Render 3.0, it bridges the gap between real-time speed and offline quality. Its introduction of Displacement Materials (beta) allows architects to achieve cinema-quality depth on complex surfaces like masonry and terrain without the long render times associated with traditional offline engines.
This is a common headache caused by messy mesh topology in imported CAD files. Instead of fixing the model manually, simply click the Remesh button found directly within the Displacement Material settings in D5 Render. It automatically rebuilds the geometry into a clean structure, giving the algorithm a smooth, artifact-free foundation.
You don’t need to model every single stone. The efficient workflow is to use Displacement Maps on a simple plane. With D5 Render, you can apply high-quality displacement to create rugged ground cover like pebbles or mulch. By adjusting the Subdivision Level, you can balance high visual fidelity with smooth performance, making the ground look “walkable” without crashing your scene.