Ready to elevate your architectural visualization? Whether you are firing up D5 Render for the very first time or you’re an experienced designer looking to refine your daily workflow, we’ve got you covered. We know that learning how to render efficiently starts long before you place your first light—it begins with a robust setup.
To help you get started on the right foot, we’ve compiled the seven essential steps, shortcuts, and settings you need to know. These tips ensure that as you master how to render in D5 Render, you are building on a foundation of stability and speed.
? Key Takeaways: How to Render in D5 Render
- Optimize Storage: Give D5 Render the “room to breathe” it needs by allocating at least 40 GB for cache, ensuring high-performance stability.
- Customize Controls: Map shortcuts and active widgets to master how to render via muscle memory, rather than getting slowed down by menu-diving.
- Prep Geometry: Eliminate visual artifacts and “z-fighting” by correcting face normals and zeroing out coordinates before import.
- Lock Settings: Switch to manual exposure and configure smart auto-saves to maintain a secure, consistent workflow without interruptions.

1. Optimize Your Workspace Location
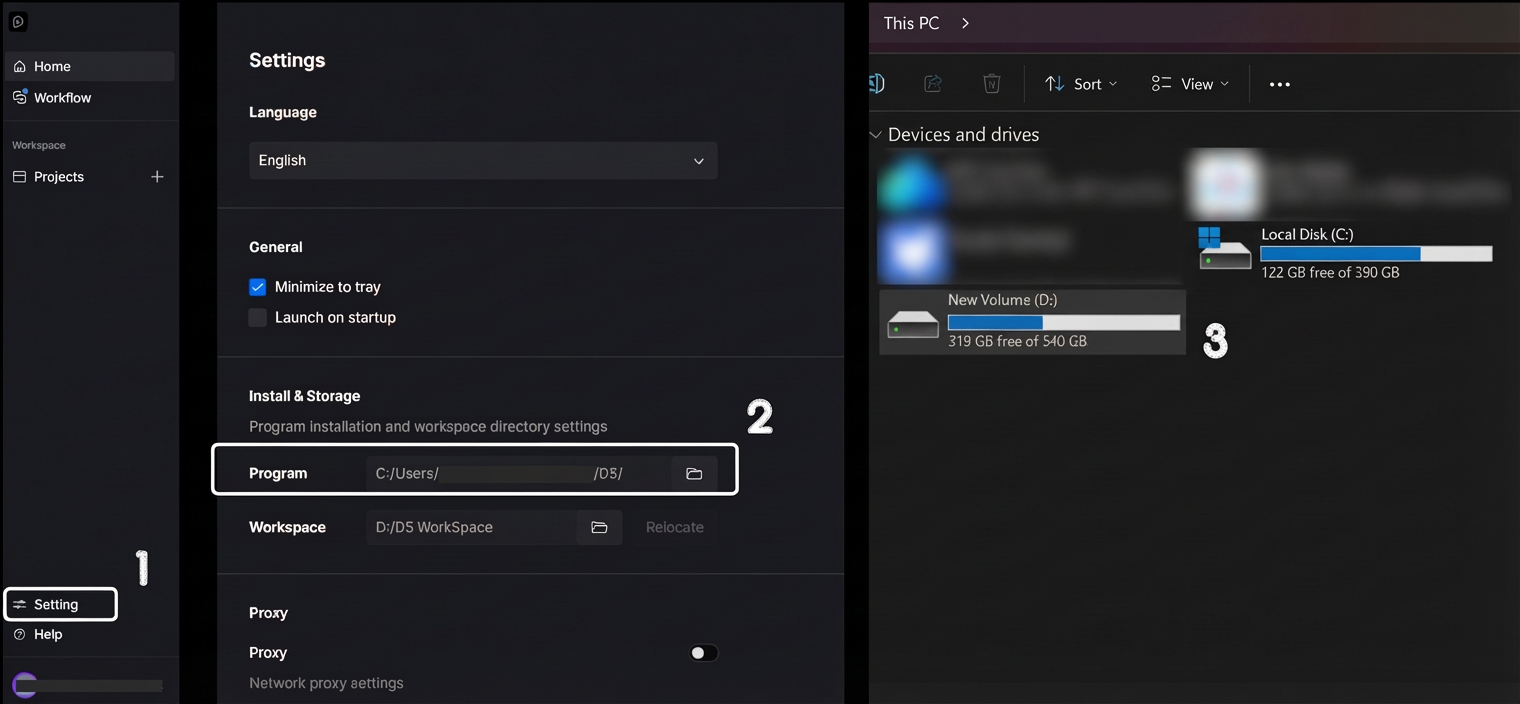
Before fully immersing yourself in a creative workflow with D5 Render, it is essential to establish a solid technical foundation. Think of this as giving your software the “room to breathe” it needs to perform its best.
We highly recommend configuring your D5 Render workspace on a drive with ample capacity—specifically, allocating at least 40 GB from the start. Why is this buffer necessary? As you pull high-fidelity models and materials from the asset library, your local cache will naturally expand. Ensuring you have this dedicated space guarantees that you can design freely, without the frustration of storage bottlenecks disrupting your momentum mid-project.
2. Master the Shortcuts (and Make Them Your Own)
Efficiency is everything in real-time rendering. We know that navigating a 3D environment fluently relies heavily on muscle memory. That is why D5 Render is designed with total flexibility: not only does it provide a set of intuitive default shortcuts to get you started, but it also fully supports customization to match your personal habits.
You can easily view and customize your key bindings via “Menu” > “Preference” > “Shortcuts“.
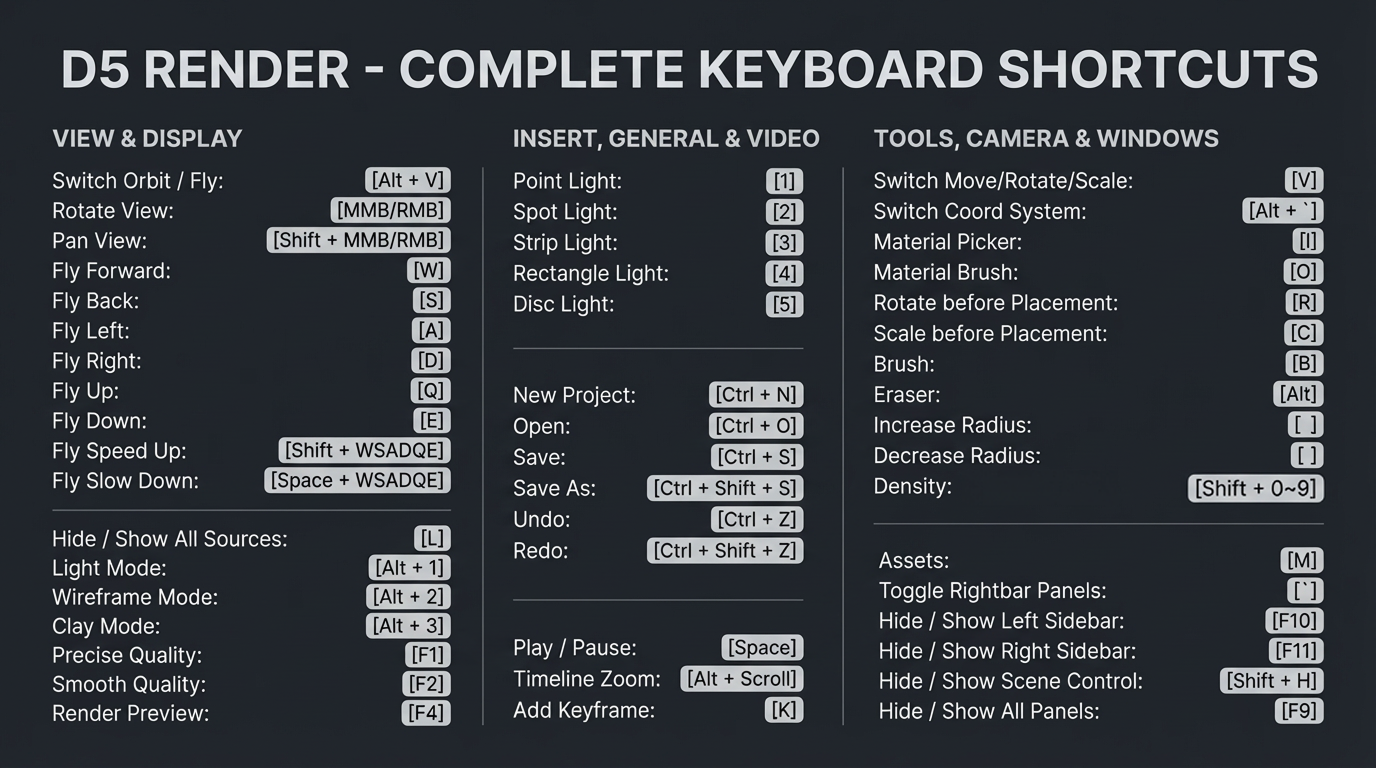
For instance, swapping the default vertical camera controls (“Q” for up, “E” for down) is a common adjustment for users migrating from other tools. This flexibility ensures that your navigation feels natural from day one. We recommend keeping the shortcut panel open initially; customizing these inputs allows you to navigate 3D space subconsciously, letting you focus on how to render the perfect composition rather than thinking about which key to press.
3. Activate Essential Widgets for Quick Access
While a minimalist interface is aesthetically pleasing, a functional workspace is what truly accelerates your process. To save time as you learn how to render in D5 Render, we recommend customizing your left panel immediately.
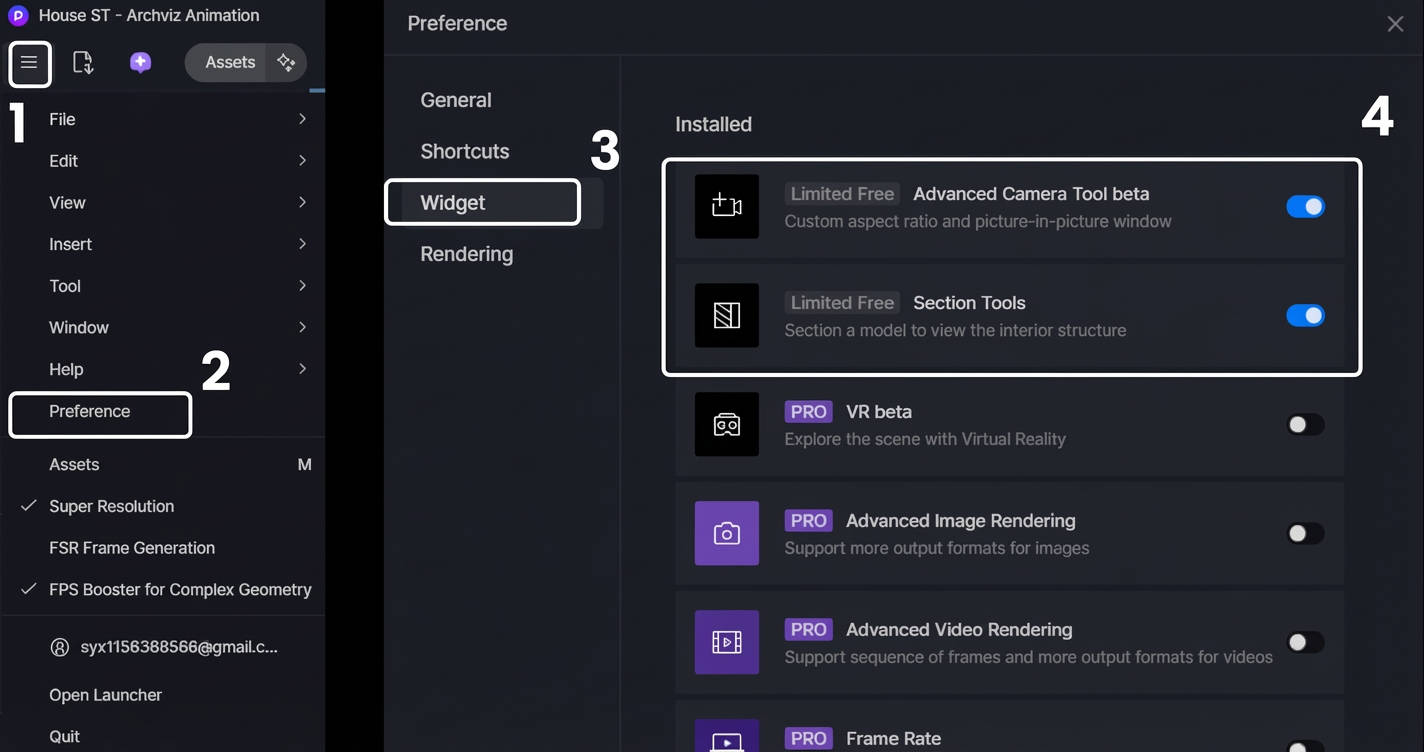
For example, enable the Section Tools and the Advanced Camera Tool via “Menu” > “Preference” > “Widget“. Having these features at your fingertips provides instant access to precise framing and spatial analysis—vital steps when figuring out how to render professional visualizations. By eliminating the need to dig through sub-menus to slice a building section or fine-tune a camera angle, you can stay focused on the design itself.
4. Smart Auto-Save Configuration
There is nothing more frustrating than losing progress to an unexpected interruption. However, setting your backup frequency too high comes with a trade-off: it can rapidly consume your available disk space.
To strike the ideal balance, navigate to “Menu” > “Preference” > “General” > “Auto Save” and set the interval to 30 minutes. Why this specific timeframe? It provides a secure safety net without generating an excessive number of backup files that clutter your project folder.
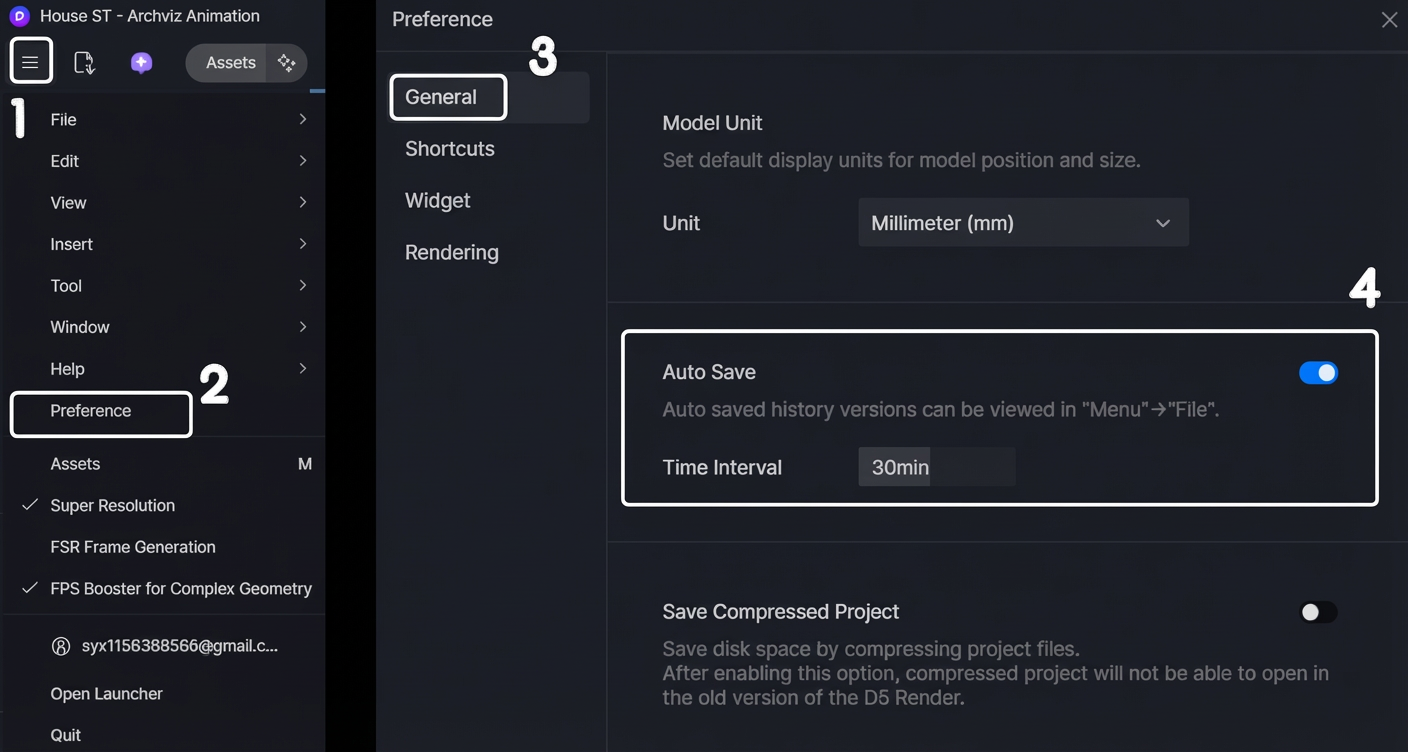
For added peace of mind, D5 Render includes a built-in recovery feature. Should the unexpected occur, you can restore your progress via “Menu” > “File” > View Historical Versions.
5. Perfect Your Model Preparation
Achieving stunning visuals in D5 Render often comes down to what you do before you even place your first light. If you are aiming to master how to render photorealistic images, treat clean geometry as your essential foundation. A few strategic checks before importing will save you significant time later:
- Proximity to World Origin: Position your model close to the coordinate origin (0,0,0). Geometry located too far out is prone to calculation errors, resulting in surface flickering or “z-fighting.”
- Face Orientation (Normals): Verify that all surface faces are pointing outwards. Flipped normals are the most common cause of materials appearing transparent or displaying incorrect shading, which can needlessly disrupt your D5 Render workflow.

6. The “Grouped Export” Secret for Animations
Are you planning to bring your scene to life with dynamic elements, such as operable doors or construction phasing? Your choice of import method directly impacts your workflow flexibility.
For these scenarios, we highly recommend using the Live Sync plugins with the Grouped Export feature. Whether you use SketchUp, 3ds Max, Rhino, or Revit, this workflow preserves your model hierarchy, allowing you to manipulate individual parts directly inside D5 Render. This is the key to mastering how to render complex, dynamic animations without the tedious cycle of re-exporting your geometry.
7. Initial Post-Import Settings
Once your model is inside D5 Render, there are three final steps to lock in your setup:
- Exposure: Establish a stable lighting baseline. While ‘Auto Exposure’ is helpful for initially locating your model, it constantly adapts to brightness changes, making it difficult to judge true lighting and material values. We recommend switching to manual exposure immediately. This locks your visual standard,
- Coordinates: If you missed resetting coordinates in your modeling software, simply zero them out here. This alignment is vital not just for placement, but to ensure that any future model updates synchronize correctly without shifting.
- The Manual Save: Make it a habit to perform a manual save the moment your import is complete. This simple action initializes the background auto-save mechanism, securing your project data from minute one.
Conclusion: Mastering How to Render in D5 Render
And there you have it—the groundwork for a smoother visualization process. Mastering how to render in D5 Render isn’t just about lighting and materials; it’s about creating a friction-free environment where your designs can thrive. By locking in these essential settings and customizing your shortcuts, you stop fighting the interface and start focusing on your vision.
Ready to see the difference? Open D5 Render, apply these workspace tweaks, and experience a faster, more fluid workflow on your next project.
See What’s New in the Latest D5 Update
D5 Render 2.11: New AI Tools + Ultra-Fast Workflow Upgrades!
Boost Workflows with D5 Render Update: New Features Now Live
AI Rendering Revolution: D5 2.11’s Smart Tools for Designers
What Is an AI Agent? How D5 2.11 Automates Landscape Design?
How to Use Cesium in D5 Render 2.11 for 3D Mapping (3 Steps)
FAQs: Mastering How to Render for Architecture
Q1. “What is the easiest real-time rendering software for architectural beginners to learn?”
For beginners looking for a gentle learning curve, D5 Render is built to be intuitive from day one. We prioritized a “what you see is what you get” workflow, allowing you to customize shortcuts to match the modeling software you are already comfortable with (like SketchUp or Rhino). By utilizing our streamlined asset library and drag-and-drop system, you can focus purely on composition and lighting, rather than getting bogged down by complex parameter tweaking.
Q2. “Why does my 3D rendering software crash when using high-quality assets?”
Crashes during high-fidelity rendering are often caused by bottlenecks in reading heavy assets or insufficient cache space. To keep your workflow stable, we strongly suggest configuring your workspace on a drive with at least 40 GB of free space. Giving D5 this “breathing room” ensures the local cache can expand naturally as you populate your scene, preventing performance drops when handling complex textures and models.
Q3. “How do I fix transparent materials or lighting errors in my 3D model import?”
If you notice light leaking or materials looking unexpectedly transparent, the culprit is usually inverted face normals. Before rendering, take a moment to verify in your modeling software that all faces are oriented outward. Since D5 Render relies on accurate surface data to calculate physical light bounces, correcting these geometry errors before importing is the most effective way to guarantee photorealistic shading.
Q4. “How often should I auto-save my rendering projects to ensure safety without lagging?”
Balancing data security with workflow continuity is key. While setting an auto-save interval too frequently can interrupt your flow, waiting too long risks data loss. We find that a 15-to-30-minute interval is the “sweet spot” within D5 Render. This frequency provides a safety net without generating excessive backup files. Moreover, by leveraging our built-in “History Version” feature, you can always revert to a specific previous state if an error occurs, giving you peace of mind without manual file management.
Q5. “How do I prevent ‘z-fighting’ or flickering textures in large 3D models?”
Texture flickering (often called Z-fighting) typically happens when models are imported far from the world origin. To eliminate these visual artifacts, ensure your geometry is placed near the coordinate origin (0,0,0) in your modeling software before export. Because D5 Render calculates light and texture precision based on these coordinates, this simple preparation step is the most effective way to ensure high-fidelity, stable results in complex architectural scenes.
Q6. “How can I speed up my architectural visualization workflow?”
True speed comes from a fluid viewport and intuitive controls. D5 Render accelerates your process by supporting extensive shortcut customization, enabling you to navigate 3D space purely via “muscle memory.” Additionally, features like quick-access widgets for the Section Tool or Advanced Camera Tool eliminate the need to hunt through menus. This efficient UI layout drastically reduces the friction between importing your model and outputting the final render.