If you’ve spent hours tweaking complicated material nodes or running heavy fluid simulations just to get acceptable water results, you know how frustrating it can be. Crafting dynamic ocean waves and coastlines has traditionally been a time-consuming process that drains creative energy. What if you could skip the frustration and create photorealistic coastal scenes through a streamlined workflow?
D5 Render‘s ocean system makes it possible. In this guide, we’ll show you how to generate an infinite, dynamic ocean in five minutes—complete with animated ocean waves, foam, and caustics.
Key Takeaways on Creating Realistic Ocean Waves
- Create photorealistic water simulations without physics plugins using D5 Render’s streamlined workflow.
- Quickly adjust ocean wave appearance using simple sliders for surface texture, water depth, and wave height.
- Add realistic coastline foam and animated surf that conforms to any 3D terrain or model.

Who Can Benefit from D5 Render’s Ocean System?
The ocean tool in D5 Render is built to streamline workflows for a variety of creative professionals:
- Architectural Visualizers: Presenting a beachfront resort or cliffside villa? Clients want to see realistic water interaction and accurate caustics. Add sweeping ocean waves to your renders without the technical overhead.
- Landscape Architects: Designing waterfront parks or coastal promenades requires a true sense of scale. D5 Render lets you see how nearshore waves interact with your terrain in real-time.
- 3D Artists & Animators: Bypass the need for heavy physics plugins. If you need a cinematic water surface with rolling ocean waves and dynamic foam, this tool delivers fast, production-ready results.
Understanding the D5 Ocean System Structure
Before adjusting parameters, let’s quickly cover how the ocean system works.
Once you add an ocean from the site menu, D5 Render creates an infinite ocean surface across your scene. Coastlines are automatically generated around D5’s built-in terrain. Within this coastline area (which currently covers approximately 5×5 km), nearshore waves, foam, and realistic caustics appear automatically.
The system is divided into two main parts: Surface (for large-scale waves and water material) and Coastline (for nearshore details). Once you understand this structure, you’re ready to start.

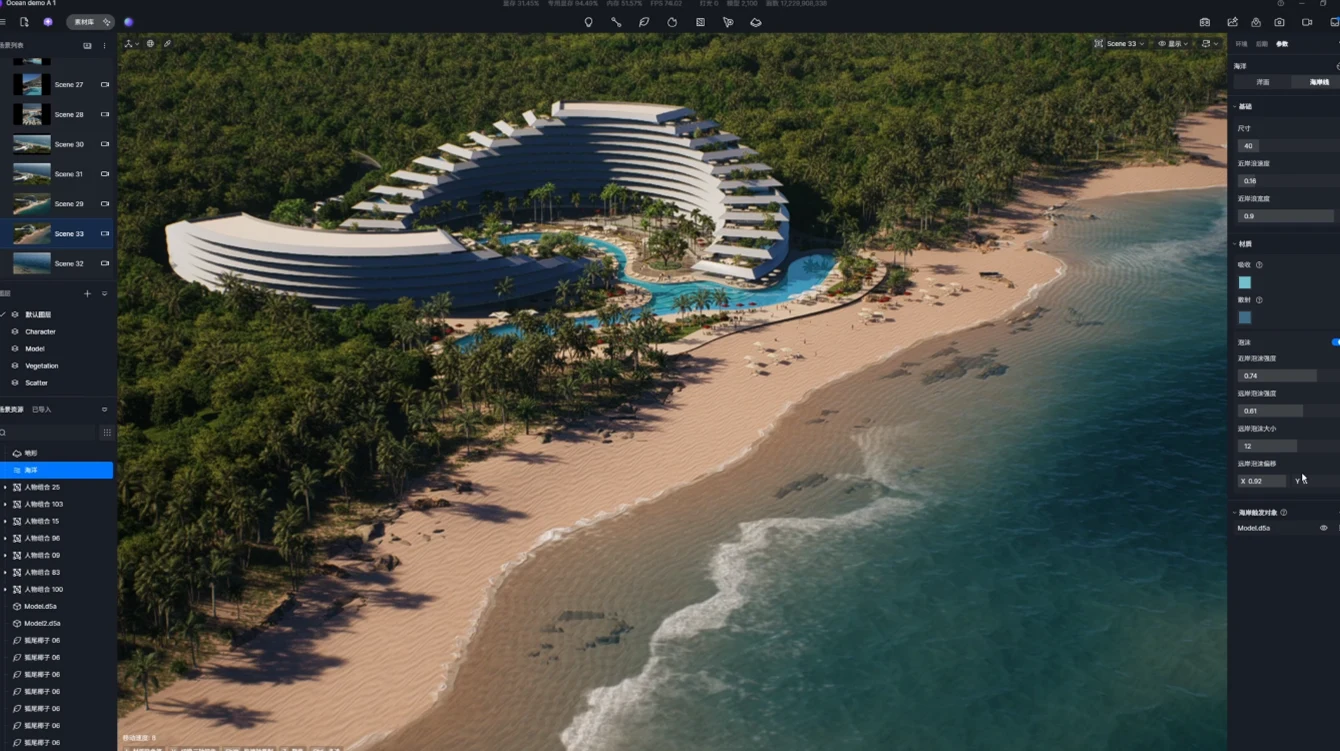
Step 1: Mastering the Ocean Surface for Perfect Ocean Waves
The Surface panel controls large-scale ocean waves and the overall water material. Here’s how to adjust these settings:
- Ocean Height & Wave Scale: First, adjust the height parameter to match the sea level with your terrain or imported buildings. Next, tweak the Wave Scale—increasing this value makes waves wider and more expansive across the open water.
- Wave Height & Speed: To simulate rough, stormy seas, raise the wave height (which controls vertical displacement) and combine it with a higher speed. For a calm, peaceful look, keep these values low for gentle, rolling waves.
Ocean Surface
Perfecting the Ocean Material
In reality, water color changes naturally based on depth and light interaction. The ocean material panel in D5 Render gives you control through three key settings:
- Absorption: This controls the primary surface color of your ocean. For a clear, tropical look, set this to a lighter blue.
- Scatter: This represents the color of light after it scatters inside the water. Because seawater contains tiny particles, this color is typically deeper than the surface. A darker blue adds realistic depth.
- Depth: This parameter affects water transparency. If you have an underwater cliff in your scene, that area will naturally look darker compared to a shallow beach. Increasing the depth value gives your water a richer sense of volume and dimensionality.
Step 2: Crafting Realistic Coastlines
In the Coastline panel, you’ll find three main sections: General, Material, and Coastline Anchor.
Setting Coastline Anchors
If you’re using built-in terrain, D5 Render handles coastlines automatically. For imported custom models—like a cliffside hotel or pier—navigate to the Coastline Anchor settings, click the plus button, and select your model. A coastline is generated immediately, following the contours of your geometry.
It’s entirely dynamic. If you adjust the water height in the Surface panel, the coastline updates automatically to match the new sea level.

Crafting Realistic Coastlines in D5 Render
Fine-Tuning Coastline Settings
To make your nearshore waves look natural, adjust these settings:
- Size: This controls the width of the active wave area inside the coastline (not the overall 5×5 km area). Increasing this value to 80 makes the wave zone much wider; lowering it tightens the surf zone.
- Nearshore Wave Speed & Width: For a calm beach scene, keep the speed low. The Nearshore Wave Width controls how close waves are to each other. A larger value creates a denser wave pattern along the shore. This parameter interacts with the Size setting, so adjust them together to get the look you want.
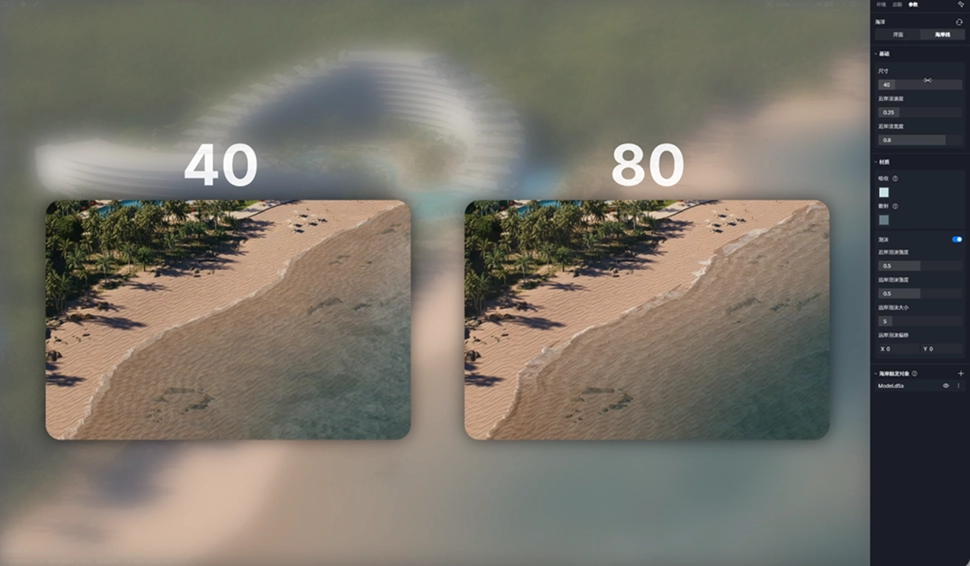
Ocean Coastline
Step 3: Animated Foam and Water Color Blending
Realistic foam and color transitions are key to photorealistic coastal renders. The D5 Render ocean system includes automatic water color blending: the closer the water is to the ground (shallow areas), the more it blends toward your coastline color. As the water extends outward, it gradually transitions to the deeper surface color.
To add animated foam to your ocean waves, adjust these settings:
- Nearshore Foam Intensity: This controls the visibility of foam crashing on the shoreline. Higher values create dense, defined sea foam; lower values produce a softer, more transparent wash.
- Offshore Foam Intensity & Size: To add realism to open water, adjust the offshore intensity to control how noticeable whitecaps are in the distance. The Offshore Foam Size changes the spacing of these distant foam crests.
- Offshore Foam Offset: Need the foam to align with your camera angle? Use the X and Y offset values to move the foam patterns horizontally or forward/backward across the water surface.
Animated Foam
Wrapping Up: Ocean Waves Made Simple
You don’t need to fight with heavy fluid simulations to get great-looking water. Setting up a photorealistic coastal scene in D5 Render really just takes a few minutes. Now it’s your turn to jump in and play with the settings. Tweak the wave scale, experiment with the foam intensity, and find the perfect look for your scene.
Download D5 Render to try these tools yourself and see how streamlined architectural water rendering can be.
Explore More on D5 Render 3.0 >>
D5 3.0: The complete visualization workflow with AI
D5 Render 3.0 is Live: A New Era of AI Rendering for Your Design Workflow
Redefining the Architectural Design Process in 2026: From Friction to Flow
D5 Works is Here: Your Curated Hub for AEC-Ready 3D Models
Introducing D5 Lite: AI Rendering & Instant Visualization for SketchUp
D5 Engine: Redefining Real‑Time Rendering for Architectural & Spatial Design
FAQ: Ocean Waves and Water Rendering in D5 Render
Flat water usually lacks depth and accurate light scattering. Instead of tweaking complex shader nodes, D5 Render lets you adjust simple Absorption and Scatter sliders. Darkening the scatter color and increasing the depth parameter gives your water a realistic sense of volume, making it look like actual ocean water instead of a flat texture.
Not anymore. Heavy fluid sims take hours to bake and are overkill for most architectural or landscape projects. D5 Render uses a built-in dynamic ocean system. You get animated ocean waves, foam, and realistic coastlines in minutes, giving you production-ready results without the technical overhead.
Using a real-time engine with a dedicated ocean tool is the fastest approach. In D5 Render, you simply add an ocean surface, and it automatically generates a large coastline area (up to 5×5 km). If you import a custom cliff or pier, the Coastline Anchor tool automatically wraps around your 3D model and creates natural foam and waves along the edges.
You can skip keyframing entirely. D5 Render generates animated ocean waves by default. You just adjust the Wave Speed and Wave Height to match your scene’s mood—keep them low for a calm, luxury resort aesthetic, or increase them for a dramatic seascape. The animation plays in real-time in your viewport.
Landscape architects need to see true scale and accurate water interactions. D5 Render works well for this because its ocean system updates in real-time. If you adjust the sea level to match your terrain, the coastlines, nearshore wave patterns, and water color blending update automatically, making it easy to design coastal parks or promenades accurately.
Realistic sea foam should react naturally to the water’s depth and movement. Instead of using flat textures, D5 Render calculates foam dynamically. You can control the Nearshore Foam Intensity for waves crashing directly on the beach, and adjust the spacing of distant whitecaps. This gives your ocean waves a more realistic, animated appearance.